Private Label, White Label, Wholesale partnerships available - EU, USA and UK - Free shipping from €75
Step-by-step laboratory reagent handling: safe practices
Learn step-by-step safe laboratory reagent handling: risk assessment, PPE, dispensing, storage, and verification aligned with UK and EU regulatory standards.
TL;DR:
- Proper reagent handling relies on thorough risk assessments and compliance with safety regulations.
- Using correct PPE, workspace setup, and adhering to protocols prevent contamination and accidents.
- Continuous verification, accurate labeling, and a safety culture ensure reliable experimental results.
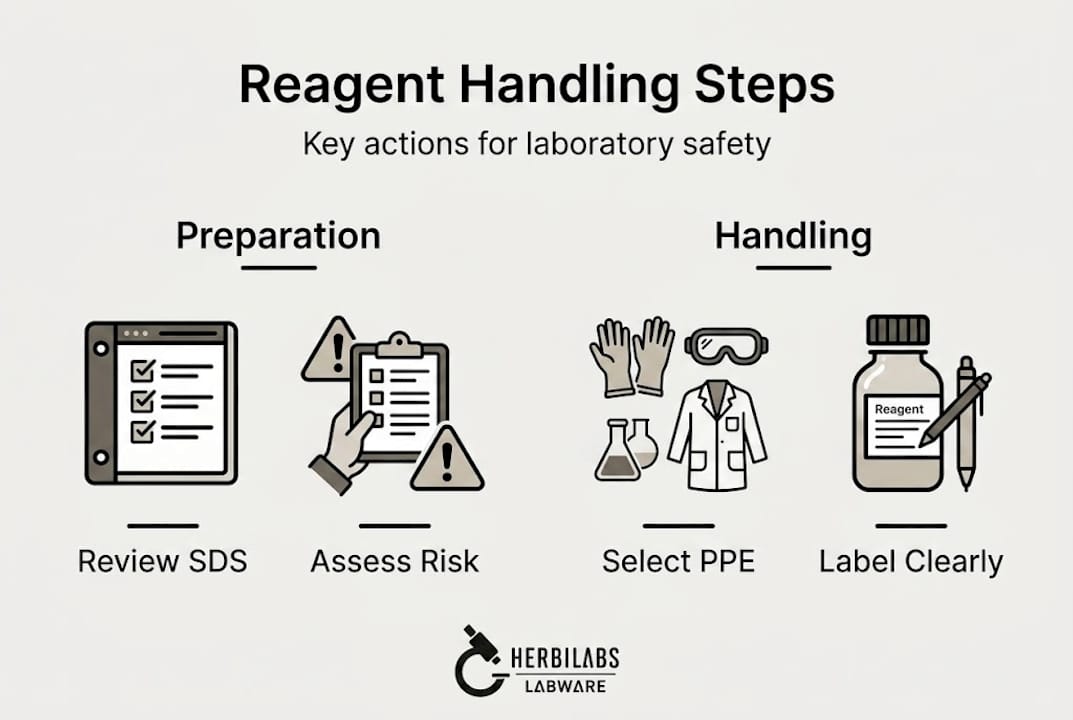
Poor reagent handling is one of the most consequential yet preventable sources of experimental failure in laboratory environments. A single instance of cross-contamination, incorrect storage, or unprotected chemical exposure can invalidate weeks of data, trigger regulatory scrutiny, or cause direct harm to personnel. Studies consistently identify procedural lapses rather than equipment failures as the primary driver of laboratory incidents across UK and European research institutions. This guide walks through each critical phase of safe reagent handling, from initial risk assessment and workspace preparation through dispensing, storage, and ongoing verification, all grounded in current Control of substances hazardous to health (hereafter “the regulations”), CLP, and regulatory compliance frameworks.
Table of Contents
- Risk assessment before handling reagents
- Setting up the workspace and choosing PPE
- Step-by-step safe handling and dispensing of reagents
- Storage, labeling, and inventory management
- Day-to-day verification and troubleshooting
- A fresh perspective on reagent handling: What experts get wrong
- Lab safety with quality-assured reagents from herbilabs
- FAQs
Key Takeaways
| Point | Details |
|---|---|
| Start with risk assessment | Always perform a COSHH risk assessment and review SDS before handling any reagent. |
| Prioritize engineering controls | Use fume hoods and local exhaust ventilation before relying on PPE for hazardous reagents. |
| Follow correct handling steps | Dispense safely, avoid cross-contamination, and never return unused reagent to the stock. |
| Label and store correctly | Detailed labels and proper storage lessen risk and help maintain reagent quality. |
| Verify and improve processes | Regularly check inventory, review procedures, and encourage feedback for safer labs. |
Risk assessment before handling reagents
Before any reagent is opened, the foundational requirement under UK and EU law is a formal risk assessment. The Health and Safety Executive specifies that researchers must conduct a risk assessment prior to handling any hazardous substance: identifying hazards from container labels and the relevant Safety Data Sheet (SDS), evaluating who may be harmed, determining realistic exposure routes, and deciding what controls are necessary and proportionate. This is not an administrative formality. Without it, the researcher cannot verify that the planned work is conducted under appropriate controls.
The SDS is the primary technical reference. Section 2 discloses hazard classification under the CLP regulation, and Section 8 specifies occupational exposure limits and recommended protective measures. These two sections alone determine the foundation of your control strategy. The broader EU/UK regulatory framework, which encompasses Control of substances hazardous to health (hereafter “the regulations”), CLP, and Registration, evaluation, authorization and restriction of chemicals (hereafter “the regulations”), mandates SDS provision, documented risk assessments, and verifiable training records for anyone routinely working with chemical substances.
Compliance under these frameworks means applying the hierarchy of controls: first seek to eliminate the hazard entirely, then substitute with a less harmful substance, then apply engineering controls such as enclosed systems or ventilation, then implement procedural safeguards, and use personal protective equipment (PPE) only as the final layer. Many labs invert this hierarchy in practice, reaching for gloves before asking whether the reagent can be substituted or the process redesigned. That inversion creates a systematic residual risk. Understanding reagent standards for results as part of your hazard review also helps clarify purity requirements and associated risks before work begins.
Before handling any reagent, verify the following:
- Container label is intact, legible, and CLP-compliant
- SDS (current version) is accessible at the point of use
- All relevant exposure routes are identified (inhalation, dermal, ingestion)
- Engineering controls (fume hood, LEV) are certified and operational
- PPE matched to specific hazards is available and undamaged
- A colleague is aware you are working with hazardous materials
Risk is not static. A reagent used safely in one context may pose entirely different hazards when heated, mixed with another substance, or used in larger quantities. Re-assess whenever conditions change.
Setting up the workspace and choosing PPE
With the risk assessment complete, the next task is configuring the physical environment to match the identified control requirements. Engineering controls take precedence over PPE in all circumstances where they are technically feasible. A properly maintained fume hood, for instance, provides continuous airflow protection that no glove or mask can replicate for volatile reagents. The workspace must be free of clutter, with clearly demarcated zones for hazardous materials, clean areas, and waste.

Selecting PPE without reference to the SDS is a common and serious error. The appropriate PPE selection depends on the specific reagent and its concentration. For most organic solvents, nitrile gloves provide adequate dermal protection; however, for concentrated acids or bases, neoprene or butyl rubber gloves are required. The SDS Section 8 specifies this directly, and following it precisely is not optional under the regulations.
| PPE type | Primary hazard scenario | Notes on selection and use |
|---|---|---|
| Safety glasses/goggles | All chemical handling scenarios | Full goggles for splash risk |
| Chemical-resistant gloves | Contact with solvents, acids, bases | Match material to reagent (SDS) |
| Lab coat (cotton or FR) | General reagent use | FR rating for flammable solvents |
| Face shield | High-splash risk, corrosives | Use over goggles, not instead |
| Half-face respirator | High-vapor volatile reagents | Only where fume hood unavailable |
| Close-toe shoes | All lab environments | No sandals or open footwear |
Before starting any experiment, verify:
- All PPE is correctly sized and properly donned
- The fume hood sash is at or below the certified working height
- Emergency eyewash and safety shower are tested and accessible
- A spill kit appropriate to the reagent class is within reach
- All secondary containment (trays, bench mats) is positioned correctly
Pro tip: PPE that is visibly degraded (discolored gloves, scratched goggles) should be replaced immediately. Many glove failures occur because researchers continue using gloves that have already been permeated by previous chemical contact but show no obvious visual deterioration. To streamline your equipment selection process, review essential labware tools before sourcing or purchasing.
Step-by-step safe handling and dispensing of reagents
Effective safe handling depends on following a consistent, reproducible sequence rather than relying on informal habit. The following numbered protocol integrates best-practice guidance and regulatory requirements for working safely with research-grade reagents:
- Move to the designated work zone. Position all materials inside the fume hood if the reagent is volatile, toxic, or an irritant. Work at least 15 cm (6 inches) inside the sash and confirm airflow is operational before opening any container.
- Use minimum necessary quantities. Remove only the volume required for the experiment using a calibrated instrument (pipette, syringe, or graduated cylinder). Never estimate by eye for hazardous reagents.
- Use dedicated, labeled dispensing tools. A spatula, pipette, or pump used for one reagent must not be introduced into another container. Cross-contamination from shared tools is a primary route of both data error and accidental chemical reaction.
- Use an intermediate container where appropriate. Rather than pipetting directly from a stock bottle, transfer a working aliquot to a secondary vessel. This reduces exposure frequency and protects the integrity of the stock.
- Never return unused reagent to the stock container. Even visually uncontaminated material may carry trace impurities sufficient to degrade the entire stock. The safe dispensing protocol is explicit on this point: dispose of surplus or store it in a clearly labeled secondary vessel under appropriate conditions.
- Clean the workspace immediately after use. Use reagent-compatible cleaning materials and ensure waste is segregated correctly by hazard class.
Warning: Introduction of even nanomolar concentrations of contaminants into stock reagents can produce systematic errors across multiple experimental runs, invalidating data without producing any immediately visible sign of failure. This is how contamination destroys reproducibility silently.
Pro tip: Record the reagent batch number, date of opening, volume dispensed, and your initials in the lab notebook for every use. This traceability is essential for reagent quality control auditing and for isolating variables when results are anomalous. For sterile or biological applications, additionally reference aseptic reagent techniques to prevent microbial contamination.
Quick reference: dispensing dos and don’ts
- Do use calibrated instruments for every transfer
- Do work in a fume hood for all volatiles and corrosives
- Don’t use mouth pipetting under any circumstances
- Don’t pour reagents back into stock bottles
- Don’t leave containers open longer than necessary
Storage, labeling, and inventory management
Proper storage and labeling are as critical as the handling steps themselves. A reagent that is correctly dispensed but then mislabeled or stored in an incompatible environment will degrade, potentially without any visible indication, and generate unreliable or hazardous conditions downstream. Label all containers with the reagent name, concentration, date of preparation or opening, hazard classification, and the initials of the responsible handler. This minimum data set is not optional under CLP requirements.
| Label element | Required information | Example |
|---|---|---|
| Contents | Full chemical name and concentration | 70% ethanol (v/v) |
| Date | Date of preparation or first opening | 14 Jan 2026 |
| CLP hazard | GHS pictogram and signal word | Warning: flammable |
| Handler | Name or initials of responsible person | J. Smith |
| Storage condition | Temperature, light, atmosphere | Store at 4 °C, dark |
Certain reagent classes require additional attention. Special storage cases include peroxide-forming compounds such as diethyl or tetrahydrofuran, which must be tested for peroxide accumulation and discarded within 12 months of opening regardless of apparent condition. Additionally, hygroscopic reagents require airtight storage in a desiccator, while air-sensitive compounds demand inert atmosphere conditions, typically argon or nitrogen overpressure. A critical but frequently overlooked point: fume hood workspaces must never serve as long-term reagent storage locations, as accumulated containers obstruct airflow and reduce hood effectiveness for all users.
Common inventory management errors to avoid:
- No expiry or opening date recorded on secondary containers
- Multiple open containers of the same reagent from different batches without clear differentiation
- Paper logs that fall behind actual stock movements
- Storage of incompatible chemical classes in proximity without segregation
Pro tip: Digital inventory systems with barcode scanning, automated expiry alerts, and electronic log capability significantly reduce transcription errors and audit time. Consider reviewing labware integrity steps to ensure storage vessels themselves do not introduce contamination through material incompatibility.
Day-to-day verification and troubleshooting
Safe reagent handling is not a one-time event but an ongoing process that requires systematic verification at regular intervals. Without structured review, procedural drift occurs gradually: shortcuts become routine, PPE degrades undetected, and stock contamination accumulates until it produces a visible experimental failure or a reportable incident.
A clean and systematic workspace is the first line of verification. Daily walkthroughs should confirm that all containers are labeled, caps are secure, storage locations conform to the chemical compatibility matrix, and nothing is stored inside fume hood working areas.
Protocol for troubleshooting a suspected contamination or handling incident:
- Stop work immediately and secure the area. Do not attempt to continue the experiment.
- Review the lab notebook for the most recent entries relating to the affected reagent or experimental run.
- Cross-reference the SDS to assess whether observed symptoms or experimental anomalies are consistent with known reagent properties or degradation products.
- Check batch and expiry information against inventory records to rule out degraded stock.
- Interview personnel involved in recent handling steps to identify any procedural departures.
- Document findings in full, including timeline, corrective actions, and outcome.
- Review controls and retrain if the investigation identifies a systemic procedural gap.
Laboratory incident investigations consistently identify that most failures arise from process deviation rather than equipment malfunction. Building a culture in which near-misses are reported and reviewed with the same rigor as actual incidents enables continuous improvement rather than reactive crisis management. The long-term reliability of experimental data depends on this kind of ongoing vigilance.
A fresh perspective on reagent handling: What experts get wrong
The predominant approach to laboratory safety in many institutions reduces to compliance documentation: completed risk assessments, signed training records, and periodic audits. These are necessary but they are not sufficient. The hierarchy of controls places engineering solutions above procedural ones for a fundamental reason: human behavior under time pressure, fatigue, or routine familiarity is unreliable. Yet many labs operate as though a signed SDS review substitutes for genuine engineering risk reduction.
Most laboratory incidents do not arise because rules do not exist. They arise because procedural culture normalizes minor deviations until a consequential one occurs.
The practical implication is that labs should invest in process review and peer feedback with the same regularity as they conduct formal audits. Personnel who identify a procedural gap or a near-miss should be recognized rather than overlooked. Following handling best practices is a foundation, but embedding a feedback culture is what sustains it over time.
Pro tip: Make near-miss reporting a standing agenda item in team meetings, treating each report as a process improvement opportunity rather than an indicator of individual failure.
Lab safety with quality-assured reagents from herbilabs
Structured handling protocols deliver their full value only when the reagents themselves meet stringent purity and quality standards. At herbilabs, we supply research-grade reconstitution solutions and bacteriostatic water manufactured under rigorous quality control conditions, specifically designed to support reproducible and safe laboratory work across UK and European research institutions.

Our labware checklist guides researchers through selecting compatible equipment for each reagent class, reducing the risk of material-related contamination. For a deeper foundation on selecting and working with research-grade materials, our guide on high-purity reagents explains why starting material quality directly determines the reliability of downstream results.
FAQs
What is the first step before handling any laboratory reagent?
Always conduct a risk assessment under the regulations, reviewing all hazard labels and the Safety Data Sheet in full before beginning any work with the substance.
How do I choose the right gloves for reagent handling?
Base glove selection directly on the reagent’s SDS, as specified under appropriate PPE guidance: nitrile for most solvents, neoprene or butyl rubber for concentrated acids, and always verify material compatibility before use.
What should I do with unused reagent after dispensing?
Never return unused reagent to the stock container to avoid introducing contamination. Store it in a clearly labeled secondary vessel or dispose of it according to your lab’s waste protocols.
Why shouldn’t reagents be stored in fume hood workspaces long-term?
Long-term storage in fume hood workspaces obstructs airflow, reducing the hood’s protective effectiveness for all users. All reagents should be held in designated, compatible storage locations.
What details must be included on reagent container labels?
Labels must state the full chemical name, concentration, date, CLP hazard classification, storage conditions, and the initials of the handler responsible for the preparation or opening.