Private Label, White Label, Wholesale partnerships available - EU, USA and UK - Free shipping from €75

Sterile Glass Vials: A Practical Buyer’s Guide for Labs
A researcher removes a 10 mL vial of reconstituted peptide from the refrigerator, prepares the second withdrawal of a planned multi-dose series, and pauses before puncturing the stopper. Has the septum resealed properly? Could a rubber core or glass particle have entered the solution? Does the supplier's Certificate of Analysis cover the exact lot on the bench, or is it a generic document reused across products?
Those questions expose the purchasing problem. Sterile glass vials are not just containers. The format, glass specification, stopper, crimp, sterilization record, closure integrity, shipping conditions, and lot documentation work as one system. A vial can arrive sterile and still be a poor choice for repeated access if the stopper cores, the closure distorts, or the fill volume leaves excessive headspace.
The practical decision is to match the vial to the workflow before comparing unit prices. That means assessing access frequency, reconstitution volume, particulate sensitivity, storage conditions, and the evidence supplied with each lot. International standardization provides an important baseline, with ISO 8362 defining glass vials for injectable preparations across major editions since its first publication in 1989, followed by revisions to tubular-glass specifications in 2003 and 2009/2011 (ISO 8362 standard history).
Table of Contents
- What a Sterile Glass Vial Really Has to Do in Your Lab
- Choosing Between 3, 10, 20, and 30 mL Vial Formats
- Stopper Types and Closure Systems That Reseal
- Sterilization Pathways and Aseptic Filling Workflows
- Reading the COA and QA Documentation Before You Buy
- Handling Multi-Dose Vials Without Compromising the Vial
- Storage, Shipping, and a Short Selection Checklist
What a Sterile Glass Vial Really Has to Do in Your Lab
A vial leaving the warehouse has to perform at several points in succession. It must arrive with its sterile barrier intact, tolerate transport and temperature changes, accept the intended diluent or formulation without creating an unacceptable extractables concern, and maintain a reliable closure after handling. The bench operator then needs a format that supports the actual number of withdrawals without unnecessary transfers or repeated exposure.
Start with the access pattern
Single-use work and multi-dose work place different demands on the same package. A small vial may reduce residual volume and handling, while a larger vial may reduce the number of containers opened during a shared-stock workflow. Neither choice is automatically safer. The wrong size can create excess headspace, encourage repeated punctures, or leave a partially used container in storage longer than the laboratory's validated in-use period.
Stopper selection matters just as much. A closure that performs well during the first puncture may behave differently after repeated needle entries, especially if the operator inserts at an angle, withdraws through the same damaged area, or uses a needle that promotes coring. The crimp must hold the stopper under suitable compression without distorting it. Health Canada's sterile manufacturing guidance specifically identifies vial-cap crimping as a source of substantial non-viable particle generation and says vials with missing or displaced stoppers should be rejected before capping (WHO GMP guidance for sterile pharmaceutical products).
Treat paperwork as part of the vial
A lot-specific COA should connect the physical package to its quality history. The document needs enough detail for a buyer to confirm that sterility, endotoxin control, dimensions, glass classification, and traceability apply to the lot received. A polished PDF without a lot number, issuing quality-unit approval, or a clear test method doesn't provide that assurance.
Practical rule: A sterile label answers only one question. It doesn't prove that the closure, sterilization record, and test results fit the intended multi-dose workflow.
The sections that follow focus on the decisions that most often fail at the bench: selecting a usable capacity, checking stopper behavior, understanding the sterilization chain, reviewing the COA, and controlling repeated access. The objective isn't to find the vial with the longest specification sheet. It's to buy a validated package that continues to behave predictably after it reaches the laboratory.
Choosing Between 3, 10, 20, and 30 mL Vial Formats
Capacity should follow the working volume and access plan, not the supplier's available carton size. For RUO peptide and protein workflows, a 3 mL vial usually suits a single-dose preparation or a short course with limited withdrawals. Its smaller internal volume can reduce unused solution and unnecessary air space, provided the fill is compatible with the intended needle access and mixing method.
A 10 mL vial is often more practical for a moderate-access peptide workflow. It gives the operator room for repeated withdrawals without moving the solution into another container, while remaining easier to segregate by study, lot, or formulation than a larger shared stock. A 20 mL vial makes more sense when the laboratory prepares a higher-volume working solution or wants fewer containers in circulation across a study.
The 30 mL format is better reserved for bulk diluent and shared stocks with frequent access. It can reduce container handling, but the larger internal space also deserves closer review. More headspace can mean more air exchange during repeated punctures, and each additional access event creates another opportunity for particulate entry or closure damage.
Check the neck finish before approving the format
The bottle capacity alone isn't enough. The buyer should confirm the neck finish, stopper dimensions, cap compatibility, and filling range as one assembly. Common crimp systems use 13 mm or 20 mm closures, but the supplier must verify that the chosen stopper and seal match the vial finish rather than assuming compatibility from nominal capacity.
A fill that leaves reasonable room for needle access and pressure equalization is generally easier to handle than one filled almost to the shoulder. The exact operating fill should come from the formulation, closure, and process validation rather than an unverified universal rule. For diluents and reconstitution solutions, the buyer should also assess whether the selected size creates more residual material than the protocol can use.
Researchers comparing formats can find bacteriostatic water vials in several capacities, but the same procurement questions still apply: confirm the lot documentation, stopper system, fill volume, and intended RUO handling conditions.
| Format | Typical dose count | Access frequency fit | Headspace concern | Recommended use |
|---|---|---|---|---|
| 3 mL | Low | Single-dose or limited access | Usually easier to control, but verify the working fill | Short-course preparations and small study lots |
| 10 mL | Moderate | Repeated access with defined handling | Balance access room against unused air space | Multi-dose peptide and protein workflows |
| 20 mL | Higher | Shared stock with regular withdrawals | Review air exchange and storage duration | Higher-volume preparations and study-wide stock |
| 30 mL | Higher or bulk | Frequent access by one workflow or team | Greater attention needed for headspace and particulate entry | Bulk diluent and shared laboratory stocks |
A format decision becomes defensible when the buyer can explain why the capacity fits the number of withdrawals, storage period, and operator behavior. If that explanation depends only on the vial's nominal label, the selection is incomplete.
Stopper Types and Closure Systems That Reseal
A vial can leave the warehouse sterile and still become a weak barrier after repeated punctures. The stopper, coating, cap, and crimp must work together to limit resealing failure, rubber coring, extractables, and particulate entry during the actual access schedule.
Bromobutyl is commonly selected when low extractables and dependable resealing are priorities. Chlorobutyl may reduce cost, but compare its extractables profile and repeated-puncture performance with the formulation, needle choice, and number of withdrawals. The right material depends on how the vial will be used, not on the elastomer name alone.
Coatings affect both handling and risk. Silicone-coated and fluoropolymer-coated stoppers can reduce sticking and lower the chance of rubber coring during needle withdrawal. They also require compatibility and extractables review. Ask for evidence that the coating remains intact after sterilization, shipping, and the intended puncture pattern. A coating does not compensate for a closure system that has not been qualified under working conditions.
Match the stopper to the puncture plan
A multi-dose protocol should define the needle type, entry angle, puncture site, withdrawal technique, and maximum access pattern. Resealing data is useful only when the test conditions resemble bench practice. A stopper tested with one needle gauge and limited punctures may perform differently after repeated entries, refrigeration, and use by multiple operators.
Record the puncture pattern alongside the vial lot and COA. That connects a supplier's mechanical claim with the particulate observations, handling deviations, and access history seen in the laboratory.
The cap provides a separate control point. A flip-off polypropylene cap makes the closure easier to inspect and can support color-based segregation of products, lots, or study groups. An intact cap offers an initial tamper-evidence check. If it is loose, distorted, or separated from the seal before use, quarantine the vial rather than placing it on the bench.
Inspect crimp quality, not just cap appearance
An under-crimped closure may leak during refrigeration cycles or transport vibration. An over-crimped closure can deform the stopper, change compression, and reduce resealing performance. Ask how the supplier controls crimp dimensions and what container-closure integrity evidence supports the assembled vial.
Useful supplier questions include:
- Stopper chemistry: Is the material bromobutyl, chlorobutyl, or another elastomer, and what extractables information supports the intended use?
- Coating: Is the stopper silicone-coated or fluoropolymer-coated, and was the coating assessed after sterilization?
- Mechanical properties: What durometer range and test method does the supplier use?
- Reseal evidence: Which needle, puncture sequence, storage condition, and acceptance criteria support the self-sealing claim?
- Assembly control: How are displaced stoppers, damaged seals, and crimp variation detected before release?
Judge the closure as an assembly. Glass geometry, stopper fit, cap pressure, crimp tooling, sterilization history, and handling records all affect whether the vial remains a credible sterile barrier after the first puncture.
Sterilization Pathways and Aseptic Filling Workflows
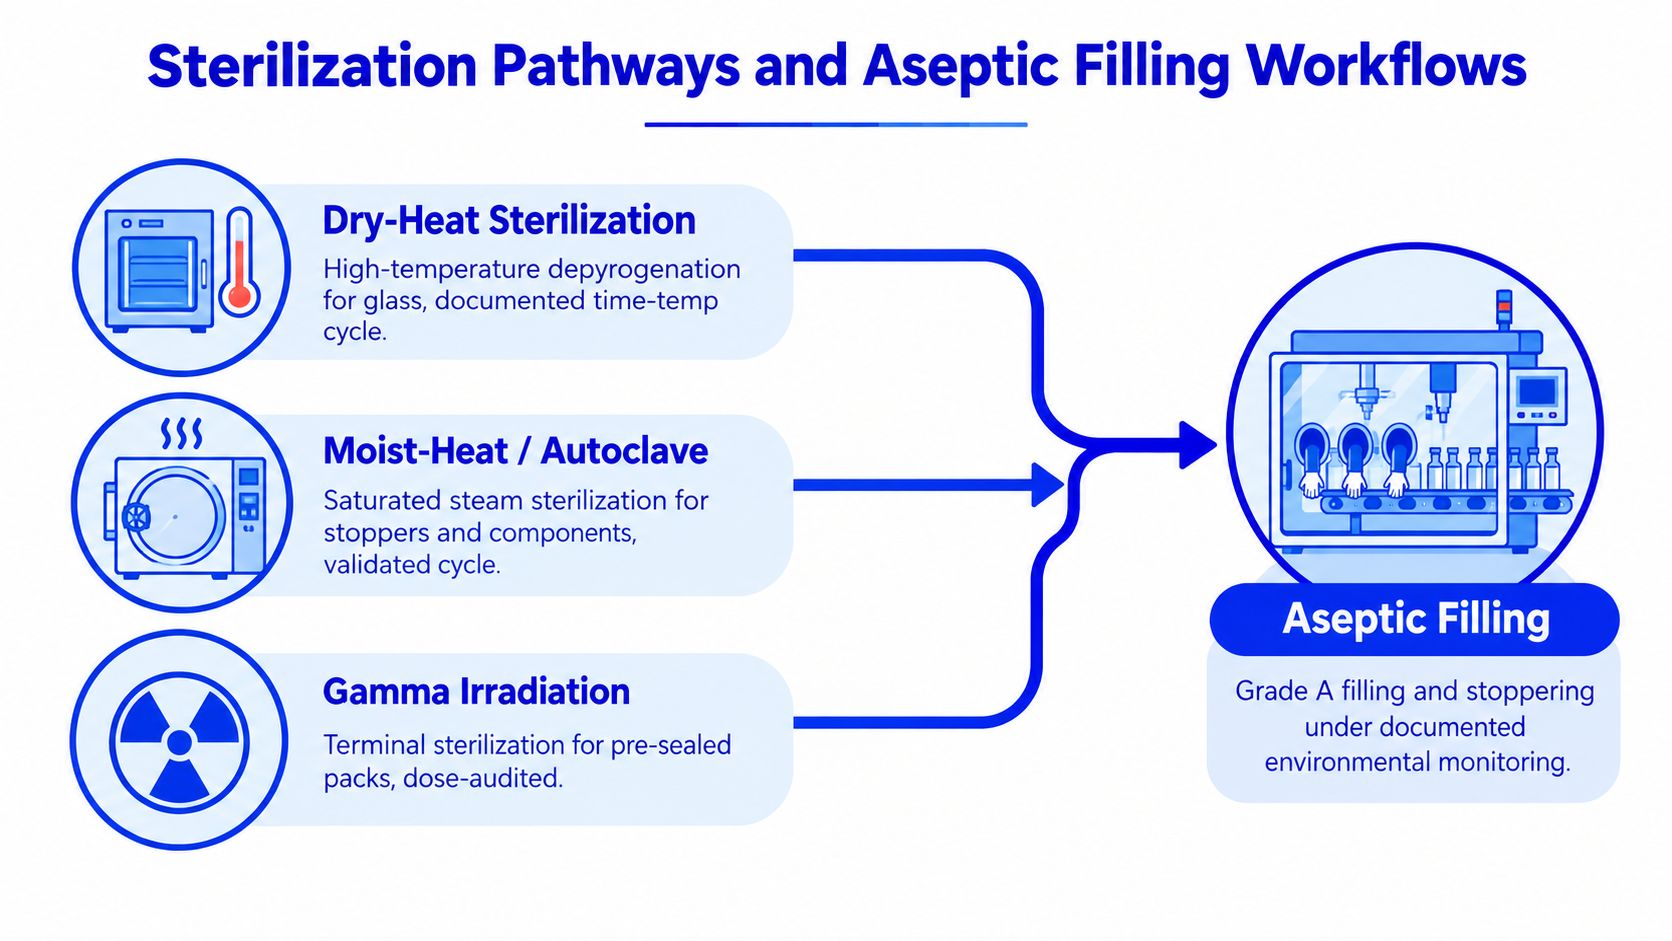
A sterile vial can arrive with the right glass specification and still create problems at the bench if its sterilization route, stopper compatibility, or filling controls are unclear. Procurement should connect the treatment history of the glass, stopper, cap, and filled product to the intended use, with records showing which steps were validated for those materials.
For glass vials, terminal sterilization after filling commonly uses autoclaving at 121°C for about 20 to 30 minutes. Some systems use ethylene oxide at temperatures up to 70°C for around 6 hours, particularly when heat compatibility affects component selection (ISO 8362 processing reference). Request the cycle, load configuration, monitoring method, and release criteria. A “sterile” label alone does not show whether the stopper, cap, and formulation tolerated the process.
Connect filtration to filling controls
Sterile liquids that cannot undergo terminal sterilization generally pass through a sterilizing-grade filter with a nominal 0.22 µm rating before transfer into sterilized containers. WHO guidance notes that this step can remove bacteria and molds, while it does not remove all viruses or mycoplasmas. Upstream bioburden, hold time, filter selection, and post-use integrity testing therefore affect the process alongside nominal pore size (WHO sterile-product guidance).
Ask for evidence of clarification or prefiltration. Poor clarification can foul the final filter early, slow filling, and increase handling exposure. Bulk holding time and the filling window should remain controlled. The EMA guidance referenced in the sterile manufacturing framework requires justification, supporting data, and risk assessment when a bulk hold or filling period extends beyond 24 hours.
For multi-dose peptide or protein workflows, these records also help assess particulate burden and repeated puncture risk. A filter result does not compensate for an unsuitable stopper or an uncontrolled filling environment. Buyers reviewing vial closure options for labs should request the sterilization pathway, component compatibility evidence, filter integrity results, and filling-environment records. Herbilabs provides vial closure options for labs, while the supplier should provide the process documentation that connects those components to release.
This video provides a visual explanation of how vial sterilization and aseptic processing are commonly arranged:
Reading the COA and QA Documentation Before You Buy
A vial can meet the catalog description and still lack the records needed for release. Before approving a purchase, match the COA to the exact product, fill volume, closure format, and lot. A generic certificate lists a product family but omits the lot number, which makes it insufficient for release decisions.
Review identity and traceability first
The certificate should show the lot number, manufacture date, expiry or retest date, glass type, hydrolytic classification, and, where applicable, the glass tubing lot. It should also name the issuing quality unit or authorized signatory. These details connect the finished vial to its source materials and documented release decision.
Review the test results with the same care. The COA should identify the sterility method and result, endotoxin limit and measured value, particulate assessment, dimensional inspection, and relevant closure or packaging checks. ISO 21882 specifies a bacterial endotoxin limit for vials of less than 0.25 EU/mL when considered by filling volume, so the reporting basis matters when comparing suppliers or vial formats (ISO 21882 sample).
| COA field | What to verify |
|---|---|
| Lot number | Matches the carton, vial label, invoice, and release record |
| Manufacture and expiry dates | Covers the planned storage and use period |
| Glass classification | Identifies the glass type and relevant hydrolytic specification |
| Sterility test | Names the method, acceptance criteria, and result |
| Endotoxin | States the limit, measured result, units, and reporting basis |
| Particulate result | Identifies the test approach and applicable acceptance criteria |
| Dimensions | Confirms neck, body, and critical fit measurements |
| Traceability | Links the finished lot to source glass and closure materials |
| Quality approval | Includes a date, signature, or authorized quality-unit release |
Look for omissions that change the risk
“Below limit” may be acceptable in some quality systems, but ask whether the supplier can provide the measured value and clarify whether the limit is stated per vial, per milliliter, or per rinse volume. These reporting bases cannot be compared directly. Missing sterilization-validation references, absent filter-integrity records for aseptic fills, or one COA reused across different formats should prompt a supplier query before payment.
Requesting a redacted sample COA before purchase gives the buyer a practical check of the supplier's documentation process. Reconcile that sample with the final lot record, then judge whether the evidence fits the laboratory's risk tolerance. That review matters especially for peptide, protein, antibody, or reconstitution workflows where repeated access can expose weak closure, particulate, or traceability controls.
Herbilabs supplies vial closure options for labs, while the supplier should provide documentation connecting the selected vial, stopper, sterilization pathway, and release decision. This connection is what lets procurement review support actual bench use rather than treating each specification as an isolated checkbox.
Handling Multi-Dose Vials Without Compromising the Vial
Repeated access turns a well-made vial into a handling-dependent system. The operator controls whether the stopper stays clean, whether particles enter during puncture, and whether the container remains correctly identified after several withdrawals.
Use a consistent withdrawal sequence
The following sequence keeps the most common avoidable errors out of the workflow:
- Equilibrate before opening: Move the vial into the designated clean handling area and allow it to reach a workable temperature before removing the protective cap. This reduces condensation that can collect around the stopper when a cold container meets warmer bench air.
- Inspect before puncture: Check the vial, cap, stopper, label, and solution for visible damage or abnormal particles. A displaced stopper, cracked glass, broken seal, or unexplained appearance is a quarantine event.
- Disinfect and dry: Swab the septum with 70% isopropyl alcohol and let it dry. Wiping across a wet surface can redistribute contamination instead of giving the disinfectant time to act.
- Use new sterile equipment: Use a new sterile needle and syringe for every withdrawal. Reusing either one defeats the benefit of a resealing stopper.
- Enter perpendicularly: Insert the needle straight through the septum rather than at an angle. Angled entry increases the chance of coring rubber into the solution.
- Withdraw without scraping: Keep the needle stable, avoid dragging it across the stopper, and remove it along the same path.
- Re-cap and document: Replace the protective cap when appropriate, return the vial to its dedicated tray, and record the first-puncture date and handling event in the laboratory log.
Control storage between withdrawals
For products approved by the supplier for refrigerated storage, 2 to 8°C is a common operating range, but the product documentation controls. A multi-dose RUO diluent such as bacteriostatic water still requires the stated in-use period, aseptic handling, and protection from unnecessary temperature cycling. The presence of a preservative doesn't make careless access acceptable.
Never pool residual contents from separate vials. Pooling removes lot identity, increases handling, and makes it harder to investigate a contamination or particulate event. The operator should also avoid repeatedly moving a vial between cold storage and the bench, because condensation and temperature stress can affect the closure environment.
In-use stability is formulation-specific. Preservative system, protein concentration, adsorption behavior, storage temperature, and puncture frequency all matter, so the laboratory should use the supplier's stated window or its own validated limit rather than applying a universal assumption. A fluoropolymer-laminated or butyl stopper can't compensate for a reused needle or an undocumented storage history.
Bench rule: The stopper is only one part of the contamination barrier. Clean access technique protects the stopper's performance.
Storage, Shipping, and a Short Selection Checklist
Storage instructions should describe more than a temperature number. The buyer needs to know how the stopper, residual moisture, glass color, sterile barrier, and filled formulation behave during the full journey from release to use.
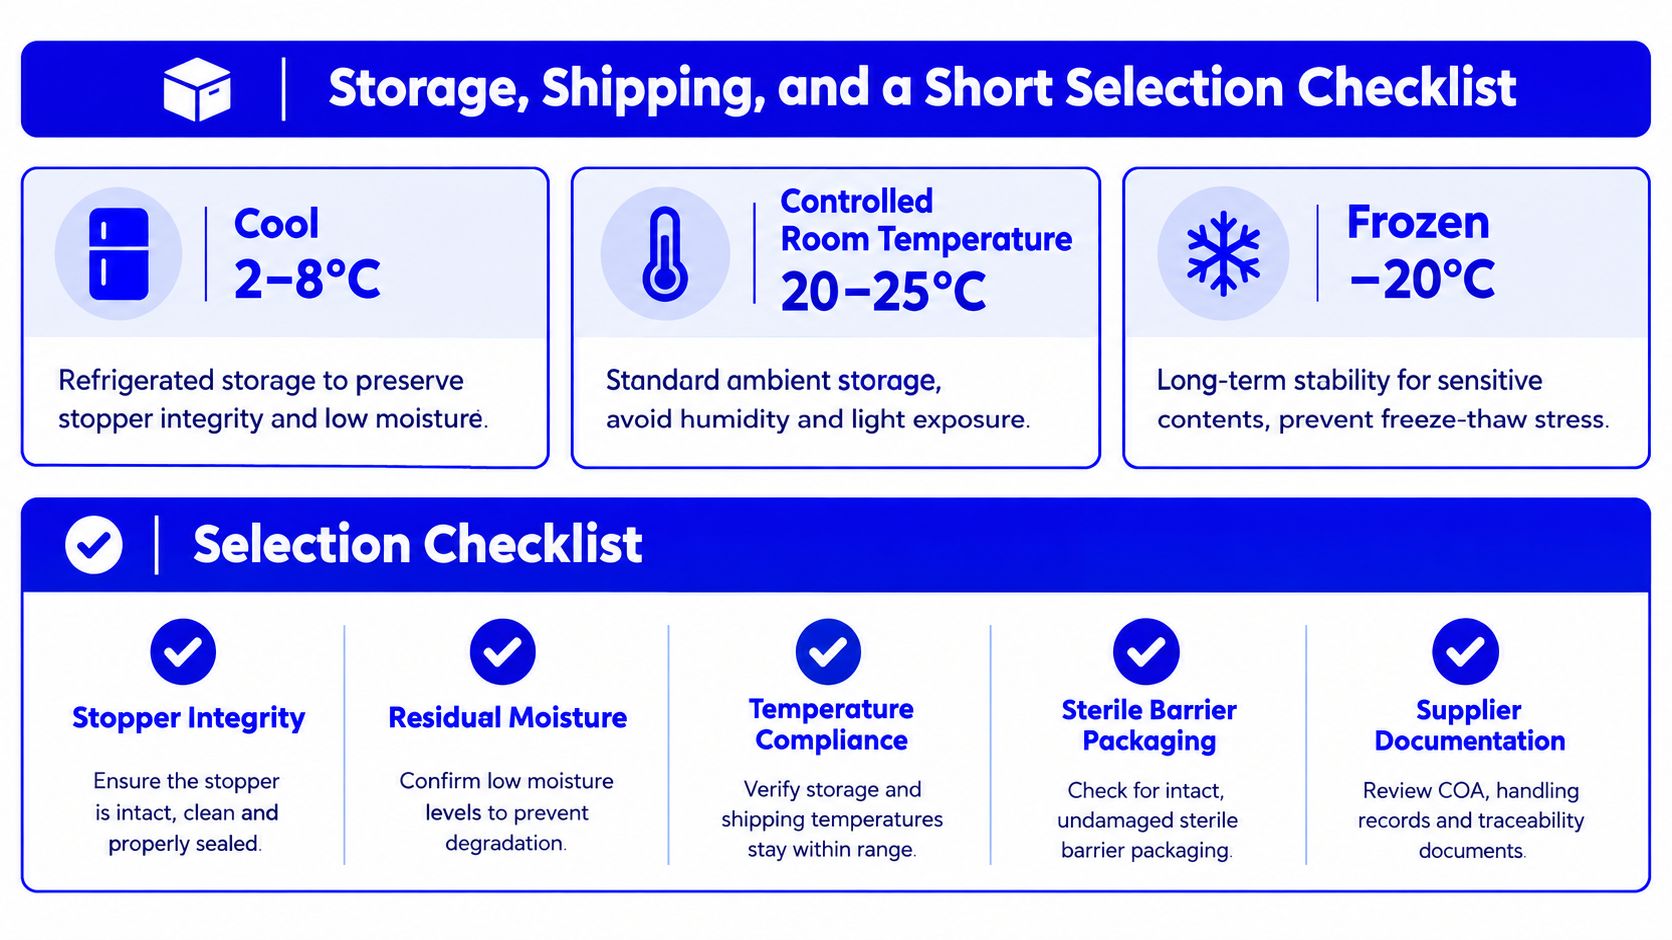
For refrigerated material, suppliers commonly publish 2 to 8°C storage conditions. Controlled room temperature may be specified as 20 to 25°C, while some products use −20°C storage for sensitive contents. These ranges are not interchangeable, and a vial should never be frozen unless the formulation, container, stopper, and supplier documentation support it.
Clear Type I borosilicate may suit formulations without a meaningful light sensitivity concern. Amber glass is more appropriate when photoprotection is required, but the buyer should verify the supplier's transmission specification rather than treating color as proof of protection. The carton should also protect against shock, vial-to-vial contact, and closure damage during transit.
Plan for the shipping temperature
Cold-chain shipments need a qualified packing approach, such as insulated mailers with gel packs or phase-change materials, according to the required range and transit profile. Tamper-evident seals help identify package interference, while shock indicators can support an investigation when breakage or closure damage appears after delivery.
A cold vial should equilibrate before the operator removes or punctures the stopper. Opening it immediately in warm, humid air can create condensation around the closure. Upon receipt, staff should record the package condition, compare lot information with the COA, inspect the sterile barrier, and move the product to the designated storage location without leaving it on an uncontrolled bench.
Apply a supplier shortlist test
A procurement review can stay concise if it asks the right questions:
- Format and fill: Does the capacity match the working volume, dose plan, access frequency, and required headspace?
- Closure assembly: Are the glass finish, stopper, cap, and crimp specified as a tested combination?
- Resealing evidence: Does the supplier provide puncture-test conditions that resemble the laboratory's actual withdrawal method?
- Sterilization record: Is the component and filled-product pathway documented, including filtration and integrity testing where relevant?
- Lot-specific QA: Does the COA identify the exact lot, test methods, results, dates, traceability, and quality approval?
- Shipping controls: Are temperature protection, tamper evidence, impact protection, and receipt inspection defined?
- Total landed cost: Does the comparison include unit price, shipping, QA review time, rejected units, and supplier response quality?
The final choice should preserve vial integrity throughout the multi-dose lifecycle. Single-direction needle entry, dry 70% IPA preparation, new sterile equipment for every withdrawal, capped storage, and accurate first-puncture records matter as much as the glass specification.
Herbilabs supplies sterile, non-pyrogenic reconstitution solutions in premium multi-dose glass vials across 3 mL, 10 mL, 20 mL, and 30 mL formats, with aseptic production and lot-specific COA documentation described for RUO workflows. Research teams, resellers, and independent laboratories can review the available options at Herbilabs and match the format and documentation to their handling protocol.