Private Label, White Label, Wholesale partnerships available - EU, USA and UK - Free shipping from €75

How to Mix Peptide Powder Safely and Accurately
A vial of lyophilized peptide sits on the bench, the calculated volume is in the syringe, and the temptation is to push the liquid in quickly and shake until the powder disappears. That shortcut can leave a researcher with uncertain concentration, excessive foam, or a preparation that shouldn't enter a controlled workflow. Knowing how to mix peptide powder means controlling more than appearance. The solvent, final volume, aseptic technique, documentation, and intended storage pattern all determine whether the preparation remains reproducible and suitable for research use only.
The practical standard is simple: choose the diluent from the vial's usage pattern, calculate the final concentration before adding liquid, introduce the solvent gently, and treat every stopper puncture as a contamination opportunity. A clear solution is useful evidence that the powder has dissolved, but it isn't proof that poor handling didn't compromise the preparation. The workflow below focuses on the decisions that prevent avoidable waste and make later withdrawals traceable.
Table of Contents
- Why Proper Peptide Mixing Matters for Research Results
- Choosing the Right Solvent for Reconstitution
- Calculating Volumes and Target Concentrations Accurately
- How to Mix Peptide Powder Without Contamination or Foam
- Troubleshooting Common Reconstitution Problems
- Storing Reconstituted Peptides and Maintaining Stability
Why Proper Peptide Mixing Matters for Research Results
A rushed reconstitution often fails in a deceptively ordinary way. A technician adds the right solvent volume, aims directly at the lyophilized cake, and shakes the vial to speed dissolution. The liquid may look clear a short time later, yet the operator has introduced unnecessary foam and mechanical stress while relying on memory rather than a written concentration record. If the vial will be accessed repeatedly, casual stopper handling creates a second problem: the preparation must remain controlled after the initial mix, not merely look acceptable at the moment of preparation.
Lyophilized peptide powder contains a fixed mass. Once solvent is added, the final concentration becomes a function of volume, so an incorrect diluent volume changes every later dose calculation. Reconstitution therefore acts as concentration control. The same step also acts as contamination control because every withdrawal, stopper puncture, and exposed surface can affect the usable life of the solution.
The visible solution is only one check
A clear solution matters, but it answers only a narrow question: whether the material appears dissolved. It doesn't confirm that the operator used the intended solvent, recorded the actual volume, or protected the vial during repeated access. Research-oriented guidance recommends bringing the vial and solvent to room temperature, adding liquid gently, avoiding vigorous agitation, and documenting the solvent volume, lot number, target concentration, and operator details in the lab notebook (research peptide reconstitution guidance).
That record supports reproducibility between operators and across preparation days. It also gives the lab a way to investigate an unexpected result without guessing whether the discrepancy came from the peptide, the calculation, the diluent, or the handling process.
Practical rule: A clear vial is a readiness check, not a substitute for a documented, aseptic preparation.
Repeated access changes the risk profile
A single-use preparation and a multi-dose vial shouldn't be treated as interchangeable. Bacteriostatic formulations are commonly selected in research protocols because their 0.9% benzyl alcohol preservative supports repeated access, while preservative-free sterile water is generally intended for single-use or very short holding periods. Practical lab guidance associates bacteriostatic preparations with refrigerated storage windows of about 14 to 28 days, while sterile water preparations are generally limited to roughly 24 to 48 hours (peptide reconstitution guidance on bacteriostatic water).
That distinction makes the initial solvent decision part of the experimental design. A researcher expecting one same-session use has different requirements from a lab drawing from one vial over several weeks. In both cases, the compound's compatibility and the applicable institutional protocol take priority over a generic internet recommendation.
Choosing the Right Solvent for Reconstitution
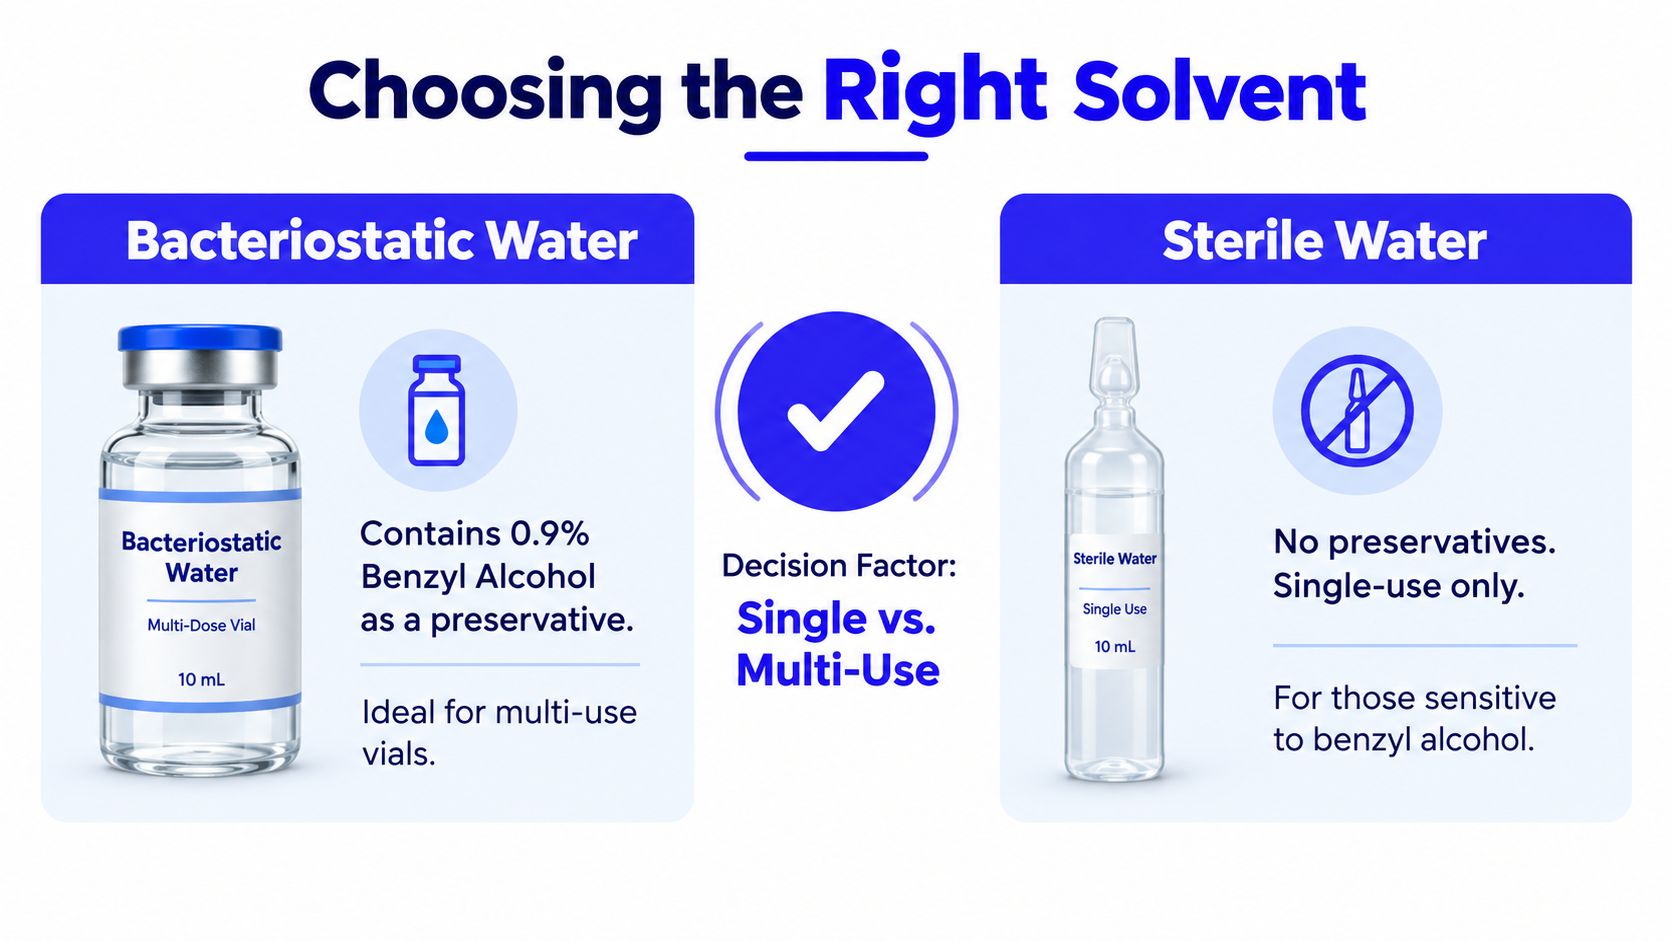
The solvent choice controls two parts of a reconstitution workflow: the final handling concentration and the contamination risk created by vial access. Bacteriostatic water contains 0.9% benzyl alcohol, which helps suppress microbial growth during repeated withdrawals. Preservative-free sterile water offers no antimicrobial protection, so it fits a single-use, same-session preparation more readily than a vial that will be punctured repeatedly.
Bacteriostatic water is not automatically suitable for every peptide. Some compounds may require preservative-free sterile water because of compatibility limits, while an approved protocol may specify that diluent for a particular application. Check the intended use, compound compatibility, expected access pattern, contamination controls, and permitted storage period before selecting the solvent.
A practical comparison
| Feature | Bacteriostatic Water 0.9% Benzyl Alcohol | Sterile Water Preservative Free |
|---|---|---|
| Preservative | Contains 0.9% benzyl alcohol | Contains no preservative |
| Best fit | Multi-dose workflows with repeated withdrawals | Single-use or same-session preparation |
| Microbial-growth control | Supports suppression during repeated access | Provides no antimicrobial protection |
| Storage implication | Aseptically handled preparations are commonly assigned a refrigerated window of about 14 to 28 days | Generally limited to roughly 24 to 48 hours or single-use handling |
| Main caution | Confirm compound compatibility with benzyl alcohol | Do not treat it as a multi-dose diluent |
Repeated withdrawals require a defined stopper-disinfection routine, controlled storage, and a documented in-use period. A single-session preparation has a simpler access pattern and may suit preservative-free sterile water when the peptide and protocol permit it. The decision should rest on whether antimicrobial protection supports the planned handling pattern and remains compatible with the material.
What the diluent label can't decide
The vial label cannot resolve every preparation question. The approved procedure should specify the research-use status, compatible diluent, required solution volume, and permitted in-use period after reconstitution. If those details are absent, pause and obtain compound-specific guidance. Adding extra solvent or an improvised additive does not correct an unresolved compatibility problem.
For teams setting up repeated-access workflows, bacteriostatic water protocols from Herbilabs provide a practical reference for handling requirements. The responsible laboratory must make the final selection under its approved procedure.
Calculating Volumes and Target Concentrations Accurately
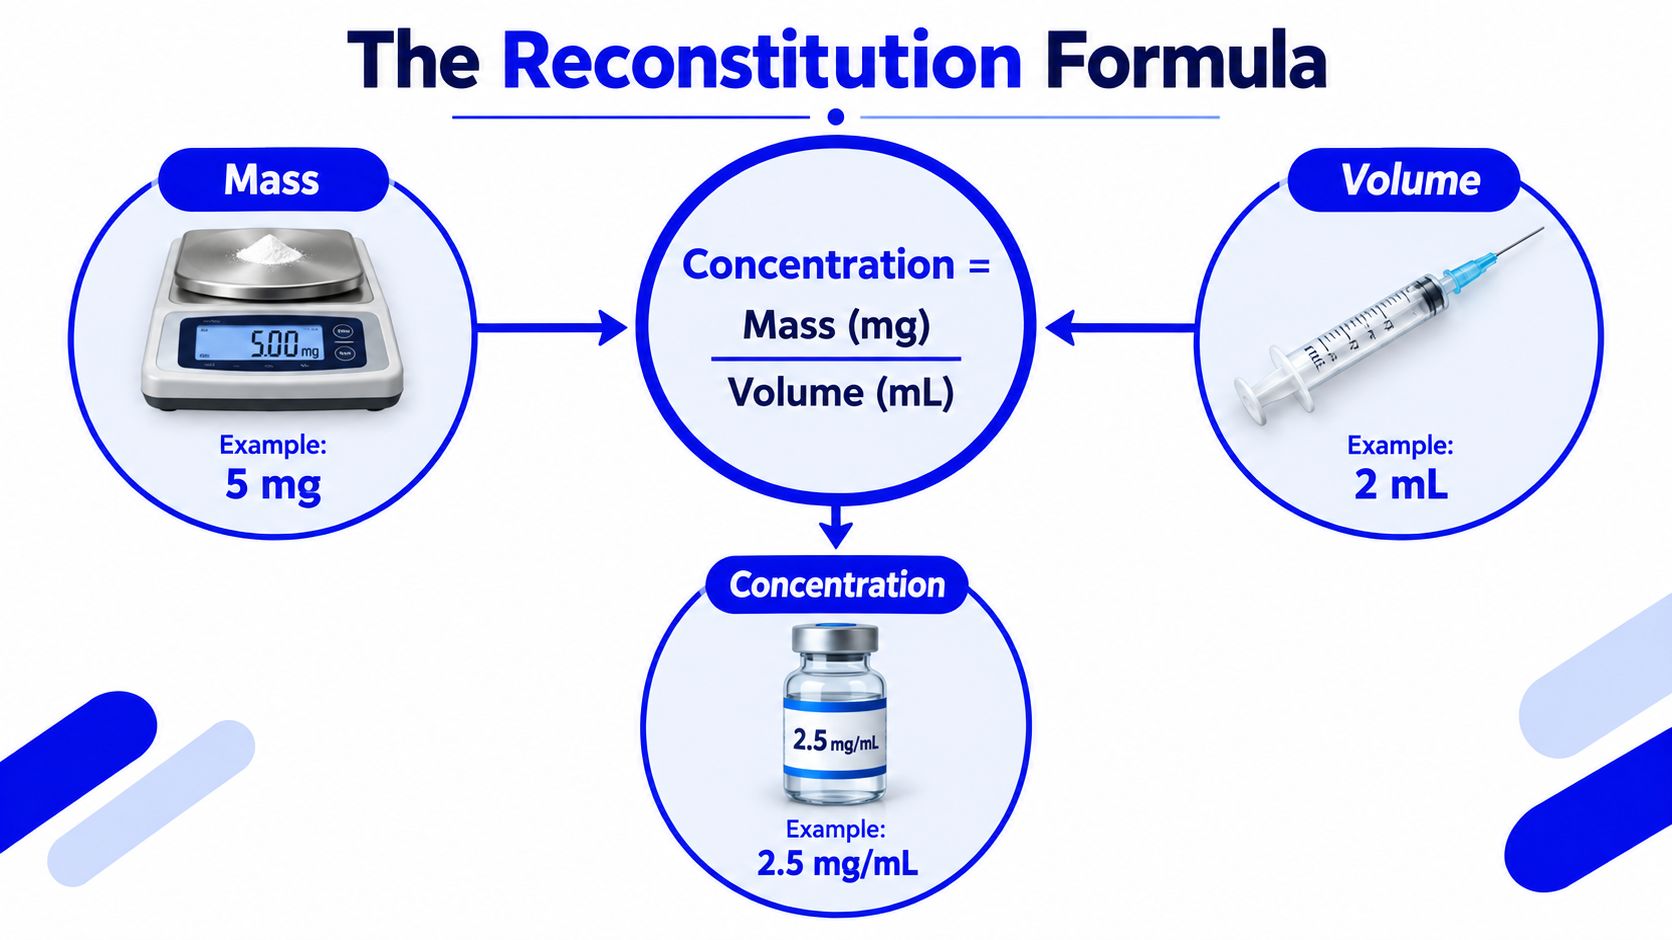
The central calculation is straightforward:
Concentration = peptide mass ÷ final volume
If a vial contains a fixed peptide mass, adding more diluent produces a lower concentration, while adding less produces a higher concentration. The calculation must use consistent units, such as milligrams and milliliters. Guessing the volume because a particular vial size is familiar undermines dose reproducibility.
Work backward from the target
When the target concentration is known, rearrange the formula:
Required volume = peptide mass ÷ target concentration
For example, a 5 mg vial prepared with 2 mL of diluent produces 2.5 mg/mL. Those values illustrate the relationship, not a universal preparation instruction. The operator should use the mass stated on the vial and the target strength specified by the approved research protocol.
A second example shows why the direction matters. If a vial contains 10 mg and the protocol calls for 5 mg/mL, the required final volume is 2 mL. If the same mass is placed in 1 mL, the resulting concentration is 10 mg/mL, not the intended strength. A later withdrawal made from the wrong concentration can be measured precisely and still deliver the wrong amount of peptide.
Researchers who need a conversion aid can use calculating mg/mL and IU for peptides, while retaining the underlying calculation in the laboratory record.
Control the variables before opening
Bring the vial and solvent to room temperature before reconstitution. This reduces avoidable temperature differences during handling and makes the liquid easier to measure consistently. The operator should also confirm the peptide mass, solvent identity, target concentration, and final volume before drawing anything.
A concise preparation record should include:
- Peptide identity and mass: Copy the information from the vial or batch record.
- Solvent volume: Record the calculated volume and the volume withdrawn.
- Solvent lot: Capture the lot number so the preparation can be traced.
- Target concentration: Write the intended strength in mass-per-volume units.
- Operator and date: Identify who prepared the vial and when.
If a partial vial is used, the calculation must be based on the actual peptide mass remaining, not the original label claim. That mass may require an established assay or batch record. Without a reliable mass value, a precise concentration cannot be inferred from the visible amount of cake.
Calculation check: Have a second qualified person verify the units, division, target strength, and final volume before the solvent enters the peptide vial.
The final volume also affects practicality. A very small volume can make measurement errors more consequential, while a larger volume may not suit the protocol or vial capacity. The best volume is the one that meets the target concentration and can be measured accurately with the available laboratory equipment.
How to Mix Peptide Powder Without Contamination or Foam
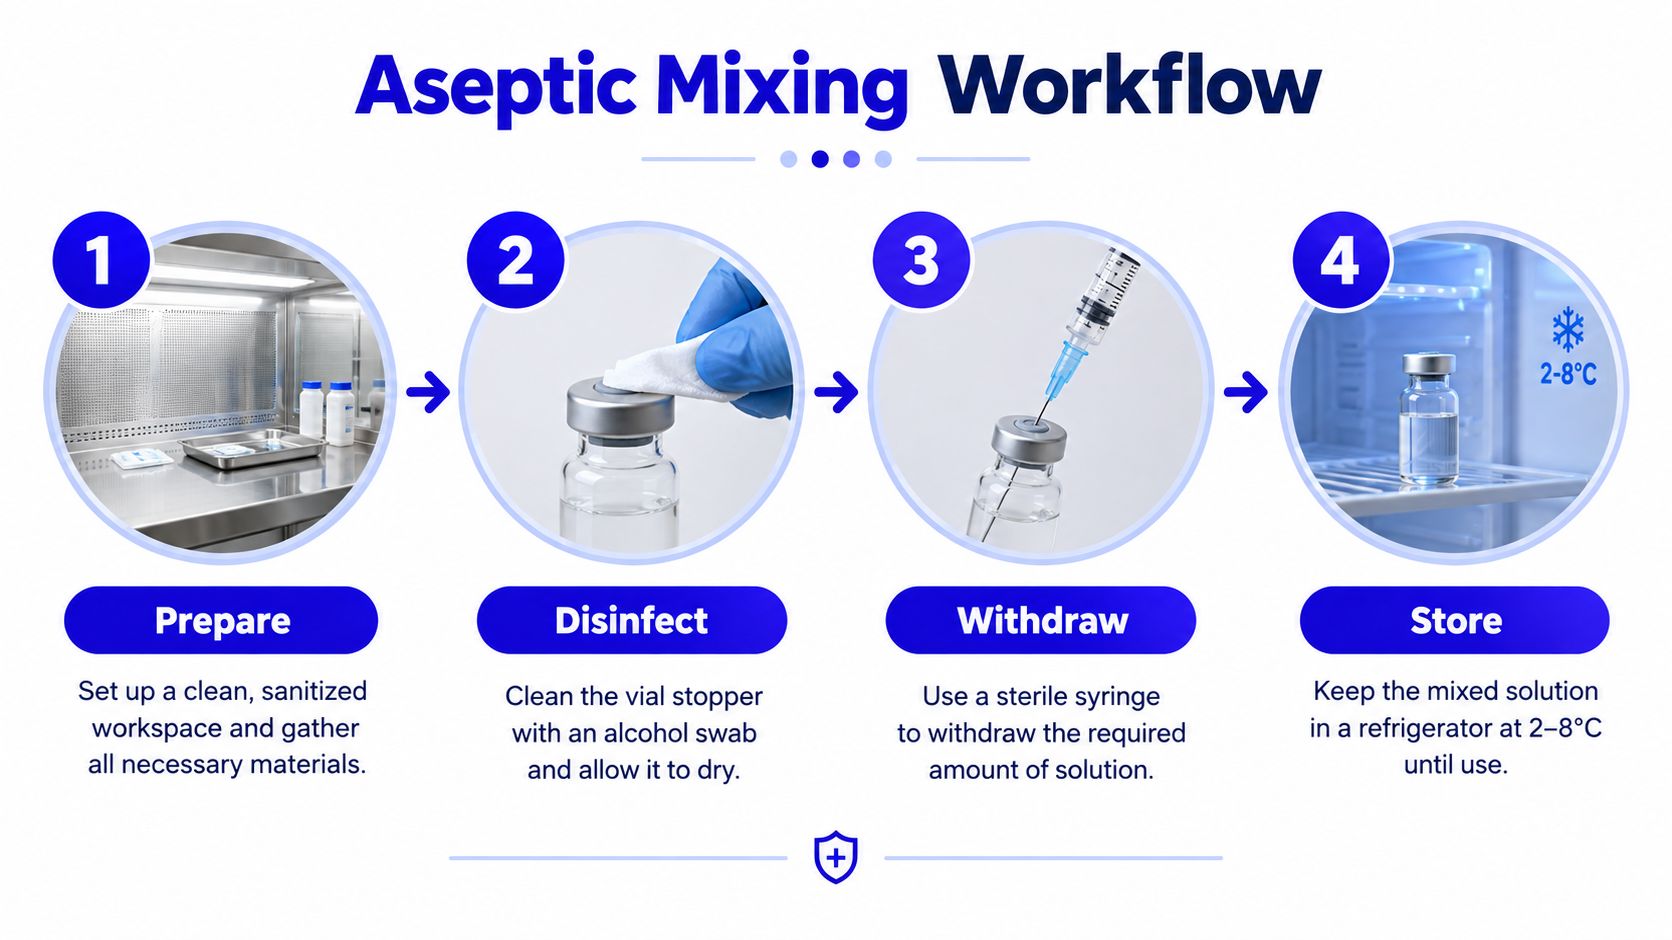
A vial sits on the bench, the diluent is ready, and the first stopper puncture is the point where concentration control and contamination control become one task. Set up a clean, organized work surface before starting. Place the peptide vial, selected diluent, sterile syringe, needle, and fresh alcohol swabs within reach. Arrange them so the operator will not reach over exposed materials or search for supplies during transfer.
Prepare the vial and diluent
Let the lyophilized peptide vial and solvent vial reach room temperature. Inspect each container for damage, confirm the identity and lot information, and prepare the calculated diluent volume. Use a new sterile syringe and needle for withdrawal and transfer, following the laboratory's approved aseptic procedure.
Disinfect both rubber stoppers with suitable alcohol swabs and let them dry fully. Contact with a cleaned stopper, an unclean surface, or visibly wet alcohol can compromise the controlled process. Keep unnecessary materials away from the preparation zone, and avoid speaking directly over it.
Add liquid down the glass wall
Withdraw the calculated diluent volume while limiting bubbles. Insert the needle through the peptide vial stopper, angle it toward the inner glass wall, and inject slowly. The liquid should run down the side instead of striking the lyophilized cake. Research-oriented handling guidance recommends waiting 2 to 5 minutes before swirling, followed by gentle circular rotation or rolling. Shaking and vortexing are excluded from that sequence (aseptic reconstitution workflow).
The angled-wall method limits splashing and sudden wetting, both of which can fragment the cake and increase foaming. Allow the vial to sit undisturbed for the recommended rest period instead of increasing agitation. Gentle rotation then distributes the solvent while limiting the air-liquid interface.
Do not shake the vial. Foam, bubbles, and mechanical stress indicate handling problems that require time and controlled movement.
After the rest period, rotate or roll the vial slowly. Do not vortex it, strike it against the bench, or repeatedly move the plunger to pressurize the vial. If dissolution proceeds slowly, allow additional time under the approved storage and handling conditions. Do not improvise an acid, salt, or extra solvent.
Confirm the preparation before storage
Inspect the solution after gentle mixing and a short rest. Research guidance describes a clear solution without visible particles as the expected readiness check. Cloudiness, persistent undissolved material, unexpected discoloration, or visible particulates require a hold and investigation before the preparation is used or stored.
Label the vial with peptide identity, concentration, solvent, preparation date, operator, and applicable in-use limit. Retain the calculation and lot information in a laboratory notebook or electronic record. A cryogenic cooling guide by Cryonos GmbH provides broader temperature-control context, while the peptide protocol determines the actual storage requirements.
Use the embedded demonstration only as a visual supplement to the approved SOP and compound-specific compatibility information.
For multi-dose workflows, pair bacteriostatic water with disciplined stopper disinfection and a documented withdrawal process. The preservative supports the intended use pattern; the preservative alone does not sterilize careless technique.
Troubleshooting Common Reconstitution Problems
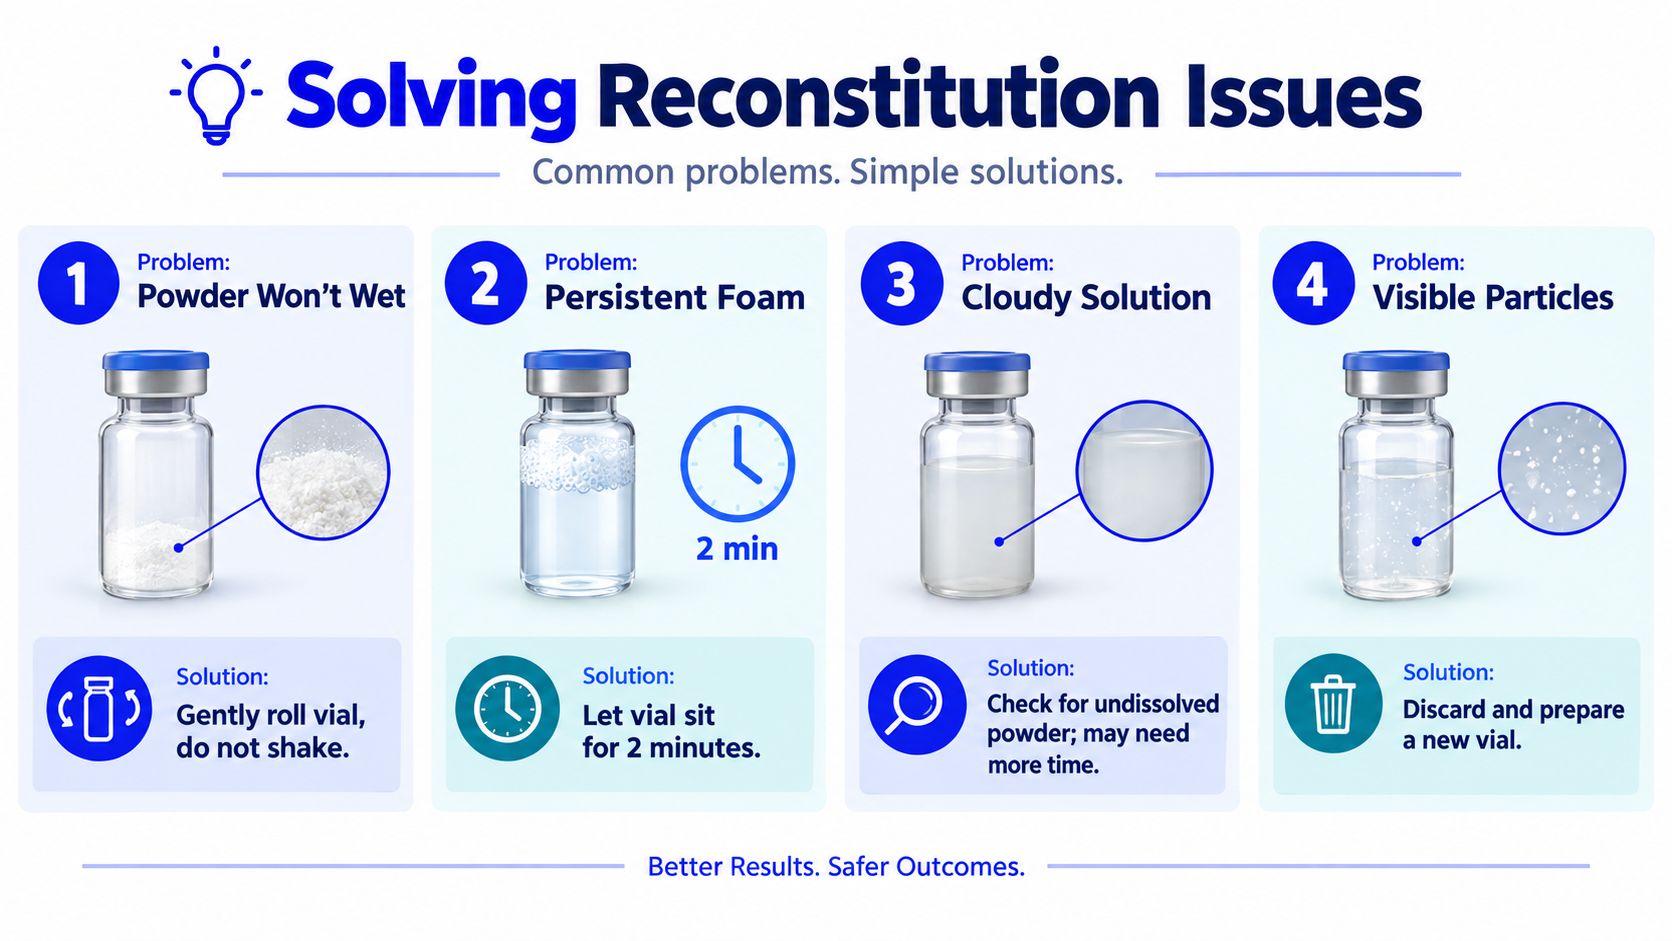
A vial that looks wrong after mixing should remain on hold. Diagnose the handling variable before changing the preparation. The main possibilities are poor wetting, excessive agitation, temperature differences, solvent incompatibility, or contamination. Reconstitution is a concentration-control and contamination-control step, so a quick visual fix can create a larger problem.
Powder won't wet
A dry patch or firm cake often forms when liquid strikes one spot, the needle creates a narrow jet, or the powder and solvent are at different temperatures. Let the solvent contact the vial wall, allow a short rest, then rotate the vial gently. Shaking can trap foam and stress the preparation without improving wetting.
If the powder remains unchanged, verify the compound protocol, solvent compatibility, and permitted holding conditions. Do not add unapproved solvent or volume. Any added volume changes the concentration and invalidates the original calculation.
Foam or bubbles persist
Rapid injection, direct impact on the cake, and vigorous swirling commonly produce foam. Set the vial down and allow it to rest for 2 minutes, a practical foam-management pause described in the supplied reconstitution best practices. Further agitation usually prolongs the problem.
Small bubbles may clear with time. Heavy foam that persists requires review against the SOP before use. Record the handling event, including how the solvent was introduced, rather than treating a later clear appearance as proof that the preparation was unaffected.
The solution stays cloudy
Cloudiness can reflect incomplete dissolution, solvent incompatibility, temperature-related behavior, or contamination. Allow the vial to rest, then inspect it for undissolved material and any change in color or texture. Persistent cloudiness or an unexpected appearance warrants quarantine and consultation with the responsible laboratory lead or compound documentation.
Visible particles appear
Visible particles are a stop signal. Do not filter, shake, or draw around them as a quick correction. The supplied troubleshooting guidance recommends discarding and preparing a new vial because visual inspection cannot identify the particle source reliably.
Repeated access increases the importance of stopper disinfection, needle control, and a documented withdrawal process. A cited lab guide reports contamination rates of under 0.1% versus 3 to 5% when comparing proper sterile preparation with casual methods in hospital-pharmacy-style preparation contexts. That comparison applies to its stated preparation context. Disciplined handling is the primary driver of contamination control; the solvent label alone is insufficient.
Storing Reconstituted Peptides and Maintaining Stability
A vial can remain clear and still have a weak storage record. Stability depends on the solvent choice, concentration, temperature history, container, and quality of aseptic handling. As noted earlier, bacteriostatic preparations are associated with refrigerated windows of about 14 to 28 days. Preservative-free sterile-water preparations generally suit roughly 24 to 48 hours or single-use handling. Treat these as protocol limits, not universal guarantees.
Store the labeled vial under the condition specified by the responsible laboratory procedure. Limit warming cycles, room-temperature holding, and direct light, and follow the compound's stability data where it is available. A change in clarity, color, texture, or visible material requires stopping use until the cause has been investigated.
A compact stability record
- Label clearly: Record identity, concentration, solvent, preparation date, and operator.
- Track access: Document each withdrawal under the laboratory's multi-dose procedure.
- Preserve traceability: Keep solvent and peptide lot numbers with the preparation record.
- Inspect before use: Check for clarity, particles, unexpected color, or other changes.
- Follow the protocol: Use the shortest approved in-use period when storage history or handling quality is uncertain.
A controlled diluent source can make this record easier to verify when it provides lot-specific documentation and a defined manufacturing process. Herbilabs offers RUO bacteriostatic and reconstitution solutions in multiple vial formats, with 0.22 µm filtration, lot-specific Certificates of Analysis, and an in-use period stated as up to 28 days with aseptic handling. Evaluate those details against the research protocol and peptide compatibility requirements. Product documentation does not replace local quality controls.
The most reliable preparation combines a defensible concentration calculation, a suitable solvent, gentle aseptic handling, a clear inspection result, and records that let another qualified operator reproduce the work.
For controlled RUO workflows, visit Herbilabs to review sterile bacteriostatic and reconstitution solutions, available vial formats, and lot-specific COA documentation. Match the diluent to the peptide protocol and planned single-use or multi-dose workflow before placing an order.