Private Label, White Label, Wholesale partnerships available - EU, USA and UK - Free shipping from €75

Peptide Calculator Reconstitution: A Step-by-Step Lab Guide
You've got the vial on the bench, the calculator open, and the target dose in mind, but the part that usually trips people up isn't the arithmetic. It's the gap between the number on the screen and the vial that still has to be handled cleanly, labeled correctly, and accessed again without turning the next withdrawal into guesswork.
A good peptide calculator reconstitution workflow does more than convert milligrams into syringe units. It turns a lyophilized vial into a reproducible working solution, with the right diluent, the right concentration, and the right aseptic habits so the result in the syringe matches the math on the screen.
Table of Contents
- Why Reconstitution Math Is the Easy Part
- The Core Calculations Behind Every Peptide Calculator
- Choosing the Right Diluent for Multi-Dose Vials
- A Reproducible Reconstitution Workflow at the Bench
- Translating the Calculator Output Into a Syringe Draw
- Calculation and Handling Mistakes That Break Reproducibility
- Your Bench-Side Reconstitution Checklist
Why Reconstitution Math Is the Easy Part
A researcher can be standing at the bench with a 10 mg vial in one hand, a syringe of diluent in the other, and a calculator tab open, yet still not know whether the vial should be treated as a one-time preparation or a multi-dose stock. The screen can tell you the concentration, but it can't tell you whether the vial format, the diluent, or the handling habits will make that concentration reliable for the next withdrawal. That's why the formula is only the starting line, not the finish.
The cleanest way to think about peptide calculator reconstitution is as a three-part decision tree. First comes the math, which tells you the concentration. Then comes the diluent choice, which determines whether the vial is meant for repeated access or a shorter window. Then comes the aseptic behavior that keeps the vial trustworthy after the stopper has been punctured.
What lyophilized peptide means in practice matters here because freeze-dried powder changes how researchers stage the next step. Lyophilized material is stable in its dry state, but the moment solvent is added, the workflow shifts from storage logic to handling logic. The calculator can't make that switch for you.
Practical rule: if the calculation is done but the vial won't be accessed again in a controlled way, the bench decision is still unfinished.
A calculator is best used as the translation layer between vial label and syringe mark. The bench still decides whether the solution will be mixed gently, labeled immediately, and used in a way that preserves the working concentration over time.
The Core Calculations Behind Every Peptide Calculator
A vial label only becomes a usable working solution after the math and the bench conditions line up. The core relationship is still straightforward, concentration equals total peptide mass divided by the volume of diluent added. That calculation gives the number on the screen, but the person at the bench still has to match that number to the vial format, the syringe scale, and the way the solution will be handled after reconstitution.
A 10 mg vial with 2 mL of diluent gives 5 mg/mL. A 5 mg vial with 2 mL gives 2.5 mg/mL. Those are the kinds of relationships a calculator should show clearly, because the lab needs to see how a mass-based label turns into a measurable working volume. A reference that keeps the arithmetic tied to practical volume choices is The calculator reference from Rite Aid, and a second check against a unit converter such as convert mg to ml easily helps keep the mass and volume paths aligned before anything is drawn.
Converting mL into U-100 syringe units
A U-100 insulin syringe is the bridge from concentration to draw volume. On that scale, 0.1 mL equals 10 units, so 0.05 mL equals 5 units. If a solution is 10 mg/mL, a 0.05 mL draw delivers 500 mcg. The bench needs to know where the plunger stops, and that is the unit conversion that matters when a calculator is used at the hood or bench.
For a quick cross-check, the practical habit is to verify the result in both mass and volume terms before the draw. The calculator output should stay explicit enough that a user can see whether the dose is being read as mg, mcg, mL, or syringe units without doing a second round of mental arithmetic. That becomes even more useful when the same numbers are tied to a dilution workflow, like the one shown in compound concentration and dilution calculation, because the same formula has to hold up from vial prep to final withdrawal.
| Vial mass | 1 mL diluent | 2 mL diluent | 3 mL diluent |
|---|---|---|---|
| 2 mg | 2 mg/mL | 1 mg/mL | 0.67 mg/mL |
| 5 mg | 5 mg/mL | 2.5 mg/mL | 1.67 mg/mL |
| 10 mg | 10 mg/mL | 5 mg/mL | 3.33 mg/mL |
Why the calculator still needs a human check
The same output can be misleading if the label, the target dose, and the working units are not read the same way. If the target is written in mcg, the working concentration should be read in mcg/mL or converted cleanly from mg/mL before any syringe draw is planned. For assay work that uses other concentration expressions, the calculator can be adapted to molarity or IU-based logic, but the checking step stays the same, confirm the unit path before the draw.
The useful calculator is the one that lets the bench verify the result without guessing about units, dilution volume, or syringe scale. It should present the mass input, the added volume, and the final concentration in a way that can be checked against the vial label and the intended draw, because those three numbers have to agree before the solution is considered ready for use.
Choosing the Right Diluent for Multi-Dose Vials
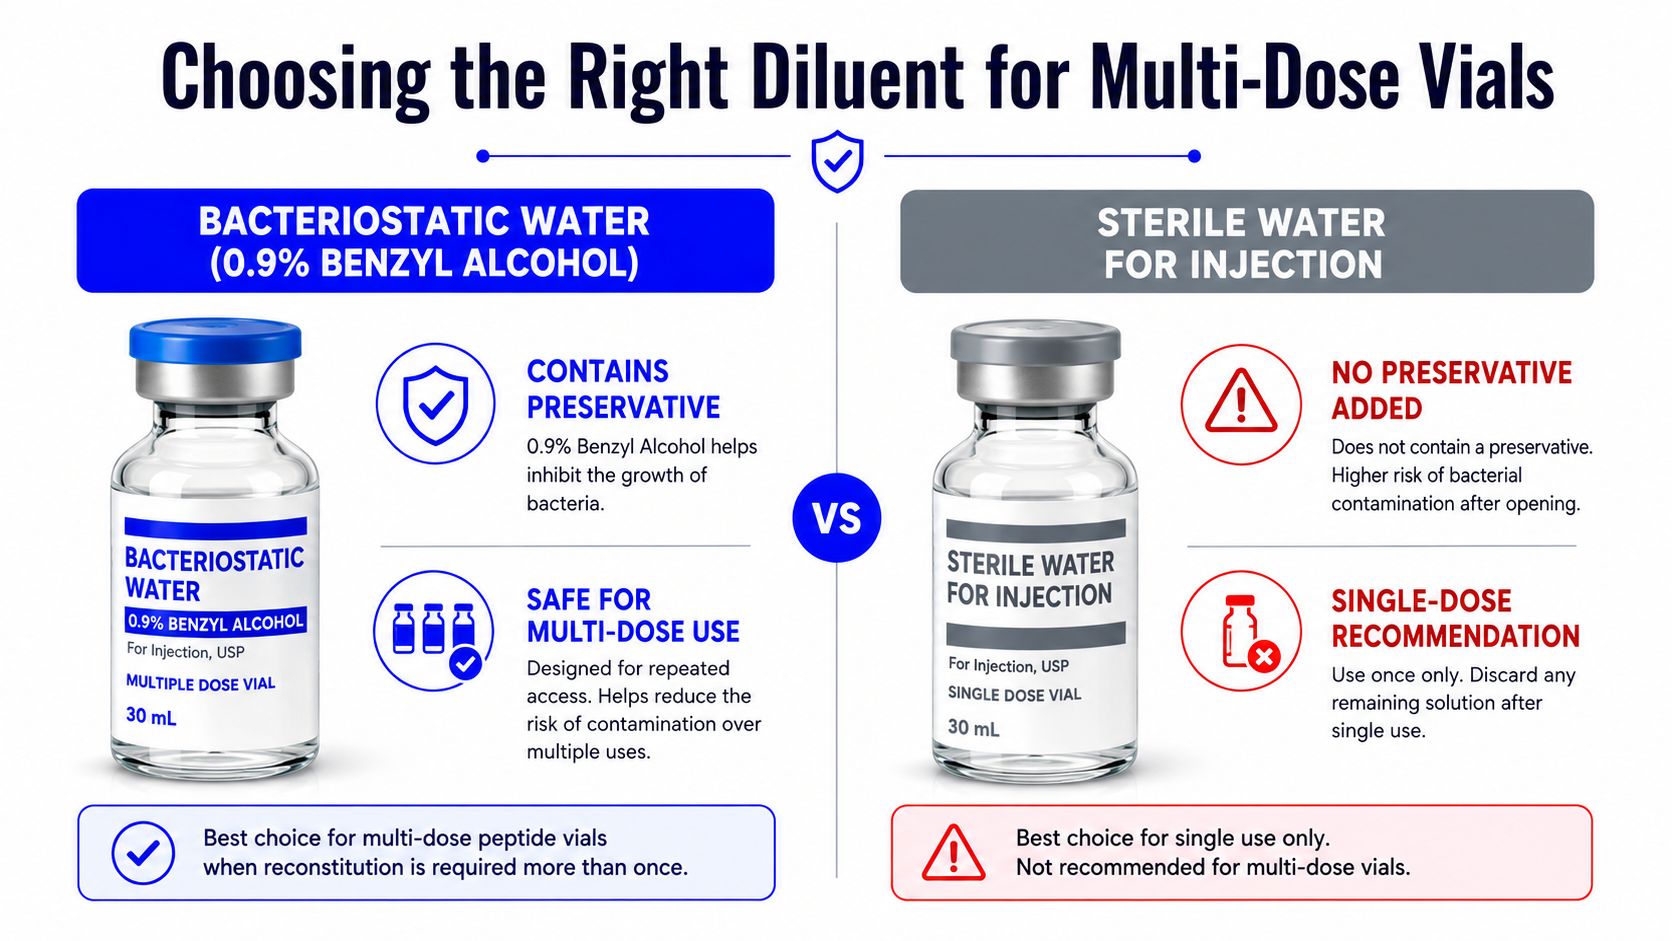
The diluent choice decides whether the calculator output supports one access or repeated access. Bacteriostatic water is typically formulated with 0.9% benzyl alcohol, and the guidance linked in the brief repeatedly describes 1 to 3 mL as a typical reconstitution range, with 2 mL and 3 mL often used as defaults for multi-dose vial prep. That matters because the chosen volume sets the working concentration that will be drawn for the life of the vial. PeptideMind's calculator guidance connects that volume choice to the practical in-use window.
Bacteriostatic water versus sterile water
Bacteriostatic water fits repeated access better because its preservative supports more than one withdrawal from the same vial. The 28-day in-use window is repeatedly cited in research-facing guidance, so the workflow has to include aseptic technique and clear multi-dose labeling from the start. For a lab that expects to return to the same vial across sessions, that preservative support helps keep the preparation practical.
Sterile water has a narrower operational role. It can work for single-use or very short-window work, but it does not provide the preservative support needed for repeated puncture and storage. A protocol that calls for a one-off preparation can use sterile water appropriately. A vial that will be revisited belongs with bacteriostatic water, and the distinction is laid out clearly in this comparison of bacteriostatic water and sterile water.
Why vial format and withdrawal count matter
Multi-dose workflow also depends on the vial format itself. Herbilabs' product range includes 3 mL, 10 mL, 20 mL, and 30 mL formats, which matches the practical reality that the expected number of withdrawals affects how much headroom the vial needs. A small vial can suit a short protocol, but a repeated-access schedule needs enough volume to support the planned draws without forcing awkward precision on the last withdrawals.
The useful question is how many times the vial will be entered, and what concentration will keep those withdrawals practical across the full window. That answer ties the calculator and the diluent choice together, so the bench plan stays aligned with the syringe draw instead of treating them as separate tasks.
Choosing the Right Diluent for Multi-Dose Vials depends on repeatability as much as chemistry. The right diluent sets the concentration, but the preservative and handling pattern decide whether that concentration stays usable.
A Reproducible Reconstitution Workflow at the Bench
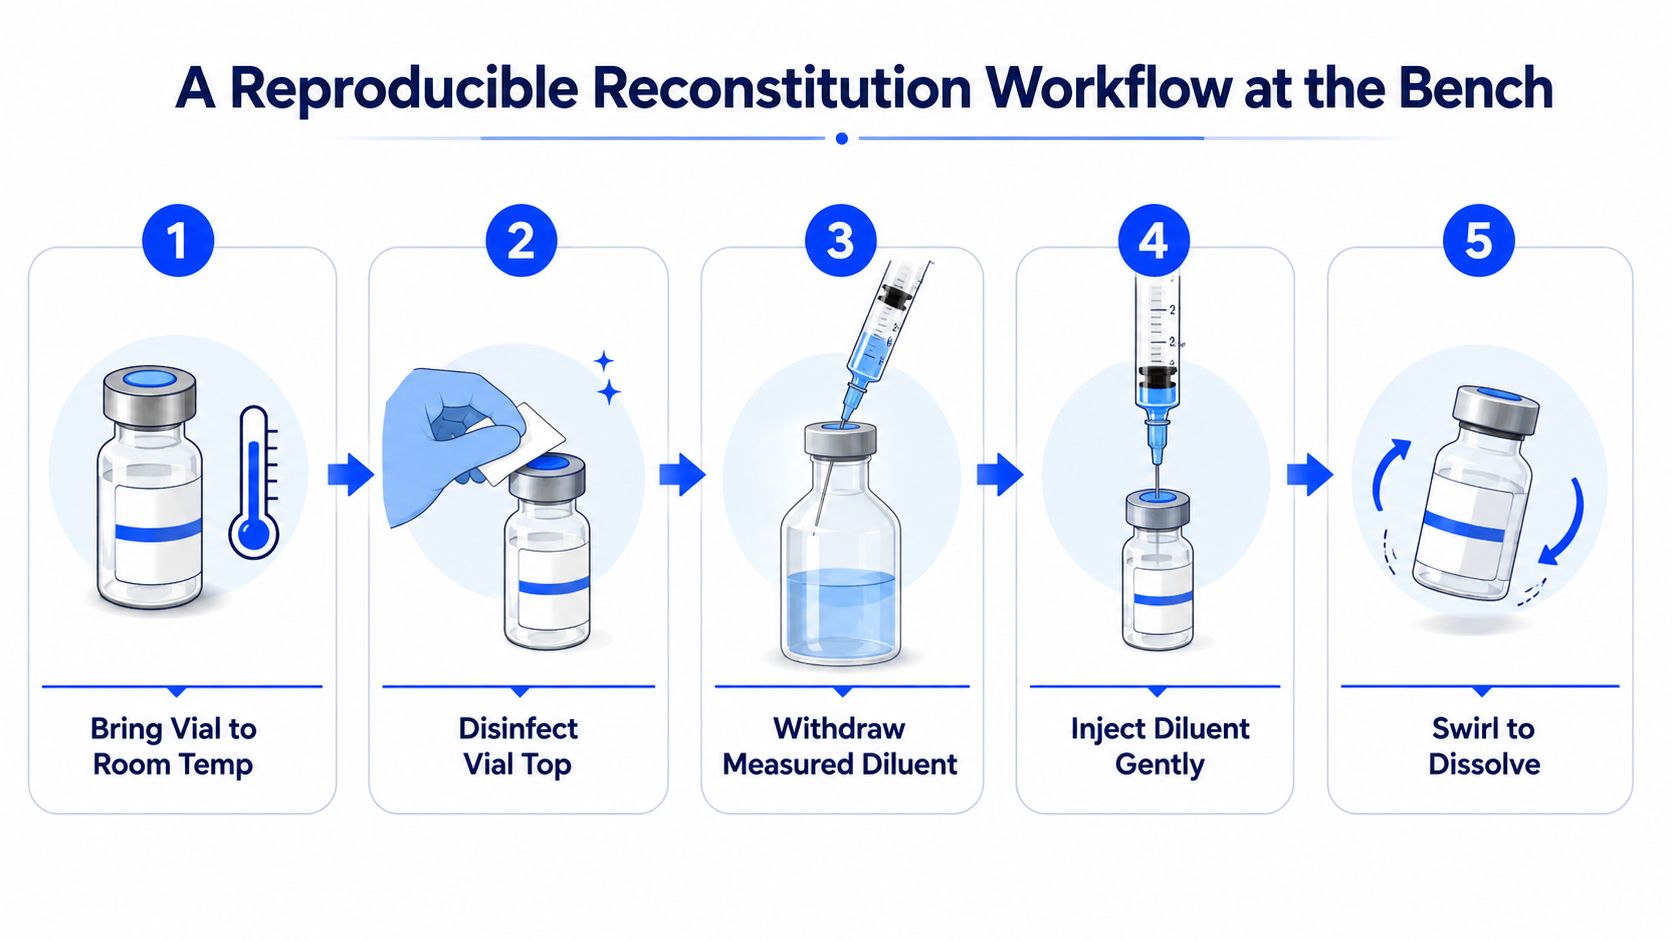
Prepare the vial before the first puncture
Bring the vial to room temperature first, then disinfect the stopper with an alcohol wipe. Cold vials can encourage sloppy handling, and a neglected stopper turns a simple transfer into a contamination risk. A calm setup is faster than a rushed correction later.
A guide on how to create effective step by step instructions is useful here because bench work succeeds when the sequence is unambiguous. A good workflow reads like a fixed path, not a set of loosely remembered habits.
Bench habit that pays off: label the vial before the next task starts, not after the vial is back in the rack.
Add diluent slowly and mix gently
Inject the diluent down the side wall of the vial rather than blasting it straight into the cake. Slow addition reduces foaming and helps the peptide wet evenly. Once the solvent is in, gentle swirling is the right move, not aggressive shaking.
Vigorous mixing is a common mistake because it feels efficient, but it can work against sensitive sequences. If the powder isn't dissolving right away, the answer is usually patience and gentle handling, not force. Over-agitation is exactly the kind of bench behavior that makes a calculator's perfect number fail in real life.
Write the working concentration on the vial
The vial should be labeled with the mg/mL concentration, the date and time of reconstitution, and the diluent lot. That record turns the vial into a traceable stock rather than a memory exercise. If the protocol uses a specific draw volume, write that too, along with the calculated syringe units.
The strongest habit is to capture the calculator output directly on the container. That way, nobody has to reconstruct the math from memory on a later shift, and nobody has to guess whether the last withdrawal came from the same starting concentration. The calculator is doing work for the bench, not replacing bench discipline.
Keep the reconstitution note practical
A label that says only “reconstituted” is too vague to support repeat use. A label that says 5 mg/mL, the date, and the diluent lot gives the next researcher a reliable starting point. That is the difference between a solution and a record.
Translating the Calculator Output Into a Syringe Draw
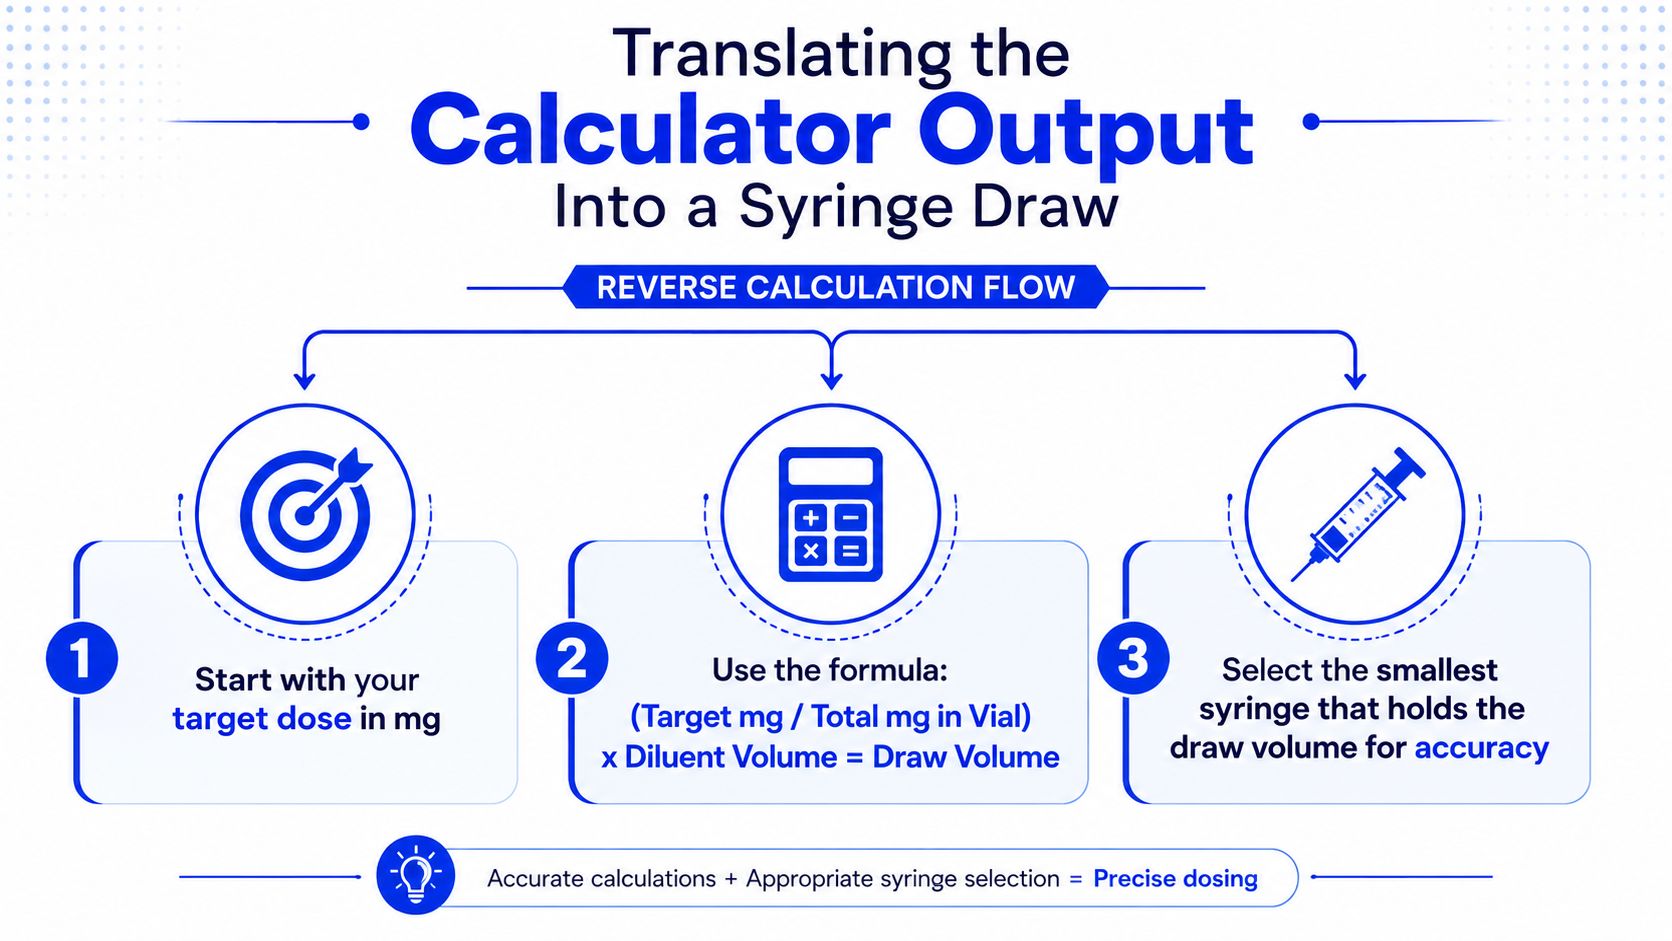
A target dose is easiest to handle in reverse. Start with the dose, divide by the reconstituted concentration to get mL, then convert that draw to U-100 units. That sequence keeps the dose logic intact and prevents the common mistake of trying to infer volume from syringe markings first.
For a 250 mcg dose from a 5 mg/mL vial, the draw volume is 0.05 mL, which equals 5 units on a U-100 syringe. For a 500 mcg dose from a 10 mg/mL vial, the draw is also 0.05 mL, again 5 units. Different concentrations can land on the same plunger mark, which is why the vial concentration must stay visible at the bench.
Reverse the math before the draw
The working steps are straightforward. Pick the target dose in mg or mcg. Divide by the concentration in mg/mL to get the draw volume in mL. Convert that draw into syringe units by multiplying the mL value by 100 on a U-100 syringe.
That sequence matters because it also supports multi-week planning. If the vial contains enough total mass for the planned draws, the calculator output can be compared against the expected withdrawal schedule before the first puncture. That keeps the bench aligned with the protocol rather than forcing the protocol to adapt midstream.
Keep the draw precise
The smallest syringe that comfortably holds the draw volume is usually the right choice. Large empty syringe capacity adds unnecessary room for misreading the line, while an undersized syringe makes the draw awkward. The best draw is the one that the operator can read cleanly, repeat consistently, and document without hesitation.
- Start with the dose: Define the target in mg or mcg before touching the syringe.
- Verify the concentration: Read the vial label, not memory.
- Check the unit path: Convert mL to U-100 units only after the dose volume is fixed.
- Match the syringe to the draw: Use the smallest syringe that still holds the full volume clearly.
Calculation and Handling Mistakes That Break Reproducibility
A perfect calculator session can still end in a messy result if the vial is handled loosely afterward. The biggest failures usually aren't mathematical. They're small habits that accumulate, like under-mixing, vague labeling, and repeated access without a clean record of what was done.
The errors that survive good math
Adding diluent too fast is a classic mistake because it creates local turbulence and poor wetting. Under-mixing leaves a concentration gradient, which means the vial isn't uniform even if the final number looked right on paper. Re-deriving the concentration from memory later is another quiet failure, especially when multiple vials are on the bench at once.
Using the wrong syringe type creates a different kind of error. A U-100 syringe is designed around a specific unit system, so any other format forces a conversion step that should have been avoided. When the syringe doesn't match the calculator output cleanly, the odds of an off-by-one or off-by-ten error climb quickly.
The practical questions operators actually ask
Room temperature matters most at the start, when the vial is first prepared and the contents need to wet and dissolve evenly. After that, the bigger concern is not the initial temperature but the consistency of handling across repeated access. How much mixing is too much comes down to restraint, not force, because the goal is to dissolve, not to whip air into the solution.
Partial-use vials need labels and logs, not assumptions. If the vial has been punctured multiple times, the record of remaining volume and the timing of each withdrawal becomes part of reproducibility. Repeated withdrawals from a bacteriostatic water vial do change the operational risk profile, which is why the 28-day window keeps showing up in research-facing guidance.
Don't trust the first good draw and forget the vial. The later withdrawals are where sloppy records and contamination habits usually show up.
Your Bench-Side Reconstitution Checklist
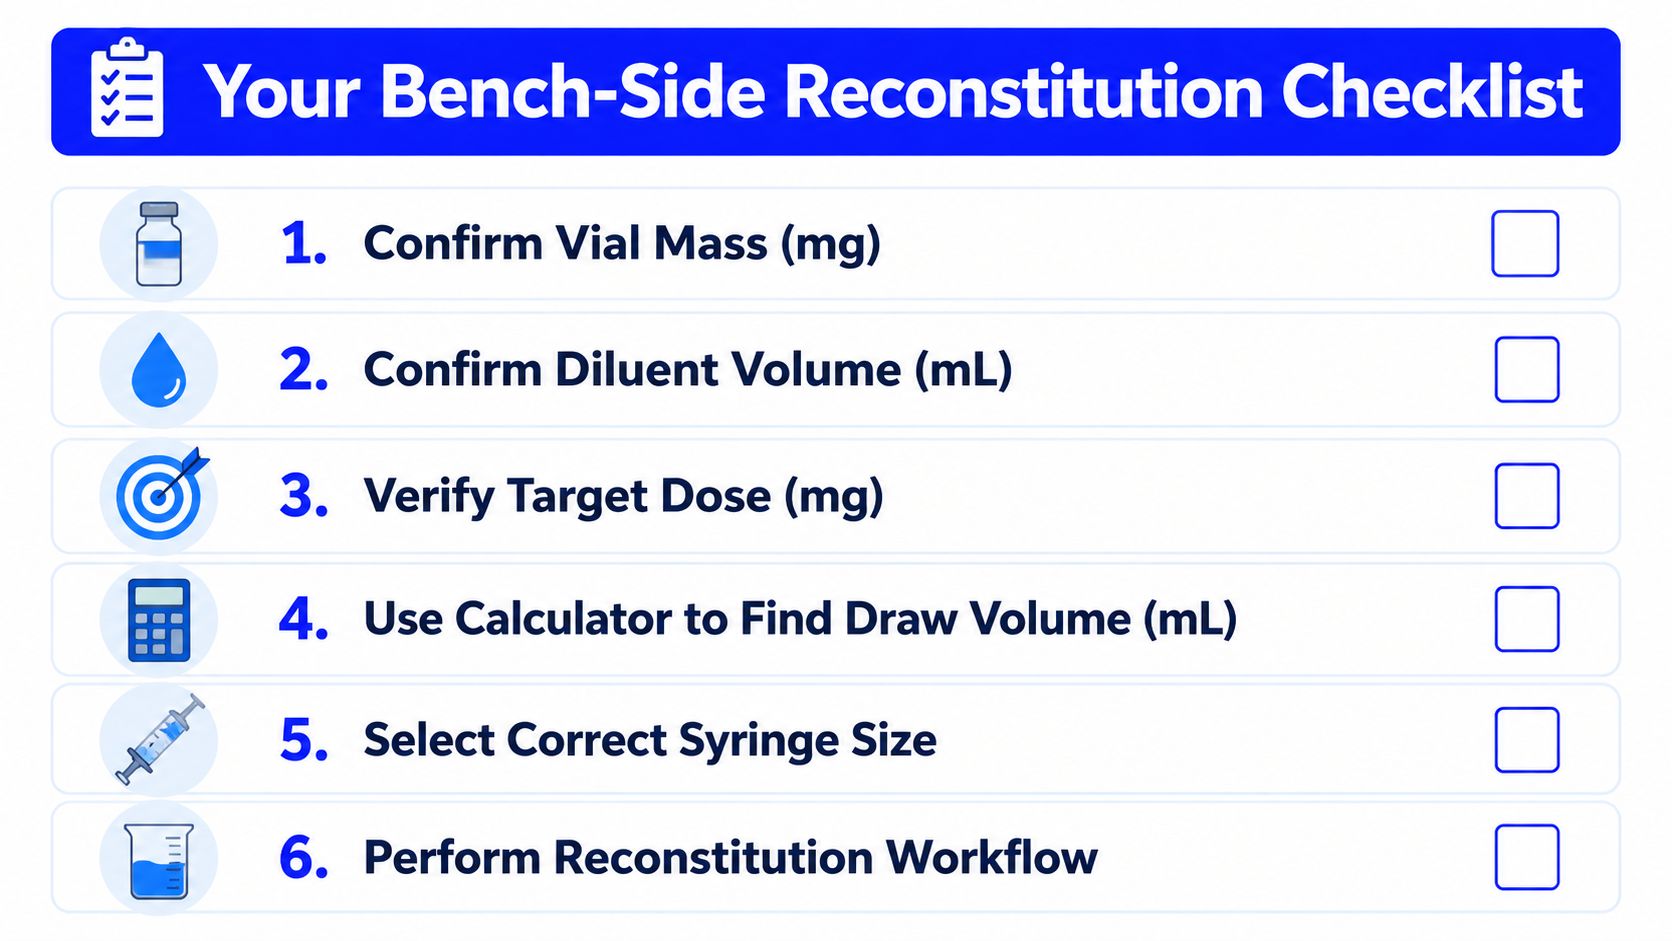
- Confirm the vial mass: Read the label in mg before opening anything.
- Confirm the diluent volume: Decide the mL before drawing the solvent.
- Verify the target dose: Keep the planned dose in mg or mcg, not both loosely at once.
- Use the calculator for draw volume: Convert the concentration into mL, then into U-100 units.
- Select the correct syringe size: Pick the smallest syringe that still makes the draw easy to read.
- Perform the workflow cleanly: Room temperature, stopper disinfection, slow diluent addition, gentle swirling, and immediate labeling.
For diluent choice, the simplest decision aid is direct. Single-use or short-window work can use sterile water when the protocol calls for it. Anything accessed more than once should move to bacteriostatic water with benzyl alcohol so the working solution has a realistic multi-dose path.
The value of a peptide calculator reconstitution tool is that it gives the number, but the lab still has to protect that number with correct diluent selection, clean handling, and a legible label. When those parts stay aligned, the concentration on the screen is the concentration that shows up in the syringe.
Herbilabs supplies sterile bacteriostatic water and related labware for research-only reconstitution workflows, with vial formats that fit different bench schedules and multi-dose use patterns. If you're standardizing peptide preparation, visit Herbilabs to review the product options, documentation, and supply format that match your lab's reconstitution routine.