Private Label, White Label, Wholesale partnerships available - EU, USA and UK - Free shipping from €75

Sterile Empty Vials 10ml: A Practical Lab Guide
A researcher pulls a foil-pouched vial from cold storage, checks the label, and has one practical question before the next step. Is this sterile empty vial 10 mL format the right container for a lyophilized peptide that still needs diluent, mixing headspace, and a clean closure system that won't complicate the assay later?
The short answer is that a 10 mL sterile empty vial is not a finished drug product, it's a ready-to-fill container built for controlled laboratory use. In packaging terms, that matters because the vial's geometry, glass type, closure, and sterilization status all shape what can happen after it leaves the box, not just how it looks on the shelf. The key question is whether the vial fits the workflow, the handling method, and the risk tolerance of the lab.
Table of Contents
- What a 10 mL Sterile Empty Vial Actually Is
- Understanding 10 mL Vial Dimensions and Glass Type
- Closures, Sterilization Methods, and Material Choices
- RUO Use Cases for Reconstitution and Storage
- QA Checks, Documentation, and USP Standards
- In-Use Handling and Contamination Risk After First Puncture
- Sourcing Checklist for Labs and Procurement Teams
What a 10 mL Sterile Empty Vial Actually Is
A 10 mL sterile empty vial is a clean, pretreated container that arrives ready for filling, not a finished pharmaceutical dose. In RUO work, that distinction matters because the vial is only one part of the system, and the user's aseptic technique, closure choice, and storage habits decide what happens after first access.
Why the format became standardized
The 10 mL class is a packaging standard, not an arbitrary bottle size. ISO 8362-based 10R tubular vials are commonly specified around 45.0 mm body height, 24.0 mm body diameter, and 11.5 mL to the centre of constriction, while catalog guides also show a 10 mL class vial around 62.0 mm total height and 17.75 mm diameter depending on the design and finish, according to the SGD Pharma pharmaceutical glass packaging catalogue. That standardization matters because the geometry affects capping, nesting, filling-line compatibility, and automation.
For lab users, the practical meaning is simple. A standardized 10 mL vial is easier to place into a routine than a custom container, especially when a workflow needs repeatability across batches, benches, and operators.
Sterile, depyrogenated, and empty are not the same thing
“Sterile” means the vial has been processed to be free of viable organisms at release. “Depyrogenated” means it has also been treated to reduce endotoxin risk. “Empty” means exactly that, the container is clean and unloaded, so the contents, if any, are added later under the lab's own controls.
Practical rule: the vial's release status does not protect the contents forever. Once a septum is punctured, downstream handling becomes the main sterility control.
That's why the right mindset is not “Is the vial sterile?” but “Is the vial compatible with the way the lab plans to open, fill, and use it?”
Understanding 10 mL Vial Dimensions and Glass Type
A sterile 10 mL vial is a packaging choice, not just a container size. The useful questions are whether the fill volume leaves enough headspace, whether the glass will hold up to the reagent, and whether the closure can stay consistent after handling and first puncture.
Brimful volume and working space
Brimful volume tells you how much liquid the vial can physically hold before it reaches the top. In sterile 10 mL formats, that extra space matters because the sample may move during transport, temperature change, or mixing. If the vial is filled too close to the closure, liquid can touch the stopper or seal and raise leakage or particulate risk.
That is why buyers should compare the stated capacity with the actual brimful volume, not just the printed size on the box. For teams doing RUO work, the practical check is whether the vial gives enough room for reconstitution, transfer, and short-term storage without crowding the closure.
Why Type I borosilicate is used
Most 10 mL sterile empty vials for lab use are specified in Type I borosilicate glass because it offers high hydrolytic resistance and chemical inertness. That matters when the reagent is sensitive, the storage condition is cold, or the liquid needs to remain in contact with the container for more than a brief bench transfer.
Glass choice is part of the workflow, not an afterthought. If a lab is comparing glass options for RUO use, the key point is how the container behaves with the actual sample, not how the vial looks on a catalog page. For a practical buying guide, see selecting 10ml vials for RUO.
Closure compatibility follows from the finish
The vial finish determines which closure family will fit without improvisation. A 20 mm crown or neck finish is standard for many 10 mL sterile vials, so the stopper or cap must match that finish exactly. When the finish, closure, and fill method line up, the vial is easier to seal, reopen, and inspect without stressing the glass.
Closure compatibility also affects how the vial behaves after the first puncture. A septum that fits the finish well and seals cleanly gives the lab more control over in-use contamination risk. If the closure is loose, mismatched, or hard to seat consistently, the problem often shows up later during storage, not at the bench.
What to verify before purchase
A buyer reviewing 10 mL vials should confirm three points on the spec sheet. First, the brimful volume leaves usable headspace. Second, the glass is Type I borosilicate. Third, the finish supports the closure family the lab already uses.
Those checks sound simple, but they prevent the common mismatch where the vial is nominally right and operationally wrong.
Closures, Sterilization Methods, and Material Choices
The closure decides how the vial behaves after filling, not just how it ships. For a 10 mL RUO vial, the two common approaches are 20 mm crimp-top aluminum seals with elastomeric stoppers and 20 mm screw-thread finishes with PTFE-lined caps.
Crimp top versus screw thread
Crimp-top systems are the better fit when the vial will sit in cold storage, travel between benches, or need a tighter-seeming closure under routine handling. The stopper and aluminum seal create a compact system, and that helps when the user wants less movement between the cap and the glass.
Screw-thread systems trade some of that permanence for convenience. They're easier to reopen without tools, which can help in repeated-access workflows, but that same convenience can encourage casual handling that doesn't belong in a sterility-sensitive process.
A closure that's easy to open is also easy to misuse.
Glass versus plastic
Glass remains the default when the reagent is chemically sensitive or the workflow is built around visual inspection. Plastic options like COC and COP are useful when shatter risk, weight, or leachables are bigger concerns during frozen storage, but they change the compatibility conversation. In a lab, the right choice depends on whether the sample is fragile, the transport route is rough, or the team wants a lighter container.
Sterilization routes and what they imply
Sterile packaging can be produced in more than one way. Dry-heat depyrogenation is used for glass systems, steam autoclaving works for materials that tolerate it, and gamma irradiation is common in presterilized plastic systems. The label should make the route clear, because “sterile” alone doesn't tell the buyer how the container was treated or what residual-risk profile it carries.
Here's a compact decision table for RUO planning, including one practical option that aligns with regulatory QA for medicine vials when documentation matters.
| Option | Best For | Trade-off |
|---|---|---|
| Crimp-top glass | Long-term cold storage, aseptic fills | Needs matching crimp tooling |
| Screw-thread glass | Repeated access, simpler bench handling | Easier to disturb closure integrity |
| COC or COP plastic | Shatter concern, weight-sensitive storage | Different leachables profile than glass |
| Gamma-sterilized plastic | Presterilized disposable workflows | Less suitable when glass-like chemistry is preferred |
The choice isn't about status. It's about whether the vial has the mechanical and chemical behavior the workflow needs.
RUO Use Cases for Reconstitution and Storage
A 10 mL sterile vial earns its place when the workflow needs a controlled middle-ground container. It holds a reconstitution batch without forcing the material to sit through repeated transfers in a larger, more exposed vessel.
Where the format fits best
One common use is reconstituting lyophilized peptides, then dividing the solution into aliquots for downstream assays. The 10 mL format leaves enough headspace for gentle mixing, while still keeping the batch small enough to split into smaller vials afterward. For a practical companion workflow, Herbilabs offers a reconstitution solution format that fits this kind of RUO handling.
It also fits the short-horizon preparation of small-molecule probes or working solutions made from frozen intermediates. In those cases, the vial is the mixing and holding vessel for the step at hand, not the final home for every sample.
For peptide users who want stepwise handling guidance, Peptoro's reconstitution solution steps can serve as a procedural reference, especially when a lab is turning a lyophilized material into a usable working solution.
Storage choices depend on the material, not the vial
A vial can sit at room temperature, 2–8°C, -20°C, or -80°C depending on what is inside and how stable it is. The glass does not decide that. The reagent does, along with the closure and the lab's handling pattern.
A useful way to compare storage is by the risk created after the first puncture. Once a vial has been opened, every return to the bench adds another chance for contamination, evaporation, or temperature drift. That is why a 10 mL sterile vial is often chosen as a deliberate in-use package, not just a container with extra space.
| Use Case | Typical Diluent Volume | Storage Temperature | Expected Hold Time |
|---|---|---|---|
| Lyophilized peptide reconstitution | Enough to fully dissolve the cake, then adjust as needed | 2–8°C or frozen, depending on stability | Short-horizon use |
| Antibody aliquoting | Enough for the day's working batch | 2–8°C or frozen | Limited by freeze-thaw plan |
| Small-molecule working solution | Volume set by assay concentration | Room temperature, 2–8°C, or frozen | Assay-dependent |
| Temperature-sensitive intermediate | Minimal practical fill with headspace | 2–8°C, -20°C, or -80°C | Workflow-dependent |
The 10 mL vial is often the right call when the lab wants one batch that stays visible, manageable, and easy to divide into smaller working containers without turning the process into repeated handling.
QA Checks, Documentation, and USP Standards
A sterile vial only helps if the receiving team knows what to look for. The first inspection should treat the vial as a controlled component, not just a piece of glass in a pouch.
What to verify on the paperwork
The most useful documents are the Certificate of Analysis and the lot record. For a research-grade vial, the buyer should confirm sterility testing aligned to USP <71>, endotoxin testing aligned to USP <85>, and dimensional conformance to ANSI/ISO 8362-1. Where the supplier states depyrogenation, the method should be specific, not vague, and the lot paperwork should make traceability clear.
What to inspect on receipt
Before any vial enters the workflow, the receiving team should check for visible cracks, chips, delamination, internal particulate, damaged seals, and compromised packaging. That matters because a vial can look acceptable in a listing photo and still arrive with a problem that affects handling at the bench.
- Glass integrity: look for chips, cracks, or obvious stress marks.
- Closure condition: confirm the cap or crimp hasn't shifted.
- Internal cleanliness: inspect against light for particulate or haze.
- Packaging condition: reject torn, crushed, or wet outer packs.
- Document match: confirm the lot number on the box matches the CoA.
Receiving rule: if the label and the paperwork don't match, the vial isn't ready for use.
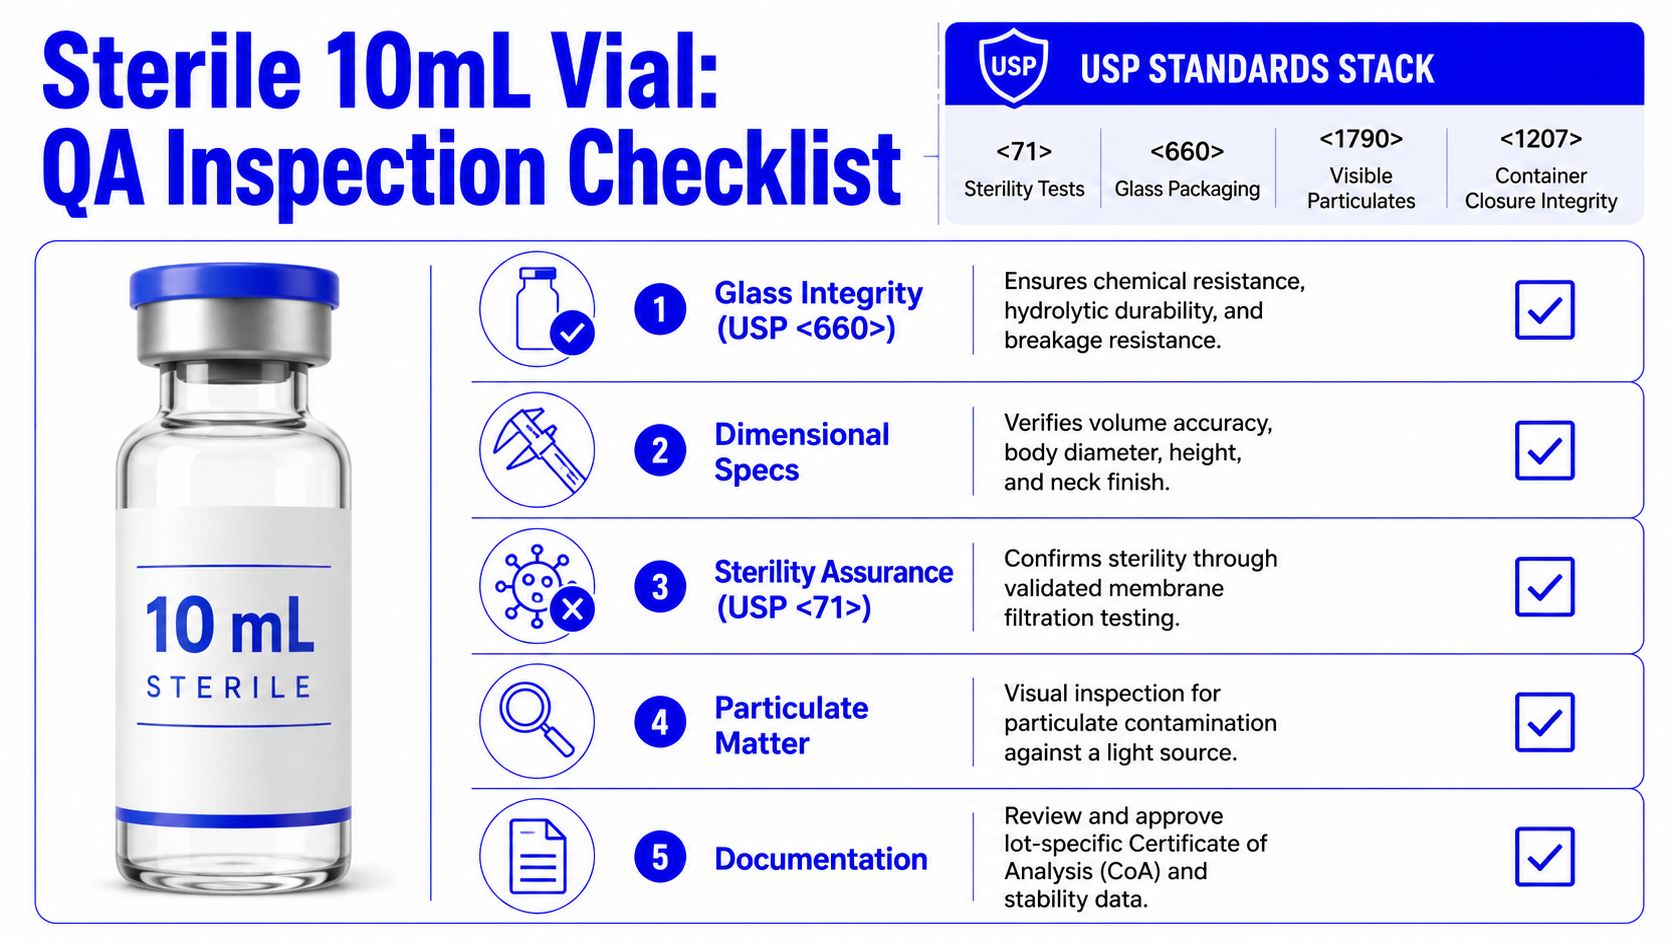
A good supplier should be able to show what was tested, how the vial was sterilized, and how the lot ties back to the release record. That documentation is what turns “sterile” from a marketing word into a usable procurement decision.
In-Use Handling and Contamination Risk After First Puncture
The biggest mistake is assuming the vial stays sterile just because the original packaging was sterile. Once a needle goes through the septum, the sterile barrier is no longer intact in the same way.
What changes at first puncture
The first insertion can core septum material, bring in environmental microbes, and open a path for contamination if the workflow is sloppy. Even if the contents remain chemically usable, microbiological safety is now controlled by the person handling the vial, the bench environment, and the number of access events.
The practical difference between contents and container matters here. A solution may still be chemically stable while the vial is no longer microbiologically safe for arbitrary reuse. That's why multi-dose handling needs labeling discipline, not assumptions.
How to reduce the risk without overcomplicating the bench
The workflow doesn't need a cleanroom, but it does need habits. A laminar flow hood helps, alcohol swabbing of the septum helps, and single-use needles and syringes reduce back-contamination. The vial should also be dated on opening, initialed by the user, and given a clear beyond-use date.
A 28-day in-use window is often used as a working control in multi-dose handling, but that's not the same thing as a guarantee for every formulation or every lab environment. If the process needs frequent withdrawals, the primary limit is usually the closure, not the glass.
When the format stops being the right choice
If a workflow expects more than about 10 to 15 withdrawals, the safer decision is usually a different container strategy. The lab may need smaller aliquots, a different closure, or a format that reduces repeated puncture risk.
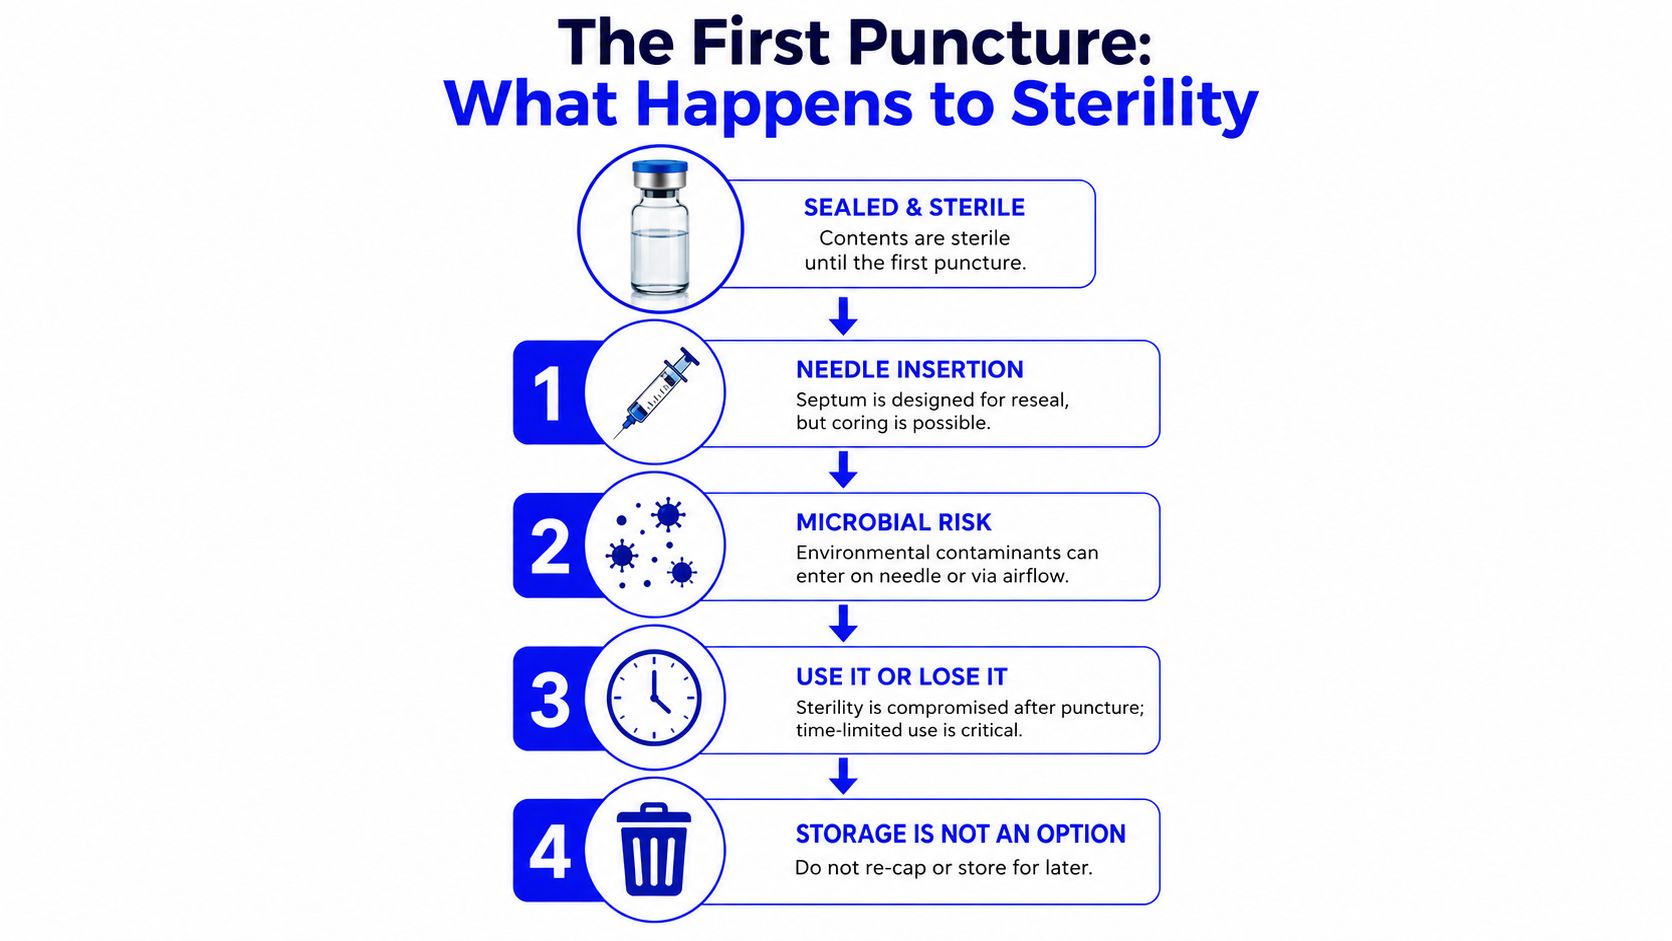
The honest trade-off is simple. A sterile vial is reliable at release, but repeated access turns it into a handling problem, not just a packaging problem.
Sourcing Checklist for Labs and Procurement Teams
Procurement gets easier when the supplier questions are specific. A good reseller can answer them without turning the conversation into a brochure.
What to ask before buying
The first request should be a lot-specific Certificate of Analysis with sterility results, endotoxin testing, and particulate information. The second should be the sterilization route, because “sterile” without process detail doesn't tell the buyer enough about how the vial was produced. If the supplier says depyrogenated, ask for the actual method and validation summary.
Then check the geometry and the material. The drawing should show conformance to ISO 8362-1 and the glass should be identified as Type I with hydrolytic-class support. Packaging format matters too, especially if the lab needs trays, tubs, Tyvek, film, or double-bagged presentation for controlled receiving.
Supplier questions that cut through the noise
- Request the CoA: confirm lot-level sterility, endotoxin, and dimensional records.
- Ask for the sterilization method: gamma, dry heat, or another validated route.
- Confirm the material class: Type I borosilicate, not just “glass.”
- Review the packaging configuration: make sure it fits the receiving process.
- Check traceability: lot numbers, shelf-life format, and change-control policy should all be clear.
The supplier should also be willing to discuss audit documentation, quality procedures, and how lot changes are handled. That's the difference between buying a vial and buying a controlled component.
A simple procurement filter
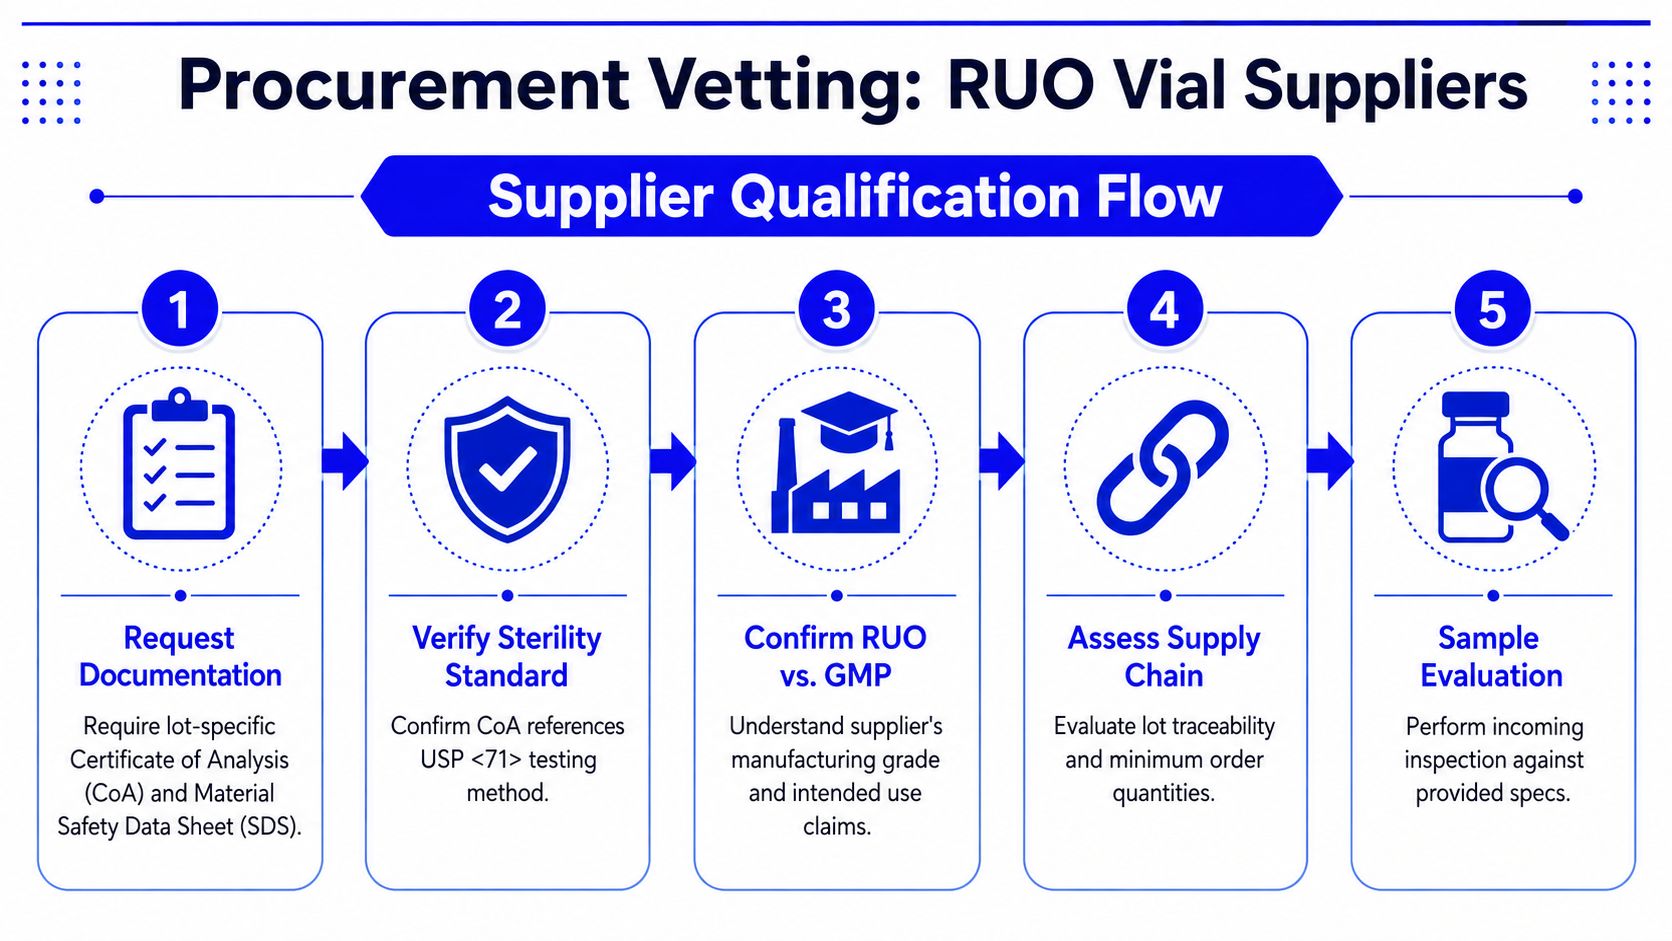
If the answer to any of those questions is vague, the safer move is to pause the order. A vial that looks identical on a product page can behave very differently once it reaches the bench.
For labs that want sterile, documented RUO vialware and related diluent formats, Herbilabs supplies packaging and reconstitution products designed for research workflows. Visit Herbilabs to review the available vial formats, documentation style, and order options that fit your bench process.