Private Label, White Label, Wholesale partnerships available - EU, USA and UK - Free shipping from €75

Lyophilized Powder Reconstitution: A Practical Lab Guide
The vial has been on the bench for a few minutes. The seal comes off a 10 mg lyophilized peptide, the cake looks intact, and the calculated diluent volume goes in cleanly. Ten minutes later, the solution is still cloudy. The junior researcher is tempted to shake harder, add more liquid, or warm the vial. Each shortcut can create a larger problem than slow dissolution.
Lyophilized powder reconstitution means adding a measured aqueous diluent to a freeze-dried product, allowing the solid matrix to dissolve fully, and producing a usable stock at a known concentration. The procedure sounds simple, but the molecule, cake structure, solvent, temperature, mixing method, and storage plan all influence the result.
Table of Contents
- What Lyophilized Powder Reconstitution Actually Means at the Bench
- Choosing the Right Diluent for Your Molecule
- Calculating Volume and Working Concentration
- Aseptic Technique and Mixing Without Damaging the Sample
- Why Some Powders Dissolve Slowly and How to Speed Them Up
- Storage, Stability, and the Multi-Use Window
- Troubleshooting and a Quick-Reference Checklist
What Lyophilized Powder Reconstitution Actually Means at the Bench
Lyophilization removes water from a formulation and leaves the material as a porous cake, pellet, disc, or loose crystalline mass. That dry structure isn't just packaging. It determines how quickly the diluent enters the material, how easily the matrix breaks apart, and whether the final solution becomes clear without excessive agitation.
The method has a long pharmaceutical history. Freeze-drying biological tissue was described in Richard Altmann's 1890 work, while lyophilization as a drug-preservation method dates to the mid-1930s and became widely used in pharmaceutical and food-processing industries by the 1950s and 1960s, as described in this historical account of reconstitution. Modern vial workflows were built around restoring water to a dried product after storage.
The physical form changes the handling
A fluffy white peptide disc usually wets readily, but it can also lift, float, or cling to the vial wall if the diluent enters too quickly. A glassy pellet from a monoclonal antibody fragment may need slower wetting and gentler mixing because the material can be sensitive to interfaces and mechanical stress. Loose crystals from a small-molecule active pharmaceutical ingredient may tolerate a different dissolution sequence, provided the solvent and pH suit the compound.
The word reconstitution covers all three situations, but it doesn't mean that one universal protocol works for every product. The certificate of analysis, manufacturer instructions, formulation notes, and intended assay should control the choice of diluent and handling conditions.
Practical rule: A clear solution isn't proof that the preparation was correct. The final concentration, solvent compatibility, sterility record, and storage history matter just as much.
A reliable workflow therefore has four parts: select a compatible diluent, calculate the volume from the target concentration, introduce it aseptically without damaging the sample, and establish a storage plan before opening the vial. The most overlooked part is often the last one. Successful dissolution is only the beginning, because a stable-looking solution can still lose activity, aggregate, adsorb to surfaces, or become contaminated during repeated access.
Choosing the Right Diluent for Your Molecule
At the bench, the wrong diluent can turn a workable reconstitution into a failed assay. Choose it by matching the molecule, the intended time in use, and the number of vial entries. A single-use preparation has different requirements from a peptide stock opened repeatedly.
Sterile water for injection suits low-volume, single-use work when preservatives or buffer components could interfere with the assay. Bacteriostatic water contains benzyl alcohol and can support repeated withdrawals in research workflows, but that preservative may affect sensitive membrane-protein preparations. Phosphate or Tris buffer provides pH control for proteins that require a defined chemical environment. Albumin or glycerol can reduce surface adsorption, although either additive may change downstream measurements.
A dedicated reconstitution solution can be appropriate when the product documentation confirms compatibility with the molecule and intended use. Treat it as a formulation choice, not a shortcut. Check the assay, storage plan, and laboratory SOP before adding it.
| Diluent | Best For | In-Use Window | Caveats |
|---|---|---|---|
| Sterile water for injection | Single-use preparations and assays sensitive to additives | Use according to the product and laboratory protocol | No preservative, so repeated access increases contamination concerns |
| Bacteriostatic water | Multi-dose research workflows requiring repeated withdrawals | Often used for roughly four to six weeks at 2–8°C, with the exact window governed by the product instructions and documented aseptic handling | Benzyl alcohol can perturb some membrane-protein preparations |
| Phosphate or Tris buffer | Proteins requiring pH stability | Depends on molecule, formulation, and storage validation | Ionic strength and buffer components can alter solubility or assay results |
| Albumin- or glycerol-containing diluent | Materials prone to surface adsorption | Depends on the formulation | May interfere with downstream assays or quantification |
| DMSO-containing system | Poorly water-soluble compounds | Depends on final formulation and assay | Use as the primary diluent only when necessary. Dilute a DMSO stock into aqueous buffer only after validation |
Reconstitution time is partly a product-design variable. A formulation that wets quickly may reduce handling time, while one that requires prolonged contact with a solvent can increase exposure to room temperature, surfaces, and repeated manipulation. That trade-off matters because post-reconstitution degradation is often the larger hidden risk. A clear solution can still lose activity, aggregate, adsorb to the vial or pipette, or become contaminated during access.
Match solvent choice to the molecule's chemistry, not to a generic peptide recipe. Cloudiness may signal incompatible pH or ionic strength rather than insufficient swirling. If manufacturer instructions conflict with an assay method, resolve the discrepancy using compatibility data and the validated method before preparing the stock.
Calculating Volume and Working Concentration
Concentration errors usually begin subtly. A researcher may calculate the right mass but mix milligrams, micrograms, and milliliters in the same line, then carry the mistake into every dilution and plate map.
The core relationship is:
Concentration = mass ÷ volume
Rearrange it when calculating the diluent volume:
Volume = mass ÷ target concentration
A worked peptide calculation
For a vial containing 10 mg of peptide and a target stock concentration of 1 mg/mL, the required volume is:
10 mg ÷ 1 mg/mL = 10 mL
That calculation assumes the stated mass is the actual recoverable mass and that the vial can accommodate the selected volume. In practice, the laboratory should confirm the supplier's fill information, vial capacity, and assay requirements before adding the full calculated amount.
A lower assay concentration changes the volume dramatically. A target of 100 micrograms/mL equals 0.1 mg/mL. Therefore:
10 mg ÷ 0.1 mg/mL = 100 mL
That volume is generally impractical for a small vial. A better workflow is to prepare a concentrated stock, then make a measured secondary dilution. If the full material were ultimately distributed at that target concentration, the arithmetic would correspond to ten 1 mL aliquots, but the actual aliquot plan should follow the experiment's needs and validated dead-volume allowances.
Units are part of the protocol. Write the mass and concentration in the same unit family before dividing. Convert milligrams to micrograms or nanomoles only after the stock calculation is clear.
Record what the vial actually contains
The labeled amount is the starting reference, not a substitute for the supplier's batch documentation. Some suppliers provide overfill to account for transfer and handling loss, so the laboratory should use the certificate of analysis and approved documentation rather than assume that every vial contains exactly the nominal label amount.
After reconstitution, record the diluent, added volume, date, operator, and calculated concentration. If the actual recovered mass or final volume is known, back-calculate:
Actual concentration = actual mass ÷ actual reconstituted volume
Label the vial with the concentration and date, then record the molecular weight when nanomolar units are required. A conversion from mass concentration to molar concentration needs the peptide's molecular weight, and that value should come from the product documentation rather than memory.
Aseptic Technique and Mixing Without Damaging the Sample
Aseptic handling depends on a sequence of small decisions. Prepare a dedicated workspace, remove unnecessary materials, use clean single-use syringes where possible, and inspect the vial's crimp, cap, and septum before puncture. A compromised seal is a reason to quarantine the vial and follow the laboratory's deviation procedure, not a reason to improvise.
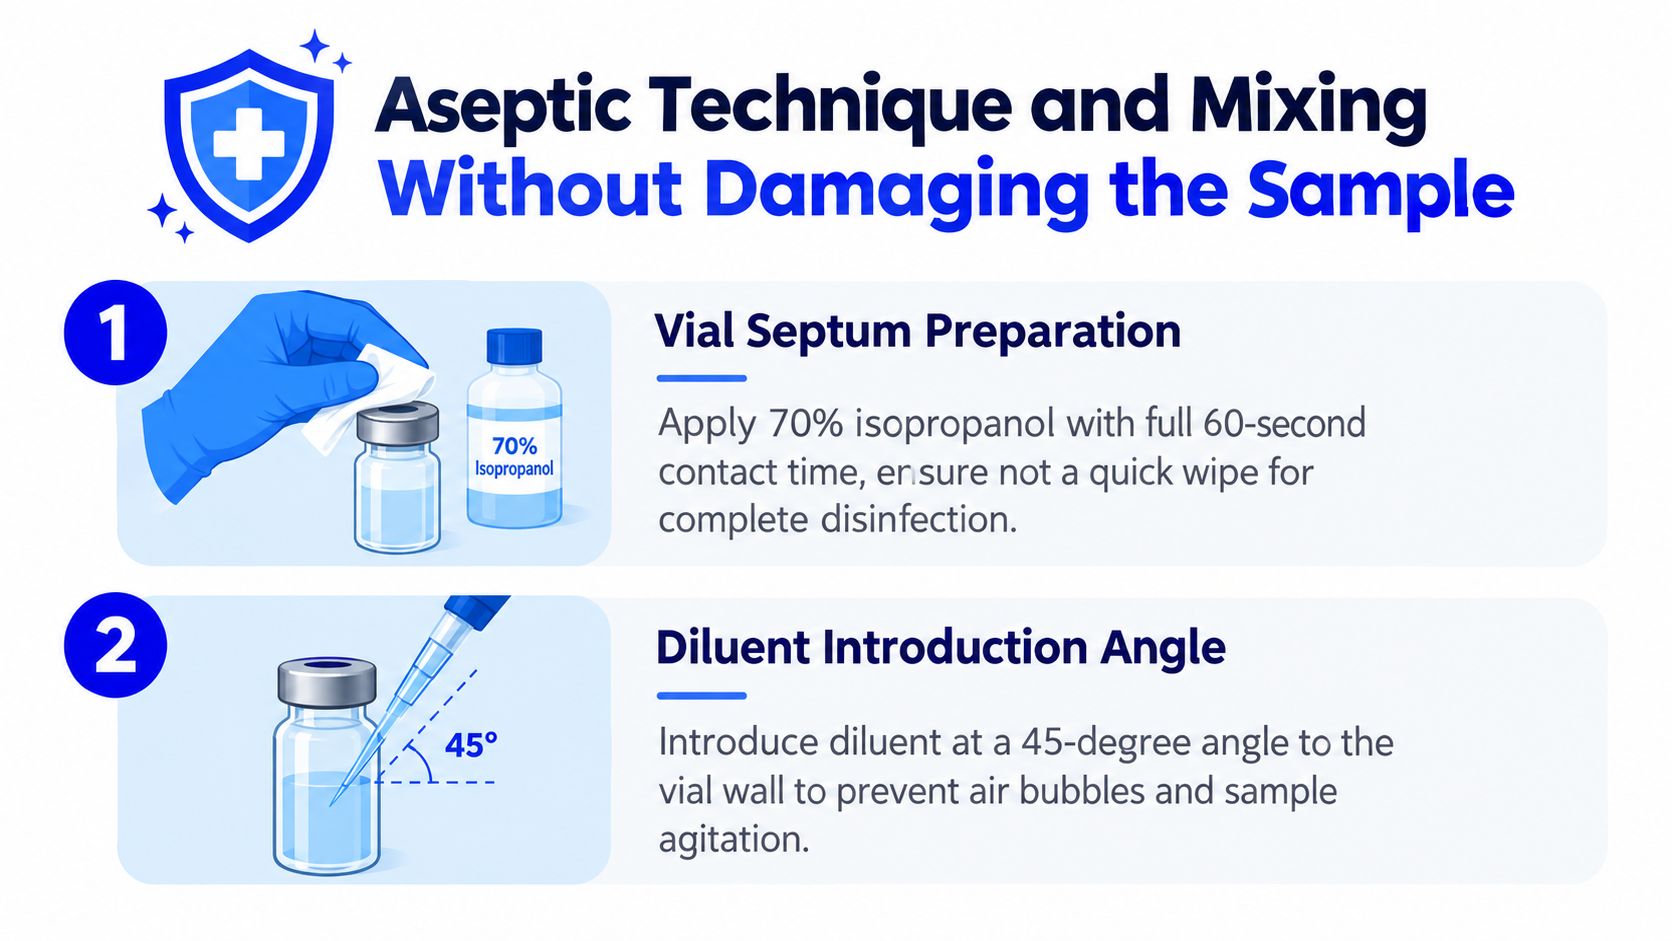
Wipe the septum with 70% isopropanol and allow a full 60-second contact time before puncturing, as specified in the laboratory's validated procedure. A fast swipe followed by immediate needle entry doesn't provide the same disinfection step. The diluent container should receive the same controlled treatment.
Introduce liquid along the wall
Use a fine needle appropriate for the vial and formulation, commonly 27–29G for standard small research vials. A wider bore may be useful when a compact cake creates excessive resistance, but the operator should avoid unnecessary punctures.
Angle the needle toward the inside glass wall. Add the diluent slowly so it runs down the wall instead of striking the cake directly. Direct jetting can create foam, disrupt the dried matrix, and produce partially wetted pockets that dissolve unevenly.
The bacteriostatic water selection must still follow the molecule's compatibility requirements and the intended access pattern. Preservative-containing diluent can be useful for repeated research withdrawals, but it isn't automatically suitable for every protein or assay.
Mix with gentle swirling along a single axis. Don't vortex, invert, tap the vial base, or shake unless a product-specific method explicitly permits that action. Vigorous movement can damage shear-sensitive biomolecules and introduce bubbles that make visual inspection harder.
A short handling demonstration can help junior researchers recognize the difference between controlled swirling and aggressive mixing.
The endpoint isn't a timer. The solution should be inspected for visible particles, haze, foam, and undissolved material, with the product specification defining whether a slight color change is acceptable.
Why Some Powders Dissolve Slowly and How to Speed Them Up
Slow dissolution is often a cake-structure or solvent problem before it is an operator problem. Lyophilization conditions influence porosity, wetting, and the path water takes through the dried matrix. Formulation and container conditions also matter. A 2025 review identifies reconstitution time as a critical quality attribute alongside stability, cake appearance, and visible or subvisible particulates (review overview).
The visual symptom gives an early clue. Powder that beads up or floats may have poor wetting or hydrophobic surface behavior. A preparation that clouds but doesn't clear can reflect an unsuitable pH or ionic strength, especially when the solvent places the peptide near a low-solubility region.
Use an escalation ladder
Start with the least disruptive intervention:
- Pause and observe. Many small peptide preparations clear after a short period of gentle swirling. The operator shouldn't add more solvent just because the first visual check is disappointing.
- Swirl or roll slowly. Gentle movement along the vial wall helps the diluent contact the cake without creating foam.
- Allow ambient equilibration. A controlled room-temperature hold may help, but the vial shouldn't be heated or placed on a hot surface.
- Re-dispense carefully. If the manufacturer's method allows it, gentle aspiration and re-dispensing against the wall can expose remaining material to the diluent.
- Escalate to technical review. Persistent haze, particles, or gel-like material should trigger a check of the diluent, pH, lot documentation, and product instructions.
Process studies show that reconstitution speed can change materially with upstream cake design and downstream handling. One peer-reviewed study reported a 38% reduction in reconstitution time when annealing at −3°C was used, while another reported a reduction of more than 60% when headspace pressure was below 10 Torr compared with 250 Torr (peer-reviewed reconstitution study). A separate optimization study found that a 37°C dilution solution plus high-frequency swirling reduced reconstitution time by 56%, but warmer diluent should never be applied to a sensitive protein without product-specific permission (applied optimization study).
Slow dissolution isn't automatically evidence of poor technique. If the same method behaves differently across lots or vendors, the cake and formulation deserve investigation.
Sonication is inappropriate unless the manufacturer's protocol explicitly allows it. Heating is also risky for proteins and peptides because faster dissolution doesn't compensate for possible loss of structure or activity. The preferred sequence remains controlled addition, gentle swirling, and confirmation that the solution is clear of visible particles.
Storage, Stability, and the Multi-Use Window
The larger risk often appears after dissolution. Once reconstituted, the vial becomes an aqueous preparation exposed to punctures, adsorption, oxidation, aggregation, and freeze-thaw stress. A clear solution can still lose biological performance, so reconstitution time is only one part of product design. The formulation, container, intended number of withdrawals, and discard window should be planned together.
For intermittent research, single-use aliquots stored frozen at a validated temperature are usually easier to control than one vial opened repeatedly. The suitable range may be −20°C to −80°C, depending on the molecule and supplier instructions. Label each aliquot clearly and store it toward the back of the freezer, not in the door, where temperature changes and handling are greater.
Match aliquots to actual experiments
Calculate the amount required for one experiment, then include a small allowance for pipette and vial dead volume. Large aliquots may simplify labeling, but they create more waste when a small experiment requires thawing the entire portion. Smaller aliquots cost more containers and handling time, yet reduce unnecessary exposure.
Never refreeze a thawed aliquot. Repeated freeze-thaw cycling can reduce activity by 5–15% per cycle, according to protein handling recommendations. Aliquot immediately after dissolution so the bulk material experiences as few temperature changes as possible.
| Storage Condition | Typical Stability | Best Use Case |
|---|---|---|
| Frozen aliquots at a validated low temperature | Generally preferred for longer-term research storage, subject to molecule-specific data | Experiments performed intermittently |
| Refrigerated multi-use vial | Often used for roughly four to six weeks at 2–8°C with bacteriostatic water, documented asepsis, and product-specific approval | Frequent withdrawals during a defined research campaign |
| Room-temperature reconstituted solution | Not a default storage condition | Short handling periods only when the product protocol permits it |
Bacteriostatic water can support a multi-dose workflow, but its preservative does not confirm peptide stability. Record the opening date, every access event, storage temperature, planned discard date, and any unexplained temperature excursion. If the product instructions do not approve a multi-use window, use single-use aliquots instead.
Troubleshooting and a Quick-Reference Checklist
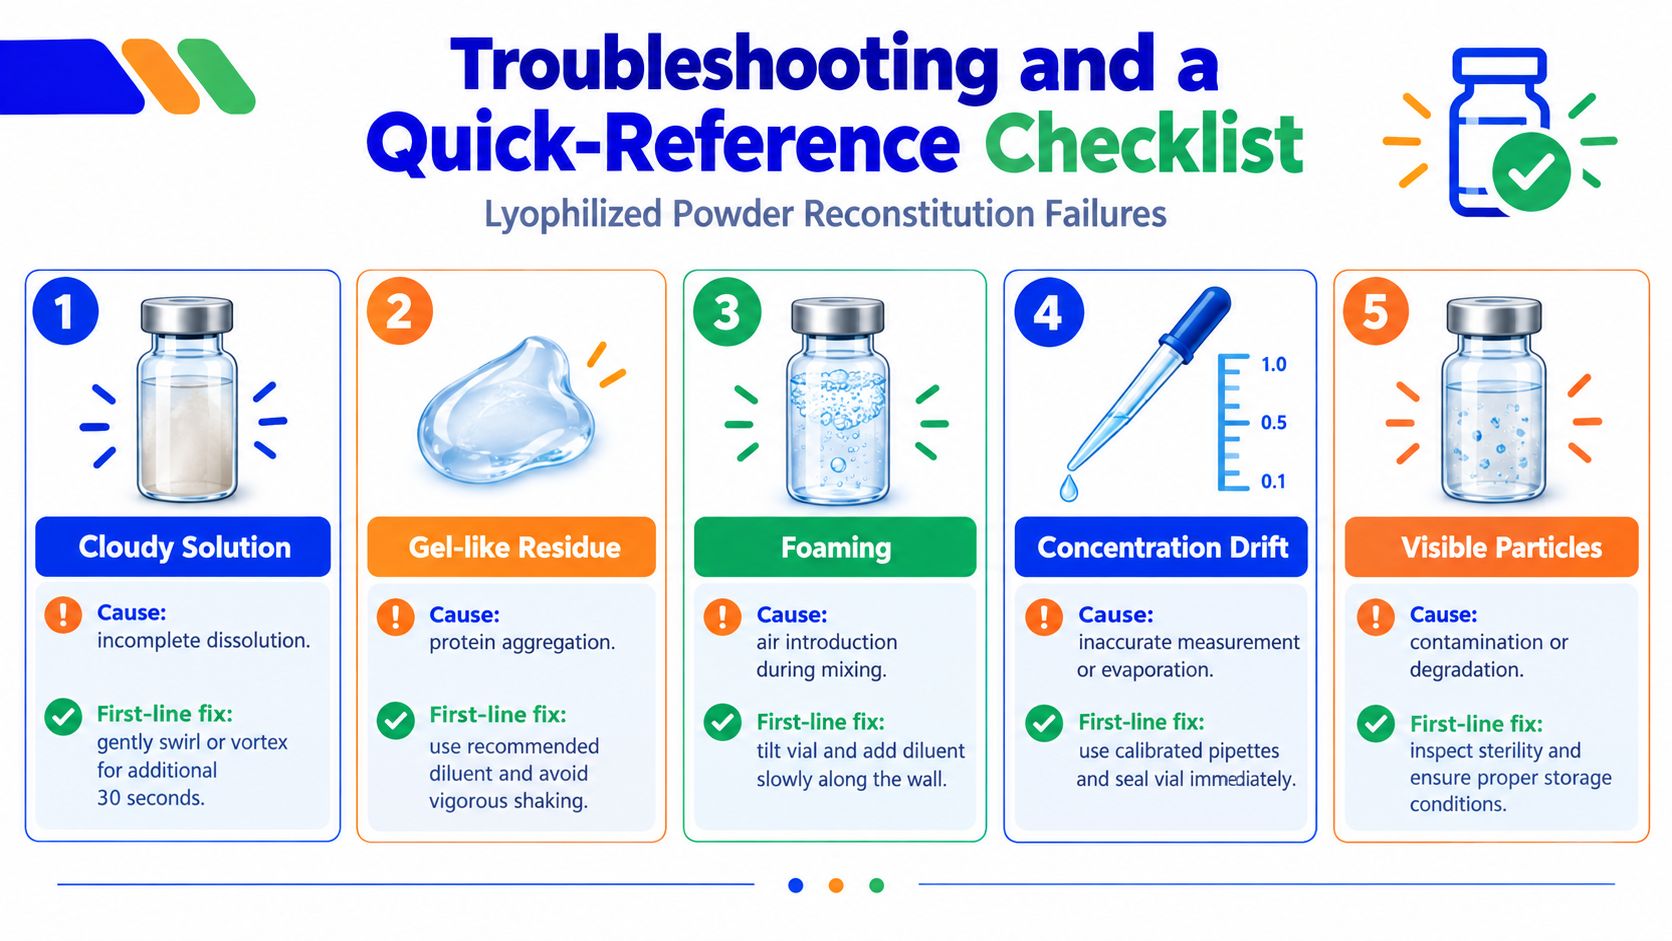
A troubleshooting decision should begin with the symptom and work backward to the earliest variable that could have caused it. Cloudiness after gentle mixing points first toward incomplete dissolution or diluent mismatch. Foam points toward air introduction, while visible particles require a sterility and degradation review rather than more agitation.
Read the failure before changing the protocol
- Cloudy solution: Check whether the selected diluent matches the molecule and whether the sample has had time to dissolve. Gentle swirling is preferable to escalating immediately to harsh mixing.
- Gel-like residue: Suspect aggregation, precipitation, or an unsuitable pH. Stop adding mechanical stress and compare the preparation with the manufacturer's buffer recommendation.
- Foaming: Review the needle angle and addition speed. Diluent should run down the vial wall, not enter as a forceful jet.
- Concentration drift: Recheck the volume calculation, pipette calibration, evaporation control, and any dead-volume assumption. Record the actual volume added rather than relying on memory.
- Visible particles: Don't filter or use the preparation automatically. Inspect the vial, storage history, diluent, and aseptic record, then follow the laboratory's material-disposition procedure.
A useful bench checklist turns those decisions into a pre-run gate:
- Vial check: Confirm identity, lot, seal condition, appearance, and storage history.
- Diluent selection: Match solvent, buffer, preservative, pH, and assay requirements.
- Volume calculation: Write mass, target concentration, units, and calculated volume before opening the vial.
- Temperature: Equilibrate the vial and diluent according to the approved protocol.
- Sterile wipe: Disinfect septa and observe the required contact time.
- Reconstitution direction: Add liquid slowly down the inside wall.
- Mixing method: Swirl gently and avoid vortexing, inversion, tapping, or unapproved sonication.
- Completion check: Confirm dissolution and inspect for visible particles.
- Label: Record concentration, diluent, date, operator, and lot.
- Storage: Place the preparation at the validated temperature in a labeled location.
- Expiry tracking: Record the opening date, planned use window, and discard date.
Tape the checklist inside the cabinet door, but treat it as a control point rather than a substitute for product-specific instructions. Reconstitution time can reflect the design of the cake and formulation, while post-reconstitution handling determines whether the dissolved material remains useful.
Herbilabs supplies sterile bacteriostatic water and reconstitution solutions for research workflows involving peptides, proteins, antibodies, and other lyophilized materials, with product documentation intended to support laboratory records. Review the available formats and compatibility requirements at Herbilabs, then select the diluent and vial size that fit the laboratory's actual access and aliquoting pattern.