Private Label, White Label, Wholesale partnerships available - EU, USA and UK - Free shipping from €75

1 Cc Luer Lock Syringe: A Practical Guide for Labs
A researcher pauses at the peptide workstation with a 1 cc syringe in hand. The vial contains a small amount of lyophilized material, the diluent is ready, and the next decision seems simple: draw the required volume and continue. Yet the syringe choice affects much more than volume. The barrel must be readable, the plunger must move predictably, the connection must stay secure during vial inversion, and the sterile workflow must remain intact from the first puncture to the final withdrawal.
That's why a 1 cc luer lock syringe deserves treatment as a workflow decision, not a commodity pulled from a drawer. The format can suit low-volume peptide and research-use-only, or RUO, routines, but only when its capacity, graduations, connector, packaging, and handling method match the task. The following guide focuses on those practical choices while keeping dosing and preparation within the documented requirements of the laboratory's approved procedure.
Table of Contents
- The Bench Moment That Raises the Question
- What a 1 cc Luer Lock Syringe Actually Is
- Sizing, Graduations, and Dosing Accuracy
- Luer Lock vs Luer Slip and Why It Matters
- Using a 1 cc Luer Lock Syringe in Peptide and RUO Workflows
- Aseptic Handling Tips That Protect Every Withdrawal
- A Practical Selection Checklist for Your Bench
The Bench Moment That Raises the Question
The researcher checks the vial label, then looks again at the syringe. A larger barrel would hold the diluent without a second thought, but its markings may be harder to interpret at a low fill volume. A smaller barrel might offer a clearer view, yet it may not hold the complete transfer in one draw. The 1 cc format sits between convenience and control, which makes it useful when the target volume is modest and visual resolution matters.
The first concern is capacity. One cubic centimeter, or 1 cc, equals 1 mL of nominal syringe capacity. That doesn't mean every withdrawal should approach the maximum, nor does it mean a 1 cc barrel automatically delivers perfect accuracy. It means the barrel gives the operator a compact measurement range that can be easier to read than a larger syringe during low-volume work.
Then comes the connection. A needle, vial adapter, or transfer accessory may need to remain attached while the vial is tilted, inverted, or accessed more than once. A slip connection depends mainly on friction. A luer lock adds a threaded collar, so the operator can secure the attachment instead of relying only on push-fit resistance.
Bench rule: If the syringe will be tilted, manipulated, or connected to an accessory during transfer, connection security belongs in the selection decision.
Sterility creates another decision point. An intact sterile package supports the starting condition, but it doesn't protect the workflow after opening. Touching the hub, resting the tip on the bench, using an unsuitable needle, or returning a used syringe to a stock vial can compromise the preparation even when the syringe itself was sterile.
The final question is waste. A syringe that's too large can leave the operator judging a small volume against a broad scale. One that's poorly matched to the task can require extra transfers, extra connections, and extra opportunities for contamination. The practical choice is the unit that holds the required volume clearly, connects securely, and fits the approved aseptic procedure without unnecessary handling.
What a 1 cc Luer Lock Syringe Actually Is
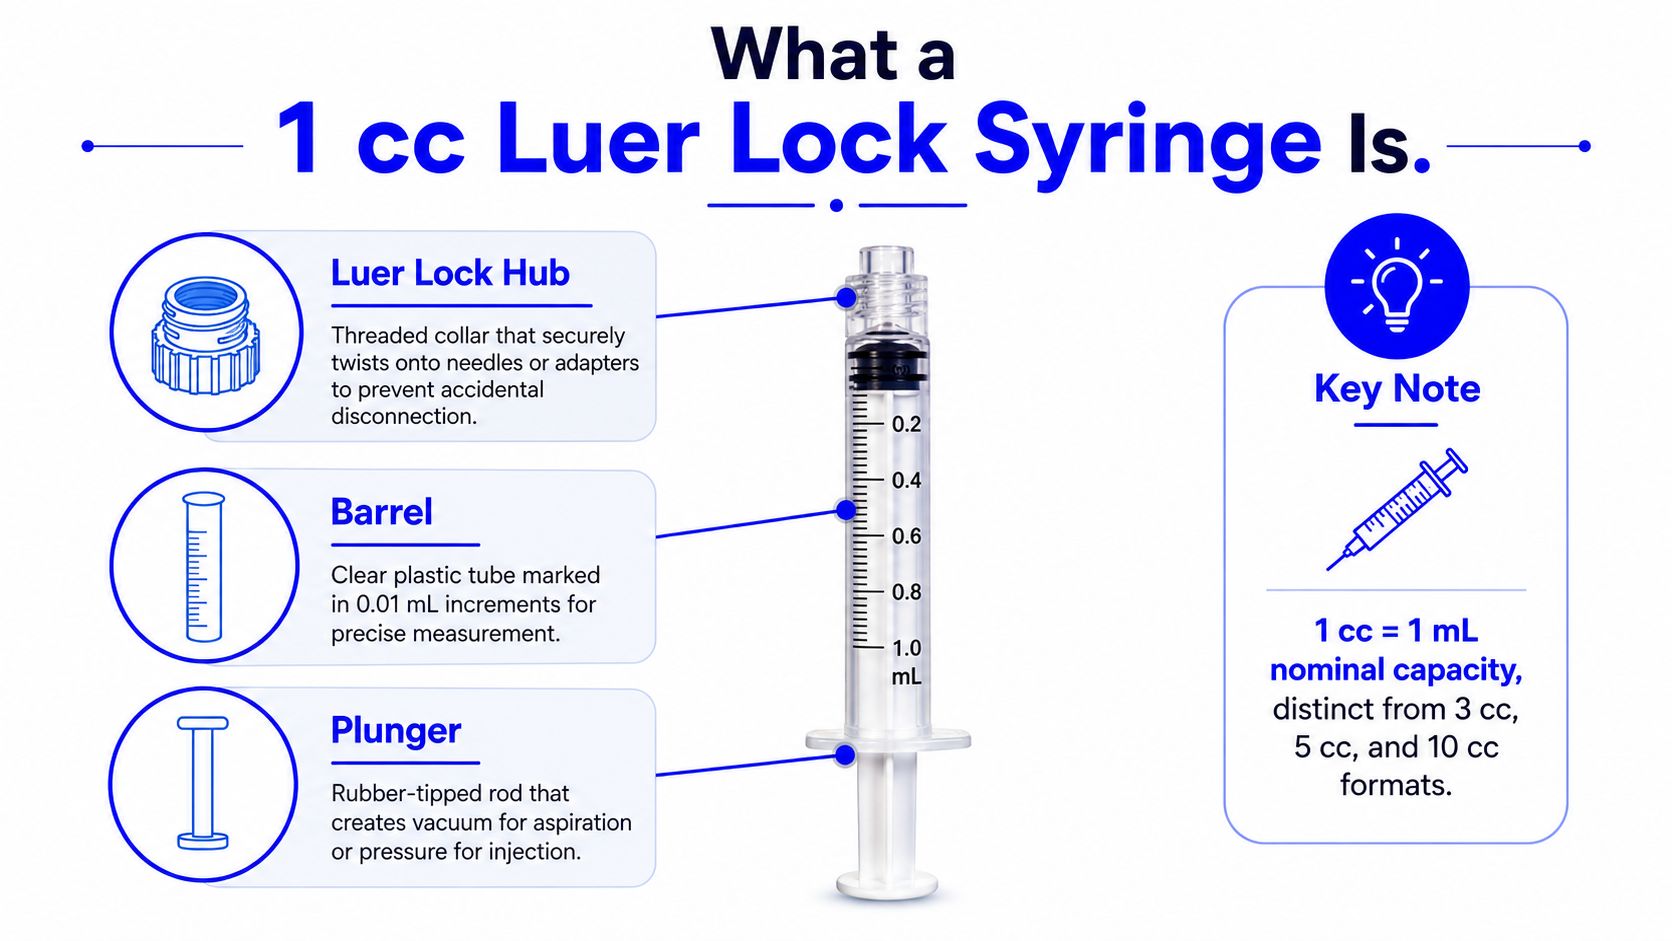
A 1 cc luer lock syringe is a small-volume syringe with a nominal capacity of 1 mL. The term describes two separate features. “1 cc” identifies the barrel's capacity, while “luer lock” identifies the connector used to attach a compatible needle or accessory.
The device becomes easier to understand when separated into its working parts:
- Barrel: The clear cylindrical body holds the liquid and carries the graduated markings. Its transparency lets the operator inspect the liquid and identify air bubbles.
- Plunger: The rod and elastomer stopper move through the barrel. Pulling the plunger creates suction for aspiration, while pushing it creates pressure for transfer.
- Luer lock hub: The tapered connector receives a compatible needle or adapter. Its threaded collar twists onto the matching fitting and helps prevent accidental separation.
- Finger flange: The projecting edge at the barrel base gives the operator a stable surface for controlled plunger movement.
Capacity is not the same as dose
The 1 cc designation doesn't identify a medication strength, concentration, or prescribed amount. It only describes the volume the barrel is designed to contain. A laboratory label may describe a material by mass, concentration, or another unit, while the syringe shows volume. Those measurements must be reconciled through the approved protocol, not guessed from the syringe size.
Compared with 3 cc, 5 cc, and 10 cc formats, a 1 cc syringe occupies less physical scale and is generally better suited to low-volume transfers, analytical sampling, and RUO reconstitution routines. The smaller barrel can make the plunger position easier to judge when the required volume doesn't fill a large syringe.
Why the connector standard matters
Luer connectors use a tapered geometry, but not every connector is interchangeable across every medical application. ISO 80369-7:2021 specifies dimensional and functional-performance requirements for intravascular and hypodermic luer connectors, with compatibility control intended to reduce misconnections. The standard is relevant when a syringe is paired with a needle, vial access device, or transfer accessory, so the laboratory should verify that the components are designed to work together. The sterile luer-lock syringe specification provides a product-level reference for this connector category.
Most units encountered in laboratory supply channels use a medical-grade polypropylene barrel and an elastomer stopper. Silicone lubrication may support smooth plunger travel, and latex-free components are common in products intended to reduce latex exposure. Packaging varies by manufacturer, but sterile single-use units are commonly supplied in individual pouches.
This is a research and laboratory consumable, not a substitute for clinical direction. For human-use medication, the prescriber, pharmacist, product labeling, and applicable regulatory requirements determine the correct device and handling procedure.
Sizing, Graduations, and Dosing Accuracy
A 1 cc syringe earns its place on the bench when its measurement scale matches the volume being handled. The operator should first confirm the unit printed on the barrel, then identify the smallest graduation, and finally check where the plunger stopper aligns with the scale. Reading the edge of the elastomer stopper consistently matters more than reading the top of the plunger rod.
The available scale determines how confidently an operator can judge a small transfer. Some low-volume syringes use fine graduations, while other models use broader spacing. Product labeling remains the authority for the actual graduation interval, so the laboratory shouldn't assume that every 1 cc unit has the same scale.
Accuracy changes across the barrel
Guidance based on ISO 7886-1 indicates that a 1 mL syringe typically has a tolerance of ±5% of expelled volume at volumes at or above 0.5 mL. Below 0.5 mL, the allowable error broadens to approximately ±(1.5% of syringe volume + 2% of expelled volume). The ISO 7886 tolerance calculation guidance explains why a 1 mL syringe generally performs more favorably when used nearer the middle or upper portion of its scale than at very small fill volumes.
That principle changes how a technician evaluates a reconstitution plan. Drawing 0.5 mL of diluent for a 5 mg vial places the operation at a meaningful point on the scale. Aliquoting 0.2 mL into another vial demands more attention because the relative effect of allowable error becomes more significant. Preparing a low-concentration standard can make each graduation consequential, especially when later analytical comparisons depend on consistent preparation.
A larger syringe may hold the volume, but its scale can be less useful for small transfers. The correct comparison isn't merely “small syringe versus large syringe.” It's usable scale, target volume, stopper position, and required repeatability.
Syringe size versus dosing resolution
| Syringe size | Typical graduation step | Best use case | Approx. accuracy tolerance |
|---|---|---|---|
| 1 cc, 1 mL nominal capacity | Confirm on product label, often fine low-volume graduations | Peptide reconstitution, small aliquots, analytical sampling | At or above 0.5 mL, typically ±5% of expelled volume under ISO 7886-1-based guidance |
| 3 cc | Confirm on product label | Transfers requiring more capacity than a 1 cc barrel | Must be evaluated against the product's stated specification |
| 5 cc | Confirm on product label | Larger-volume transfers | Must be evaluated against the product's stated specification |
| 10 cc | Confirm on product label | High-capacity transfers and flushing workflows | Must be evaluated against the product's stated specification |
The table's most important message is practical: the syringe should be selected around the working volume, not around the vial's total content or the operator's habit. If the required volume sits near the bottom of the scale, the lab should review whether the method, syringe format, or transfer sequence needs adjustment under its validated procedure.
Luer Lock vs Luer Slip and Why It Matters
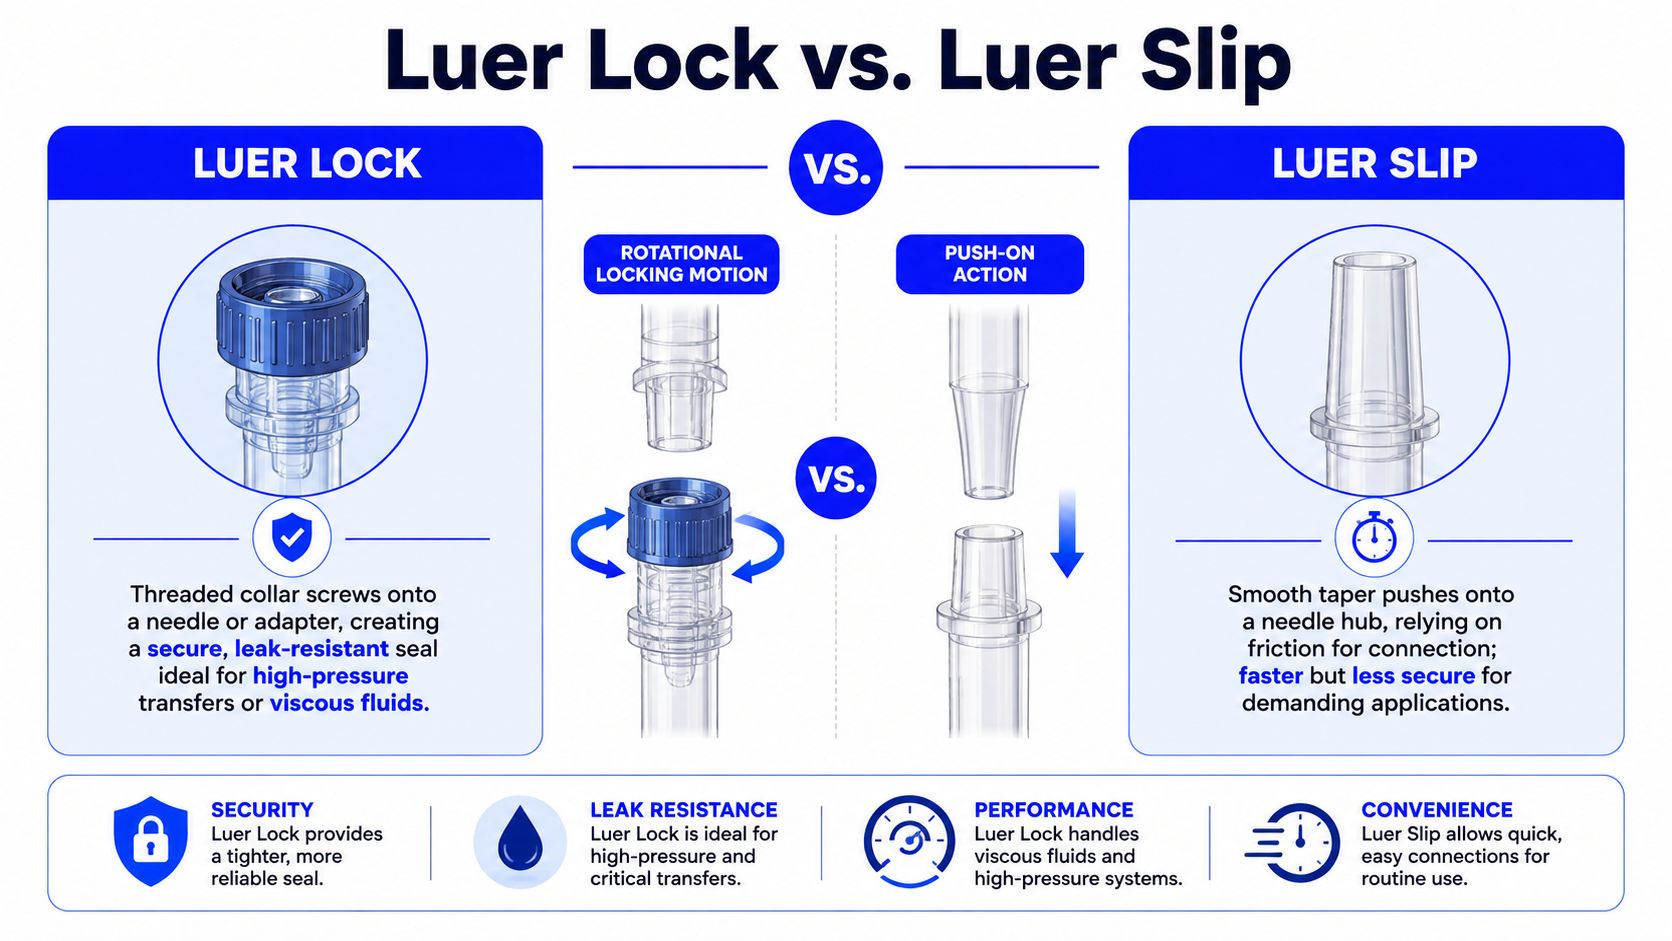
A luer slip connection uses a smooth tapered fit. The needle or accessory is pushed onto the syringe tip and held by friction. A luer lock uses the same general tapered connection geometry but adds a threaded collar that twists onto a matching hub.
The difference becomes obvious when the assembly is handled rather than used once. A slip tip can be quick to attach, which may suit a straightforward, low-pressure application where the assembly stays in one position. A luer lock takes an extra rotational movement, but that movement creates a more secure mechanical connection for transfers involving inversion, repeated access, or resistance from a viscous material.
What changes during peptide handling
A peptide workstation can involve a vial access needle, a reconstitution adapter, or another transfer accessory. The syringe may be rotated to align with the vial, inverted for aspiration, or disconnected for a needle exchange. Each movement introduces mechanical stress at the connection.
With a slip tip, that stress can contribute to needle separation, leakage during inversion, or pop-off during aspiration. The risk isn't limited to losing liquid. A disconnected needle can contact a surface, expose the operator to a sharp, or force an unplanned interruption in an aseptic sequence.
The threaded collar on a luer lock gives the operator a clear engagement action. The collar should be twisted until the compatible components are firmly seated, without forcing mismatched parts or overtightening. A secure fitting still requires correct component compatibility. Threading alone can't correct a damaged hub, an incompatible accessory, or a connection contaminated with liquid.
Connection decision: If the assembly will move, tilt, or be reused during an approved workflow, a luer lock usually provides the more appropriate mechanical control.
The historical foundation of the modern luer interface reaches back to 1894, when Hermann Wülfing-Lüer produced an all-glass Lüer hypodermic syringe in Paris. Its conical tip supported rapid, leak-free connections and tolerated autoclaving at 120 °C. A later milestone came in 1995, when the International Organization for Standardization recommended worldwide standard use of the Lüer-tipped syringe. The historical review indexed by PubMed describes that development and notes the later distinction of the locking variant as a widely used secure fitting.
A slip tip can remain reasonable for a simple push-and-go application where facility policy permits it. For a peptide or RUO transfer that involves vial inversion, accessory manipulation, or repeated withdrawals, the luer lock's added retention is usually the more deliberate choice.
Using a 1 cc Luer Lock Syringe in Peptide and RUO Workflows
The syringe should enter the workflow only after the laboratory has confirmed the material's approved preparation method. A diluent may be sterile water, bacteriostatic water, or an acidified solution such as acetic acid, depending on the peptide's documented solubility and the protocol. The syringe doesn't determine that choice. It provides the controlled transfer mechanism once the correct diluent has been selected.
For a lyophilized vial, the operator typically needs enough capacity to measure the planned diluent clearly without filling a large barrel only a small distance. A 1 cc syringe can be suitable for modest transfers, including work involving a 5 mg vial, when the protocol calls for a volume that can be read cleanly on the available scale. The exact volume and concentration must come from the approved method, not from the vial mass alone.
Match the connection to each task
A relatively larger-bore draw needle may help access a vial and move diluent efficiently, while a finer needle may suit a later measurement or transfer step. The correct gauge and length depend on the stopper, access device, material properties, and validated laboratory procedure. A syringe listing that includes a gauge or needle length describes the accessory, not the barrel's capacity.
The luer lock becomes useful when the workflow includes a detachable needle or threaded adapter. The operator can attach the component, check the seal, and manipulate the assembly without depending solely on friction. If a multi-dose stock vial is part of the approved RUO process, every withdrawal still requires a fresh sterile syringe and a controlled access sequence to reduce microbial carry-over.
Control the vial record
A reconstituted vial should carry a clear label showing the material identity, concentration, diluent, preparation date, lot information where required, and storage condition. Storage and in-use periods must follow the product documentation and laboratory procedure. Some RUO bacteriostatic preparations are specified for use for up to 28 days when aseptic technique is maintained, as described in the bacteriostatic water handling guidance, but that period shouldn't be generalized to every peptide, diluent, or preparation.
A reliable sequence looks like this:
- Confirm the peptide, diluent, vial condition, and approved preparation record.
- Select a sterile 1 cc syringe only if its scale accommodates the planned transfer clearly.
- Attach a compatible needle or adapter through the luer lock and inspect the connection.
- Transfer slowly, observing the liquid path and checking for bubbles.
- Label the vial immediately and record the preparation details.
- Use a fresh sterile syringe for every withdrawal from the stock vial.
The key control is separation between preparation and withdrawal. Reusing a syringe, even when the needle appears clean, can carry material or microorganisms into the stock vial. A luer lock can secure the connection, but it can't make a used syringe sterile again.
Aseptic Handling Tips That Protect Every Withdrawal
Aseptic technique works as a sequence of controlled actions. A single alcohol wipe doesn't compensate for a damaged pouch, a touched hub, a wet septum, or a syringe left exposed on the bench.
Before opening the package, the operator should establish a clean working field. The syringe, compatible needle, vial, alcohol swabs, labels, documentation, and puncture-resistant sharps container should be available before the first connection is made. The sterile package needs inspection for tears, moisture, broken seals, and an expired date.
A controlled withdrawal sequence
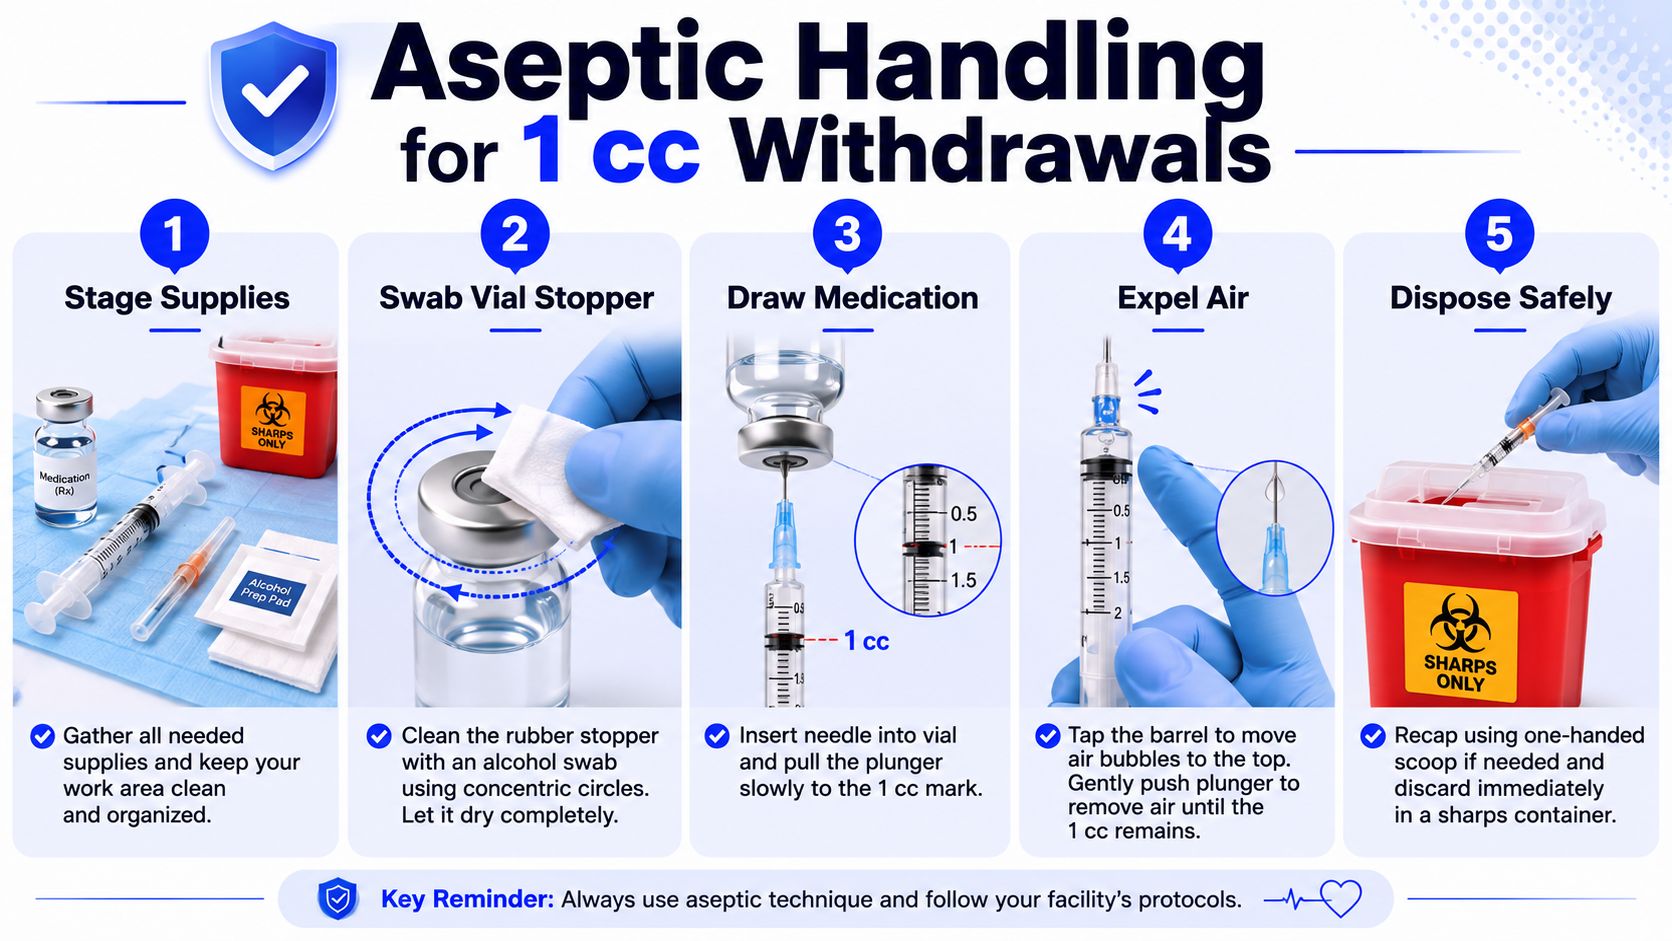
The vial septum should be disinfected with 70% isopropyl alcohol and allowed to air dry. Wet alcohol can carry contaminants or dilute the surface treatment, while touching the septum afterward defeats the cleaning step.
The needle should be attached by holding the syringe and turning the luer collar until the compatible hub is firmly seated. The operator shouldn't touch the syringe tip, needle hub, needle shaft, or exposed plunger shaft. The vial can then be positioned according to the approved method, and the plunger drawn slowly to the required graduation.
- Stage the bench: Keep every required item within reach so the operator doesn't leave the clean field mid-procedure.
- Inspect before use: Reject any unit with compromised packaging, clouded plastic, damaged components, or abnormal plunger movement.
- Draw deliberately: Move the plunger slowly and use the barrel markings rather than estimating from the stopper position.
- Control bubbles: Tap the barrel only when the procedure permits it, then expel air into an approved destination without contaminating the tip.
- Discard promptly: Place the used syringe and needle in the sharps container immediately after the permitted task.
If a needle must be recapped under a documented procedure, the one-handed scoop method is safer than guiding the cap with the other hand. A used needle shouldn't be carried between work areas, left on the bench, or returned to a sterile package. Whether the same needle may be used again for the same vial depends on the approved laboratory policy. A fresh sterile syringe remains necessary for each withdrawal.
Aseptic handling is a chain. The weakest action in the sequence can compromise the entire preparation.
After the withdrawal, the operator should log the event, update the vial record, and return the labeled preparation to its required storage condition. Laboratories developing or reviewing their own reagent preparation best practices can use the same sequence-based approach to assign responsibility and reduce avoidable variation.
A Practical Selection Checklist for Your Bench
The final selection should take less time than correcting a failed transfer. A bench checklist turns the syringe from an impulse purchase into a controlled input for the method.
Verify the unit before opening
Sterility comes first. The individual peel pouch should be intact, dry, and properly sealed. The expiration date and sterilization information should be readable, and the unit should match the laboratory's purchasing specification.
Capacity comes next. Confirm that the package identifies a 1 cc or 1 mL syringe, not a 3 cc, 5 cc, or 10 cc model. The barrel should offer enough room for the planned transfer while keeping the target volume easy to read.
Check the connector. The syringe should have a luer lock if the workflow requires a threaded needle, vial adapter, or transfer set. The accessory must carry a compatible fitting. A luer lock syringe paired with the wrong component is still an incompatible assembly.
Inspect the working parts
Hold the barrel under suitable lighting. The graduations should be crisp, evenly printed, and easy to distinguish. The plastic should be clear and free from cracks, discoloration, particles, or deformation.
Move the plunger before use only when the product and procedure permit that inspection. It should travel smoothly, without sticking, sudden jumps, or excessive resistance. The laboratory should also review the product's stated dead-space characteristics when material loss matters.
The target volume belongs near the portion of the scale where the operator can read it reliably. ISO 7886-1-based tolerance guidance should be checked against the dosing band required by the method, rather than treated as a guarantee for every volume or every product.
Confirm workflow fit
- Needle selection: Match gauge and length to the vial stopper, access depth, material viscosity, and approved procedure.
- Diluent compatibility: Confirm that the syringe, stopper, accessory, and diluent are suitable for the intended RUO preparation.
- Repeat access: If the vial will be accessed over an approved multi-dose period, verify labeling, storage, withdrawal records, and fresh-syringe requirements.
- Waste route: Place a compliant sharps container close to the point of use and confirm the local disposal process.
- Documentation: Record the syringe specification, lot information where required, and any rejected-unit observation.
For laboratories managing broader equipment quality systems, resources focused on boost compliance for pharma equipment can provide useful context for documenting selection, inspection, and maintenance controls beyond the syringe itself. Teams evaluating supporting supplies can also compare reconstitution kits for 2026 against their required vial format, diluent, and documentation process.
Rule of thumb: If a checkpoint fails, replace the unit before drawing. Technique shouldn't be used to compensate for a defective or unsuitable syringe.
A 1 cc luer lock syringe is the right choice when its capacity, scale, connector, sterility, and disposal path all support the actual workflow. That deliberate check protects more than one withdrawal. It helps the laboratory keep preparation records consistent, reduce connection failures, and maintain a cleaner RUO process from vial entry through final aliquot.
Herbilabs supplies sterile diluents and related reconstitution labware for RUO workflows, including bacteriostatic water formats used with compatible peptide and lyophilized-material preparation procedures. Visit Herbilabs to review available lab supplies and documentation options before the next controlled withdrawal.