Private Label, White Label, Wholesale partnerships available - EU, USA and UK - Free shipping from €75

Lyophilized Antibody Reconstitution Protocol and Best
A new vial of lyophilized antibody can look deceptively simple to handle. The cake is intact, the buffer is ready, and the label gives a volume. The temptation is to add liquid, shake until the powder disappears, and move on to the assay. That shortcut can introduce avoidable variability before the antibody reaches its first plate, blot, or flow cytometry tube.
Lyophilized antibody reconstitution is a controlled hydration step, not routine dilution. The selected diluent, addition speed, mixing method, wait time, and storage plan all influence whether the recovered solution remains suitable for its intended use. A disciplined workflow protects scarce material and makes downstream results easier to interpret.
Table of Contents
- Why Reconstitution Technique Determines Antibody Performance
- Preparing the Vial and Choosing the Right Diluent
- Executing the Reconstitution Step by Step
- Avoiding Aggregation and Activity Loss During Handling
- Aliquoting and Storing Reconstituted Antibodies
- Troubleshooting Common Reconstitution Problems
Why Reconstitution Technique Determines Antibody Performance
A vial can look fully dissolved and still produce a weaker assay signal. The concentration may be correct, yet the antibody can lose performance during the short transition from a dry cake to an aqueous solution. In practice, incomplete wetting, foaming, excessive agitation, overdilution, or an incompatible diluent can create problems before the sample reaches a plate, blot, or flow cytometry tube.
A historical study of a freeze-dried mouse IgG2a monoclonal antibody reported about a 10% reduction in antigen-binding capacity after reconstitution (the published reconstitution study). Treat that finding as a process warning. Visual dissolution confirms only that the material has disappeared from view. It does not confirm preserved binding, monomer content, or low particle levels.
The dry cake isn't the whole story
Lyophilization removes water, but it does not make formulation irrelevant. After liquid is added, the antibody is exposed to the selected buffer, pH, ionic strength, sugars, carrier proteins, surfactants, and the mechanical forces used to mix it. A vigorous shake can introduce foam and air interfaces. Adding too much diluent can leave the antibody at a concentration less suited to its stability or intended assay.
The diluent must match the product instructions. Water, PBS, and a formulation containing stabilizers are not interchangeable choices. Background on how freeze-drying changes protein handling is available in this peptide freeze-dry process explained.
Reconstitution changes measurable quality
A controlled study of lyophilized protein products found that monomer content and subvisible particle formation varied considerably between reconstitution protocols (the controlled reconstitution study). That makes “the powder disappeared” an inadequate endpoint. A clear-looking solution can still contain particles or aggregates that affect binding and assay consistency.
Practical rule: Treat reconstitution as part of the antibody assay, not as an unrecorded preparation detail.
Record the diluent, added volume, temperature, mixing method, waiting period, and storage decision alongside the lot number and assay conditions. If results later look weak or inconsistent, those handling details may explain the change better than a minor assay adjustment.
Preparing the Vial and Choosing the Right Diluent
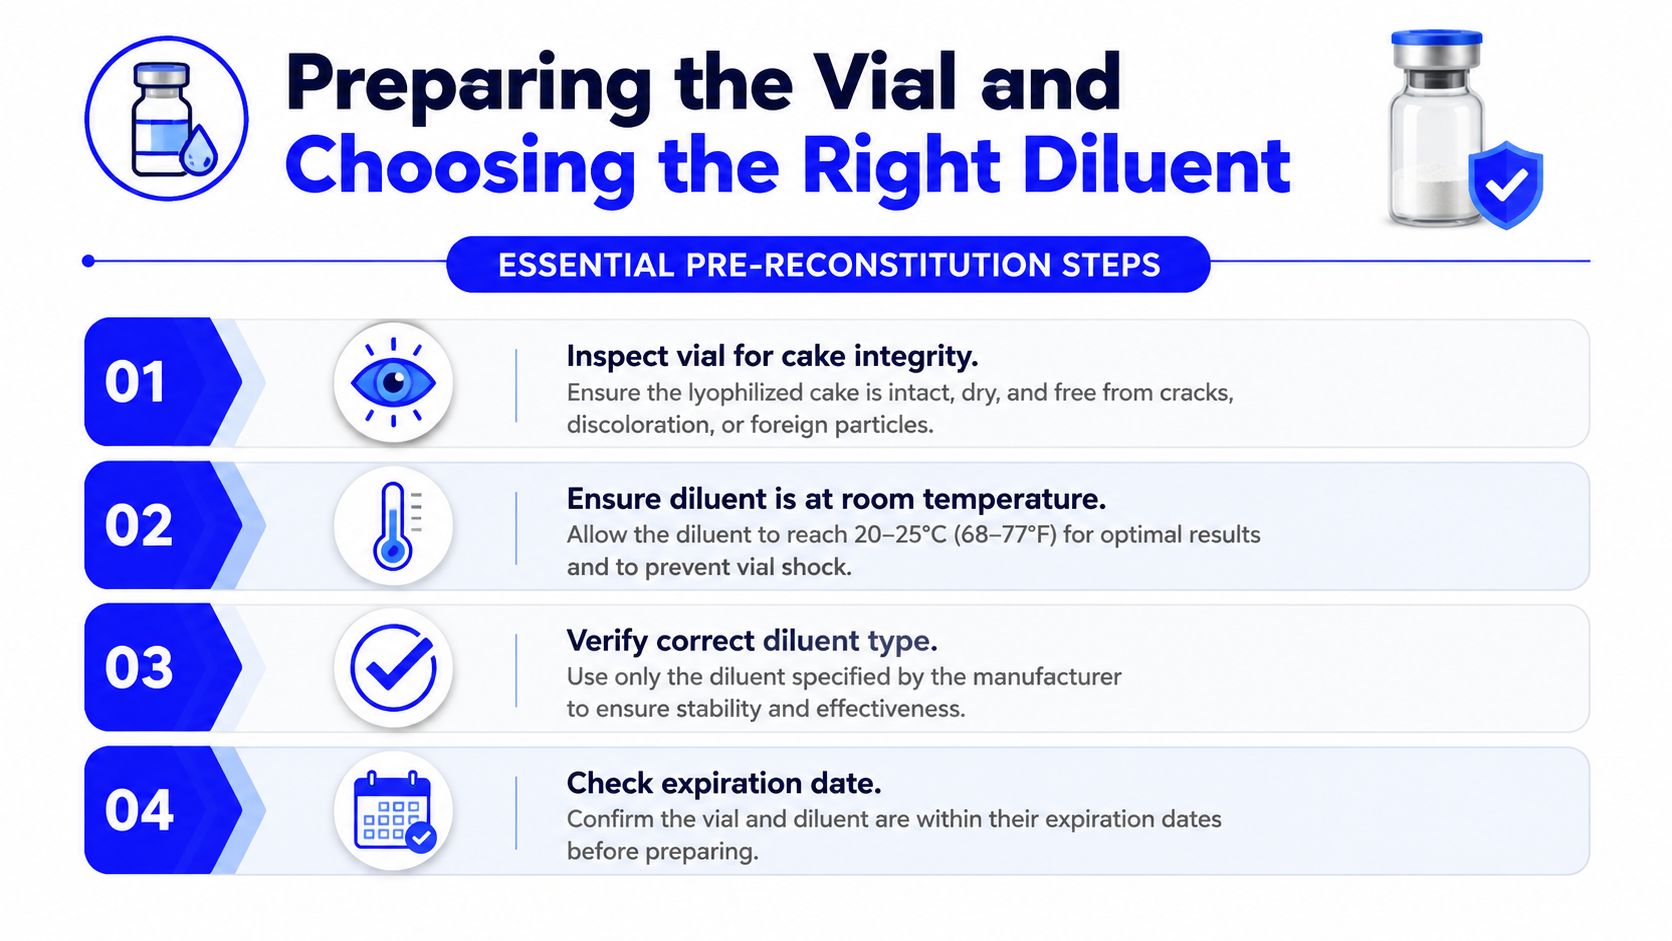
A vial can look intact and still be a poor starting point. Before piercing the septum, let the vial and approved diluent reach room temperature. Check the product label or datasheet for antibody mass, specified diluent, target concentration, storage conditions, and restrictions on preservatives or carrier proteins.
Inspect the cake for collapse, discoloration, visible damage, or powder stuck high on the vial wall. A brief, gentle centrifugation or light tap can collect loose material at the bottom and reduce product left on the glass. Do not compact the cake forcefully. The goal is even contact with the diluent, not mechanical compression.
Match the diluent to the product
“Water” in a protocol does not mean any liquid on the bench. Some antibodies require sterile distilled or filtered water. Others specify PBS or a formulation with stabilizers. Follow the manufacturer's instructions because pH, ionic strength, sugars, proteins, and surfactants affect how the antibody behaves after drying.
Formulation work with polyclonal antibodies found that PBS and sucrose provided strong lyoprotective effects in the tested system, while combinations containing PBS, sucrose, low-concentration BSA, and Tween also supported stability (the formulation study). That result does not make every PBS or sucrose mixture suitable for every product. It shows why diluent choice belongs to the formulation, not to routine lab substitution.
A ready-to-use reconstitution solution can be appropriate when its composition matches the product instructions. Do not substitute a preservative- or carrier-containing solution for water unless the datasheet permits it.
Calculate the starting stock
A 1 mg/mL stock concentration is a common benchmark in commercial antibody handling, but the product-specific volume takes precedence (the lyophilized antibody handling manual). Calculate volume by dividing antibody mass by the desired concentration, with units kept consistent.
- 50 µg antibody: Add 50 µL of the specified diluent for approximately 1 mg/mL.
- 100 µg antibody: Add 100 µL for approximately 1 mg/mL.
- Different target: Divide the antibody mass by the desired concentration.
Do not add glycerol, extra BSA, detergent, or another stabilizer because it worked for a different antibody. Unapproved additives can alter the formulation, while overdilution can leave the antibody less stable and make subsequent working dilutions harder to control.
Executing the Reconstitution Step by Step
A vial can look properly reconstituted while its antibody has already experienced avoidable stress. The sequence matters because a fast stream can fracture the cake, trap foam, or create highly concentrated wet spots. Use a slow, controlled workflow and document the diluent, volume, and handling time.
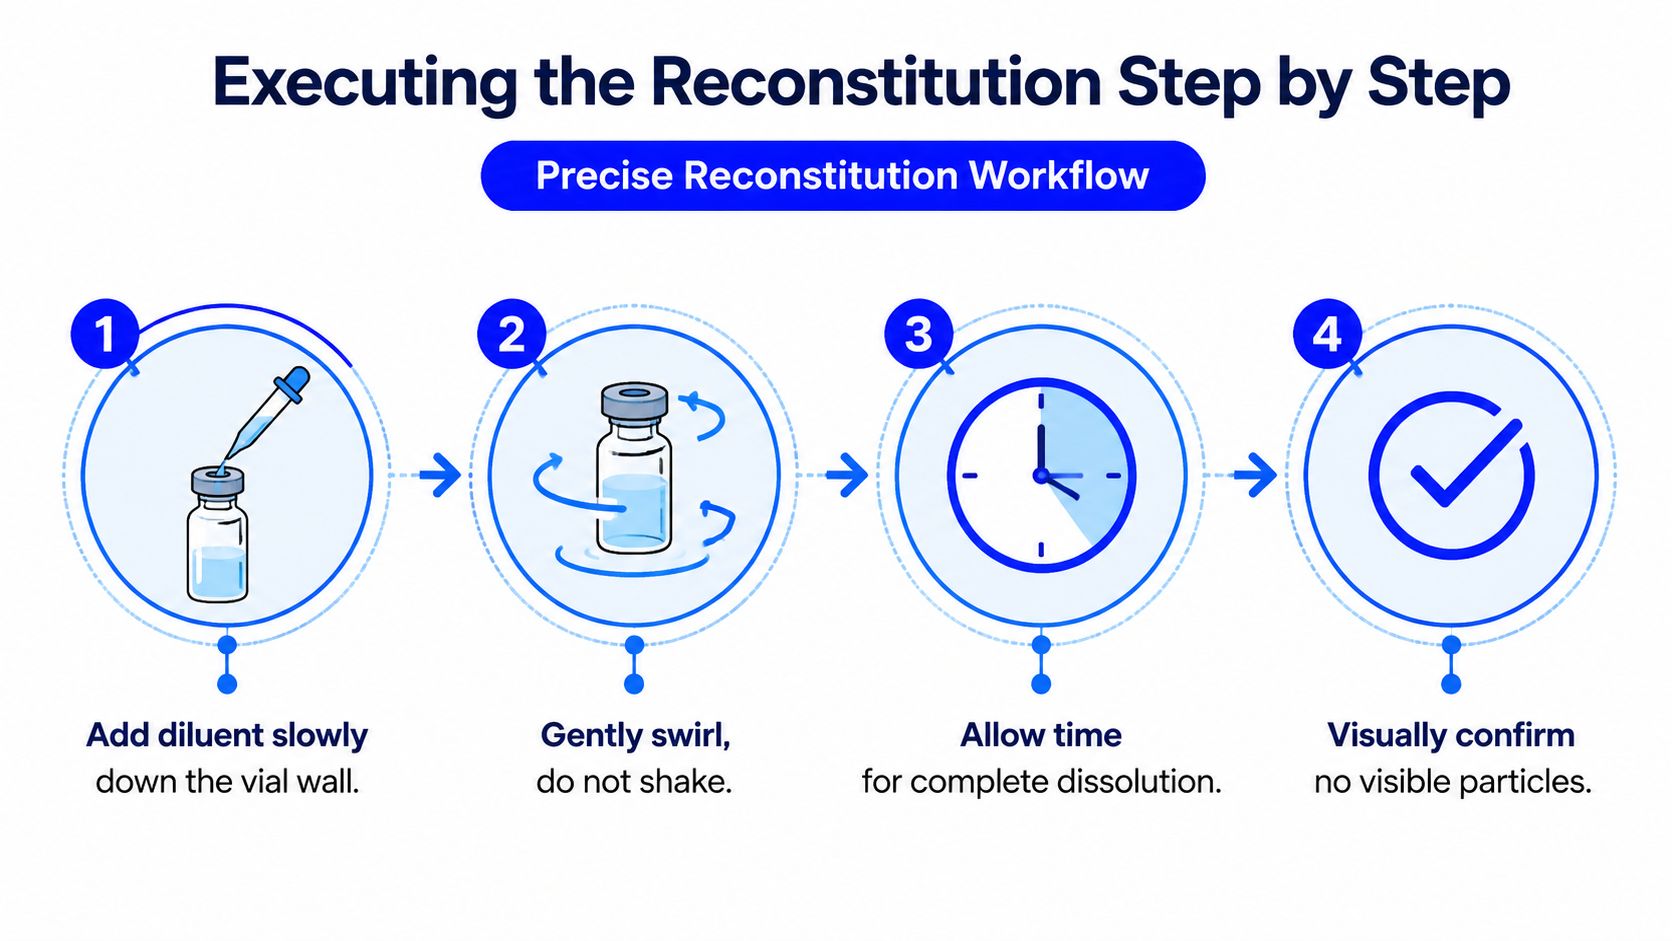
Start by bringing the vial and approved diluent to room temperature. Confirm the exact volume in the product sheet, then work aseptically with a sterile pipette or syringe. Direct the liquid down the vial wall, not onto the center of the cake. Add the calculated volume slowly, allowing it to spread across the dried material rather than break it apart.
Give the cake time to hydrate. Gently swirl the vial or roll it between your fingers, with no vortexing and no shaking. Leave it undisturbed, or continue gentle mixing, for 15 to 30 minutes before further dilution or use. This pause allows partially wetted regions to equilibrate instead of being transferred as concentrated clumps.
After hydration, a brief gentle spin can collect liquid from the vial wall, stopper, and upper surfaces at the bottom. Centrifugation cannot replace adequate hydration. Inspect the preparation for visible particles, persistent cloudiness, foam, or unexpected color. If the product sheet specifies a different appearance, follow that specification rather than applying a generic visual standard.
Why the waiting period matters
A concentrated stock is often easier to measure and store than a very dilute preparation. One common commercial workflow dissolves the lyophilized antibody to 1 mg/mL, then holds it for at least 30 minutes at room temperature before further dilution. Reconcile that practice with the product instructions. If the datasheet specifies a longer interval, follow the datasheet.
Further dilution may use a carrier-stabilized buffer when specified. One cited conjugate formulation contains 10 mM sodium phosphate at pH 7.2, 0.15 M NaCl, and 1% BSA (the antibody handling manual). This is an example, not a universal diluent. Use a separate sterile vessel for working dilutions when possible, since repeated withdrawal from the original vial increases handling and contamination opportunities.
Avoiding Aggregation and Activity Loss During Handling
A vial can look fully dissolved and still perform poorly. The main mechanical risks appear during the short period after the diluent contacts the cake, when foam, air-liquid interfaces, and local concentration gradients can alter the protein before routine inspection detects a problem.
Vortexing is the clearest avoidable error. Shaking introduces foam and repeated air-liquid interfaces, while vigorous mixing transfers mechanical stress into a partially hydrated antibody solution. As noted earlier, the controlled lyophilized IgG1 study associated shaking with increased subvisible particles and turbidity after reconstitution. Use gentle swirling or slow rolling instead.
The delivery method also matters. A narrow, fast stream can strike the cake, leaving some regions dry while others become concentrated and sticky. Add the diluent slowly down the vial wall, then allow the vial to hydrate before transferring or making a working dilution. Keep a practical stock concentration where the product instructions support it, because overdilution can increase surface exposure and reduce handling margin.
The visible endpoint can mislead
Clear liquid is only a physical endpoint. As noted in Section 1, the mouse IgG2a study found about a 10% reduction in binding capacity after reconstitution. Functional loss may therefore remain invisible, particularly when an assay depends on a narrow signal range.
The failure can present differently by assay. In ELISA, a stressed antibody may produce a weaker or less consistent signal even when the solution appears clear. In flow cytometry, aggregation can increase nonspecific background, broaden staining, or create unstable event patterns. If only one readout is monitored, a handling defect may be mistaken for a biological or instrument problem.
Avoid adding glycerol, BSA, surfactant, or another stabilizer unless the datasheet permits it. Formulation changes can alter background, adsorption, and compatibility with the assay.
Excipients have a job
PBS, sucrose, BSA, and Tween are not interchangeable. Their effects depend on the antibody, concentration, buffer strength, and intended storage condition. Earlier formulation work found that PBS provided strong lyoprotection among the tested salt solutions, while combinations containing PBS, sucrose, low-concentration BSA, and Tween better preserved stability in that system. Do not generalize that result to every antibody.
The water-activity study reported a validated range of 0.025 to 0.25 as predictive of high long-term stability for the tested lyophilized materials (the water-activity study). Water activity is not a substitute for the product datasheet, but it reinforces the operational lesson: appearance alone cannot reveal every formulation risk.
Aliquoting and Storing Reconstituted Antibodies
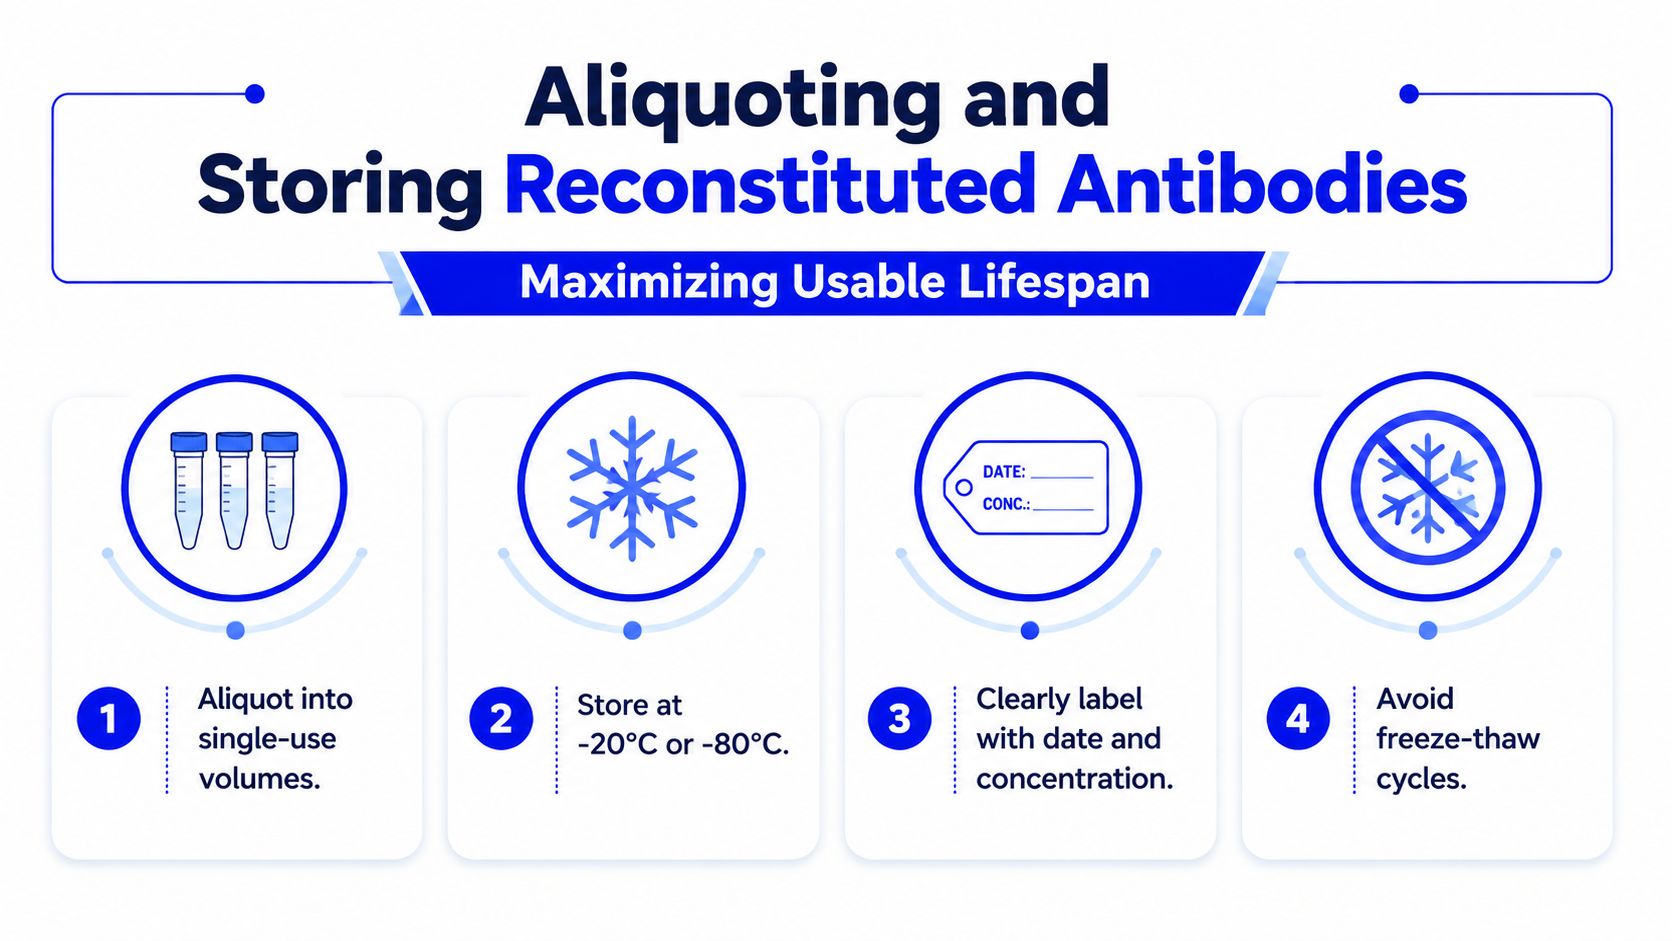
Once the powder has fully dissolved, storage handling becomes part of the assay method. Divide the antibody according to actual use, not the maximum capacity of the tube. Single-use aliquots reduce repeated vial access and limit freeze-thaw exposure, two mechanical stresses that can gradually affect performance even when the solution remains clear.
For short-term handling, many product sheets specify refrigeration at 2 to 8 °C. Long-term storage may instead call for −20 °C or −80 °C, but the manufacturer's instructions control. Size each aliquot so one experiment uses it completely whenever practical. Repeated warming and cooling of a shared stock is a common, avoidable source of variability.
Label every aliquot
Record the antibody name, lot, reconstituted concentration, diluent or buffer, reconstitution date, and storage condition. The labeling reconstituted samples guide provides a practical reference for keeping this information consistent when several lots or formulations target the same antigen.
Small aliquots reduce waste from repeated access, but very small volumes increase pipetting loss and surface exposure. Use the volume normally consumed in one experiment, while leaving enough liquid for accurate transfer and minimal residual material.
Choose the storage format deliberately
A concentrated stock can simplify working-solution preparation if its concentration and formulation remain within the product's stability requirements. Prepare working dilutions in the specified carrier or assay buffer. An improvised diluent can cause precipitation, adsorption, or activity loss after an otherwise correct reconstitution.
Where the product instructions allow, bacteriostatic water containing 0.9% benzyl alcohol can support multi-dose access for up to 28 days with proper aseptic technique. Herbilabs provides a sterile, non-pyrogenic reconstitution solution with that composition. This handling period applies to the solution's stated in-use specification, not automatically to every antibody. Confirm the antibody's concentration, formulation compatibility, sterility requirements, and storage instructions before adopting a multi-access workflow.
Troubleshooting Common Reconstitution Problems
A vial can look acceptable and still produce weak data after reconstitution. Review four variables first: diluent compatibility, added volume, mechanical stress, and time in solution. Repeating the assay with more antibody may consume another vial without fixing the cause. Check the vial, calculations, handling notes, and storage record before proceeding.
| Symptom | Likely Cause | Corrective Action |
|---|---|---|
| Visible particles remain | The cake was wetted unevenly, liquid was added too quickly, or the diluent is incompatible | Allow the specified hydration time, then swirl gently. If particles remain after 30 minutes, quarantine the vial and, where available, assess it by DLS or SEC-HPLC before discarding. Document the observation and contact the supplier with the lot number and handling record |
| Cloudiness or foam appears | Shaking, vortexing, or forceful pipetting introduced mechanical stress | Stop mixing and let the solution rest. Compare it with the product specification and record whether the appearance changes. A clearer solution later does not confirm preserved activity |
| Signal is weaker than expected | The antibody may have been stressed, overdiluted, or stored poorly | Recalculate the stock concentration and confirm the diluent, lot, access history, and storage temperature. Compare with a previously accepted aliquot or control if available |
| Precipitate forms after dilution | The working buffer is incompatible, or the concentration changed too abruptly | Test a small dilution with the specified buffer. Add the working buffer gradually while mixing gently. Do not add glycerol, BSA, detergent, or another stabilizer without documented approval |
| Repeated-access vial becomes suspect | Aseptic handling failed, or the solution exceeded its approved in-use period | Exclude questionable material from critical experiments. Review access records, discard material when sterility cannot be defended, and prepare a fresh vial |
| Dissolution fails from the start | The cake may have been compromised before opening, or the vial may have been stored incorrectly | Photograph the vial if permitted, retain the lot information, and request lot-specific documentation from the supplier before disposal |
When the vial may be the problem
A damaged cake, unexplained discoloration, persistent insoluble material, or a result that conflicts with a previously validated lot can indicate a product problem rather than a pipetting error. Record the vial condition before further manipulation. Lot-specific Certificates of Analysis can help verify identity, release testing, and documented quality attributes, but they cannot correct mishandling.
Escalate the issue when the preparation remains abnormal after controlled reconstitution. Send the supplier the lot number, reconstitution volume, diluent, timing, storage history, photographs, and any DLS or SEC-HPLC result. This gives technical support enough detail to distinguish a formulation issue from an execution error.
For research teams that need a documented sterile diluent, Herbilabs offers reconstitution solutions in several vial formats, with lot-specific Certificates of Analysis and research-use documentation. Review the antibody datasheet, confirm formulation compatibility, and establish a labelled, low-stress workflow before opening the next vial.